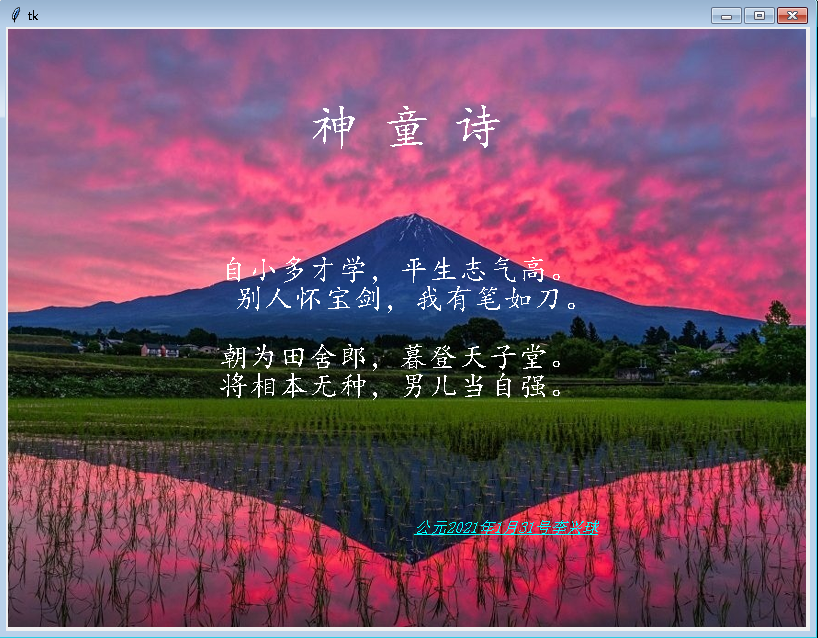
Python文字转逐字gif图片程序(合成gif/生成gif)

李兴球python合成gif
李兴球Python科学探索最终目的
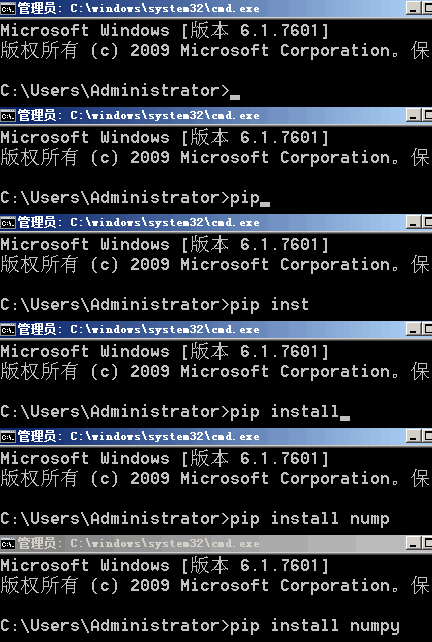
下面的程序能把一段文字,加上一个背景图,合成一个逐字显示的gif图片。 程序需要pillow模块支持。安装方法,在管理员窗口下输入pip install pillow。


from PIL import Image,ImageDraw,ImageFont

def make_gif_image(images,filename):
   """
      images: 列表或者一个路径。如果是列表,则里面的是用图形对象。如果是路径,则是一个字符串而已
      filename: 输出的gif文件名
      注意path下面的文件名要是这样的:0.png,1.png,2.png....
    """
   if isinstance(images,(list,tuple)):
        frames = images
   else:                                          # 否则认为是一个路径
       amounts = len([ image for image in os.listdir(images) if os.path.splitext(image)[-1] == ".png"])
       images = [ path_image + os.sep + str(i) + ".png" for i in range(0,amounts)]
       frames = [Image.open(image) for image in images]
   
   pic = frames[0]
    
   pic.save(filename, save_all=True,append_images=frames[1:], quality=85,duration=250)
   
def txt2images(string,width=480,height=360,bg=None,margin=68,
               fontsize=18,fgcolor=(10,0,100,255),bgcolor=(0,0,0,0)):
    
    """文本转逐字图像,输出图形对象列表"""
    if bg == None:
       base = Image.new("RGBA",(width,height),bgcolor)  # 新建图形
    else:
       base = Image.open(bg)
       base = base.convert("RGBA")
       
    frames = []
    pass                                         # 这里省略若干代码
    return  frames

string = "大家好!我是一个阳光、自信、开朗的小胖子。我非常喜欢编程。我的梦想是成为计算机编程专家,创造未来,享受属于自己的精彩人生。"
string = "有一种东西,它承载着人们的希望。这种东西有虚有实,它看不见,摸不着,却能在心中产生巨大的力量,它叫做梦想。上帝没有赐予我们翅膀,他赐予了我们会飞的心和梦想的大脑,使我们拥有一双“隐形的翅膀“。"
string = "大家好,我的梦想是成为一名计算机编程专家。在未来,我要设计在火星上种菜的程序。让在火星上种菜实现完全自动化。这个程序还会把种好的菜自动炒好,然后速冻起来,用虫洞,在1秒种内就能运回地球。"
images = txt2images(string,bg='pink.png')
make_gif_image(images,'梦想们.gif')
for index in range(len(images)):
    frame  = images[index]
    frame.save(f'images/{index}.png')

需要完整源代码,

成为会员后,登陆才能继续浏览!联系微信scratch8即可办理会员。
(会员专属:能浏览所有文章,下载所有带链接的Python资源。)

发表在 pillow, python | 标签为 , , | 留下评论

判断密码强度小程序


import random

def have_number(password_str):
    numbers = {'0','1','2','3','4','5','6','7','8','9'}
    return set(password_str) & numbers

def have_letter(password_str):
    letters = set('abcdefghijklmnopqrstuvwxyz')
    return letters & set(password_str.lower())

def makenumberstr():
    """随机产生一个3到10位的数字字符串"""
    n = '0123456789'
    return "".join( [random.choice(n) for _ in range(random.randint(3,10))])

def makalphastr():
    """随机产生一个3到10位的字母字符串"""
    s = 'abcdefghijklmnopqrstuvwxyz'
    return "".join( [random.choice(s) for _ in range(random.randint(3,10))])

def makerandomstr():
    """随机产生一个3到10位的包含数字和字母的字符串"""
    s = '0123456789abcdefghijklmnopqrstuvwxyz'    
    return "".join( [random.choice(s) for _ in range(random.randint(3,10))])

def makepass(level):
    """根据密码强度产生密码"""
    if level == 1:
        p = makerandomstr()
        while len(p)>=8:p = makerandomstr()       
    elif level == 2:               # 如果强度是2,则产生大于或等于8位的仅是数字或字母的密码
        if random.randint(0,1)==0: # 如果是0,产生大于或等于8位的数字密码      
            p = makenumberstr()
            while len(p)<8:p = makenumberstr()
        else:
            p = makalphastr()
            while len(p)<8:p = makalphastr()
    elif level == 3:               # 如果强度是3,则产生大于8位的包含数字和字母的密码
        p = makerandomstr()
        while len(p)<8 or not have_number(p) or not have_letter(p):
              p = makerandomstr()

    return p

for _ in range(10):
    level = random.randint(1,3)
    print(level,makepass(level))

发表在 python | 标签为 | 留下评论

Python寓义动画_豹的速度_一往无前

人类历史长河或许很长很长,但是相对于宇宙,我们仍旧非常渺小。虽然每个人的一生只是一瞬间。但是,我们要像豹子一样,勇往无前。

大家好,我是某某某。这是我用Python编程制作的一个小作品。
它的名字叫做《豹的速度,一往无前》。
这个作品是一个动画。运行程序后会有一个太阳在中间,
上面还有一只豹子在不断地奔跑着。
细心的话,我们还能看到月亮绕地球,地球绕太阳的动画。
伴随着背景音乐,还会有一些字幕显示出来。
这个作品描述的主要寓意就是,人类很渺小,
还有星辰大海等待着我们去探索。
我们每个人都要像豹子一样,一往无前。

下面,我先演示一下这个程序。(程序演示中……)

为了更加方便的理解程序。我把程序代码进行了分段。
每一段,都完成特定的功能。

第1段,是最简单的,只是程序的说明文字说明。
它实际上是一个没有名字的字符串。

第2段, 是从一些模块中导入一些命令。以供接下来的代码使用。

第3段,定义了程序的名字。但主要还是新建了窗口及对窗口进行设置。

第4段,无限循环播放背景音乐。注意PlaySound只能播放wav音频。

第5段,实现的是太阳动画。它是通过一些背景图片不断地切换来完成的。

第6段,实现的是豹子的动画。它是通过不断切换leopard对象的造型来完成的。

第7段,新建地球,它是一个海龟对象。它的造型是一张名为“地球.png”的图片。

第8段,新建月亮,它也是一个海龟对象。它的造型是圆形,并且是白色的。

第9段,新建dummy对象。它是用来写程序标题的隐藏海龟。

第10段,新建dummy2对象。它是用来写移动字幕的隐藏海龟。

第11段,新建了dummy3对象。它是用来写最底下的感谢信息的海龟。

第12段,新建了几个变量,然后进入了一个while循环。

这是程序的主循环。在这个主循环中主要分为A、B、C、D、E几段程序。

A段程序是地球的移动。B段程序是月亮绕地球的移动。

C段程序是让程序的标题逐步往上移的代码,一直到y坐标等于-260就不会移动了。

D段程序是实现从左到右的字幕的。
它不断地清除,不断地重写,同时x坐标不断减小,
所以我们能看到从左到右移动着的字幕。

E段代码,让程序进入主循环后,大概10秒后,在窗口最底下显示几个字。
这几个字就是“本程序由Python海龟模块制作,感谢观看。”

另外,这个作品全部用的是Python内置模块完成的,并不需要安装外置模块。
背景音乐的名字叫Just Blue。这是曾经中央电视台《动物世界》栏目的主题曲。

好了,程序就介绍到这里了。我知道一个程序最重要的是可读性。
这个程序,很多行都加了注释。希望给阅读者提供理解上的方便。

最后,非常感谢评委们认真地看了我的作品,谢谢。

"""
    豹的速度,一往无前
    这个作品有月亮绕地球,地球绕太阳公转,它们在太阳前面都显得很小很小。
    事实也是这样。寓义为人类在宇宙中是非常渺小的。人的一生非常有限。
    我们要向豹子一样义无反顾,勇往直前。
    
"""
from time import sleep
from math import sin,cos,radians
from turtle import Shape,Turtle,Screen
from winsound import PlaySound,SND_LOOP,SND_ASYNC

project = '豹的速度,一往无前'
screen = Screen()                            # 新建屏幕
screen.delay(0)                              # 延时为0毫秒
screen.setup(640,640)                        # 设置宽高  
screen.bgcolor('black')                      # 设置背景色
screen.title(project)

PlaySound('Just Blue.wav',SND_LOOP|SND_ASYNC)# 播放背景音乐

index = 0
sun_pics = [f"res/sun{i:03d}.png" for i in range(1,11)]
def alt_bg():                                # 定义函数,不断地切换太阳造型
    global index
    screen.bgpic(sun_pics[index])            # 设定背景图片
    index += 1                               # 索引号加1
    index %= 10                              # 索引号对10求余
    screen.ontimer(alt_bg,100)               # 100毫秒后再次调用alt_bg  
alt_bg()                                     # 调用alt_bg函数

bao_pics = [f"b/{i:04d}.png" for i in range(1,13)]  # 豹的造型图片
bao_shapes =[Shape('image',screen._image(im)) for im in bao_pics]# 豹的造型对象
[screen.addshape(f'bao{i}',bao_shapes[i]) for i in range(12)]    # 添加到造型字典
leopard = Turtle(shape='bao0')                                   # 新建“豹”对象
leopard.penup()                                                  # 抬笔
leopard.speed(0)                                                 # 速度为最快 
leopard.sety(180)                                                # 设定y坐标为180
leopard.index = 0                                      # 自定义属性,表示造型索引号
def alt_shape():                                       # 定义切换造型的函数 
    leopard.index += 1                                 # 索引号增加1
    leopard.index %= 12                                # 索引号对12求余
    sp = f'bao{leopard.index}'                         # 造型名称
    leopard.shape(sp)                                  # 设定豹的造型为sp 
    screen.ontimer(alt_shape,100)                      # 100毫秒后再次切换造型
alt_shape()                                            # 调用切换造型函数
    
earth_shape = Shape('image',screen._image('res/地球.png')) # 地球造型对象
screen.addshape('earth',earth_shape)                       # 注册到造型字典
earth_obj = Turtle(shape='earth')                          # 新建地球对象
earth_obj.penup()                                          # 抬笔
earth_obj.speed(0)                                         # 速度为最快 
                            
moon = Turtle(shape='circle')                              # 月亮对象
moon.penup()                                               # 抬笔  
moon.speed(0)                                              # 速度为最快
moon.shapesize(0.1)                                        # 缩小
moon.color('white')                                        # 颜色为白色 

dummy = Turtle(visible=False)                              # 新建dummy对象,用来写字
dummy.penup()                                              # 抬笔
dummy.speed(0)                                             # 速度为最快
dummy.color('yellow')                                      # 颜色为黄色
dummy.goto(0,-660)                                         # 坐标定位
ft = ('楷体',34,'normal')                                  # 字体样式

dummy2 = Turtle(visible=False)                             # 新建dummy2对象
dummy2.penup()
dummy2.speed(0)
dummy2.color('white')
dummy2.goto(1600,-200)
ft2 = ('黑体',20,'normal')                                 # 字体样式
 
dummy3= Turtle(visible=False)                              # 新建dummy3对象 
dummy3.penup()
dummy3.speed(0)
dummy3.color('cyan')
dummy3.goto(0,-300)
ft3 = ('宋体',12,'normal')                                  # 字体样式
string = "本程序由Python 海龟模块制作,感谢观看。"

radius = 300                                               # 地球绕太阳半径
angle = 0
r = 20                                                     # 月亮绕地球半径
a = 0
counter = 0
寓义 = '人类历史长河或许很长很长,但是相对于宇宙,我们仍旧非常渺小。虽然每个人的一生只是一瞬间。但是,我们要像豹子一样,勇往无前。'
while True:
    earth_x = radius * cos(radians(angle))                 # 算出地球x坐标
    earth_y = radius * sin(radians(angle))                 # 算出地球y坐标
    earth_obj.goto(earth_x,earth_y)                        # 到达坐标
    angle += 0.1

    moon_x = earth_x + r * cos(radians(a))                 # 算出月亮x坐标
    moon_y = earth_y + r * sin(radians(a))                 # 算出月亮y坐标
    moon.goto(moon_x,moon_y)                               # 到达坐标
    a += 1   
    
    if dummy.ycor()<-260:
        dummy.clear()                                      # 清除以前所写文字 
        dummy.write(project,align='center',font=ft)        # 写文字,中间对象,字体样式为ft
        dummy.sety(dummy.ycor() + 1)

    dummy2.clear()
    dummy2.write(寓义,align='center',font=ft2)
    dummy2.bk(1)
    if dummy2.xcor()<-1200:dummy2.goto(1600,-200)
    counter += 1
    if counter ==1000:
        dummy3.write(string,align='center',font=ft3)

    sleep(0.01)


需要源代码,程序说明文档,及所有素材,请

成为会员后,登陆才能继续浏览!联系微信scratch8即可办理会员。
(会员专属:能浏览所有文章,下载所有带链接的Python资源。)

发表在 python, turtle | 留下评论

小心你的Python程序,它会是你的一面镜子。小方块闯迷宫.py源代码简析。

小心你的Python程序,它会是你的一面镜子。送Scratch算法集。不要说我不“地道”,送些你看不懂的东西,算法这东西本来,就只属于极少部分人。你突破不了自己的认知,那就不要去下载了。

李兴球Python小方块闯迷宫撒切尔夫人

李兴球Python小方块闯迷宫撒切尔夫人

也据说撒切尔夫人说过下面的话:“

小心你的思想,它会变成你的语言;

小心你的语言,它会变成你的行动;

小心你的行动,它会变成你的习惯;

小心你的习惯,它会变成你的性格;

小心你的性格,它会变成你的命运。”

李兴球Python之手

所以命运,是由自己决定的。客观只是外在,客观一直在给你创造条件。只是你自己不够而已。OK,我只是普通人,但我也可以说,是吧。

小心你的程序,它会是你的一面镜子。

小心你的镜子,它会折射出你的人生。

so,我们一定要把程序写好,写得棒棒的。

话说,gameturtle可是趣味学习tkinter编程的好帮手。

今天晚上我在“日理万机的百忙之中”挤出了一点时间用gameturtle模块写了一个简单的程序。这个程序运行后,按上下左右方向箭头,操作一个红色的小方块在迷宫里移动。

李兴球Python闯迷宫小红块移动

红色小方块碰到迷宫是不会穿越过去的。程序不是很长,下面是代码图。程序分成一段段,只要理解每段代码的含义,即可理解整个程序的运作原理。

代码如下所示:

上面的程序主要的指令,在后面都有注释。

第1块代码是导入了一些命令。这里主要说一下从gameturtel模块导入的Sprite命令。它是一个类。我们可以用它实例化一个角色。它的第一个参数需要是画布。第二个参数可以不写。如果不写,那么将会是一只小海龟。如果写的话,可以像本例中那样的图形。也可以是一个列表,列表中有每张pillow图形对象,表示角色的每一帧图。

第2块代码是用tkinter的Tk命令新建了一个窗口,然后新建了一块画布,背景色是青色。

第3块代码是新建迷宫图,贴在画布上。如果直接用画布的create_image命令创建图形,那么碰撞检测将无效。

第4块代码是新建红色小方块的代码。注意在用Sprite类实例化角色时,第一个参数是画布的名称。要本例中是cv,第二个参数是square。它是用Image.new命令新建的一个红色图像。

第5块代码是定义了4个函数,分别对应第6大块代码中的4个绑定!

第6块代码是绑定画布的上下左右按键的回调函数。

这样,按右方向箭头会调用moveright函数。

按左方向箭头会调用moveleft函数。

按上方向箭头会调用moveup函数。

按下方向箭头会调用movedown函数。

最后一块代码是设置画布为焦点组件,这样才能响应按键检测。

root.mainloop是进入事件主循环,这行代码一定要在程序的最后一行。

好了,大概30行代码,我们就开发了一个简单的迷宫游戏。

读者可以把它修改成多关卡的等等。我这里就不会继续,抛块砖,看能否引块玉。


关注李兴球Python公众号,回复mazeturtle可得到本程序所有源代码和素材。

李兴球Python公众号小方块闯迷宫


发表在 gameturtle, python | 标签为 , | 留下评论

Python彩花图案练习课

python图案作画
这函数学习与练习课例子。需要安装coloradd模块。
用cmd命令,打开管理员窗口,输入pip install coloradd即可安装这个模块。
colorset命令能把整数变成一个RGB三元组。方便以原点为中心的颜色对称效果。

import turtle
from coloradd import colorset

def setcolor():
    d = turtle.distance(0,0)+ 10
    c = colorset(d)
    turtle.color(c)

def draw_square(length):
    for _ in range(4):
        turtle.fd(length)
        turtle.rt(90)

def draw_branch():
    turtle.fd(40)
    for i in range(4):
        setcolor()
        turtle.fd(40)
        if i==3:
            setcolor()
            turtle.left(90)
            turtle.circle(-10)
            turtle.right(90)
        else:
            draw_square(8)        

turtle.delay(0)
turtle.speed(0)
turtle.pensize(1)
turtle.colormode(255)
turtle.bgcolor('black') 

for _ in range(45):
    draw_branch()
    turtle.bk(200)
    turtle.rt(8)

turtle.done()

发表在 python, turtle | 留下评论

python配音彩花图案三

python配音彩花图案
给孩子们上课用的一个例子,先要讲一下函数与如何使用coloradd模块及安装方法。

import turtle
from coloradd import colorset
from winsound import PlaySound,SND_LOOP,SND_ASYNC

def setcolor():
    d = turtle.distance(0,0)+ 10
    c = colorset(d)                         # 把整数转换成RGB颜色三元组
    turtle.color(c)

def draw_miao(step):
    for _ in range(7):
        setcolor()
        turtle.fd(step);turtle.dot(10,'red')
        turtle.rt(15)
    for _ in range(7):
        setcolor()
        turtle.lt(15)
        turtle.bk(step)       
    for _ in range(7):
        setcolor()
        turtle.fd(step);turtle.dot(10,'red')
        turtle.lt(15)
    for _ in range(7):
        setcolor()
        turtle.rt(15)
        turtle.bk(step)       

turtle.delay(0)
turtle.speed(0)
turtle.pensize(1)
turtle.colormode(255)
turtle.bgcolor('black') 
PlaySound('11.wav',SND_LOOP|SND_ASYNC)
for _ in range(45):    
    draw_miao(30)        
    turtle.rt(8)

turtle.done()

发表在 python, turtle | 标签为 , , , | 留下评论

python circle命令示例彩圆图_作业

python circle color picture
这是本人课程中的一个案例,学生们学完后都很喜欢。
老师可以举一反三,比如把for循环改成while循环,或者反过来。
亲爱的读者,你能用Python海龟画图模块画出以上图形吗?下面是答案。

成为会员后,登陆才能继续浏览!联系微信scratch8即可办理会员。
(会员专属:能浏览所有文章,下载所有带链接的Python资源。)

发表在 python, turtle | 留下评论

Python turtle_彩花图案一

python彩花图案制作
这个程序需要coloradd模块支持。安装方法:按win键 + r键,打开运行对话框,输入cmd。然后在弹出的管理员窗口输入pip install coloradd即可安装。以下是所有代码。

import turtle
from coloradd import coloradd

turtle.speed(0)
turtle.pensize(10)
turtle.colormode(255)
turtle.bgcolor('black') 

c = (255,0,0)
turtle.color('red')
for _ in range(8):
    
    for _ in range(4):
        c = coloradd(c,0.1)
        turtle.color(c)
        turtle.circle(90,90)
        turtle.right(180)        
    turtle.rt(45)

turtle.done()

发表在 python, turtle | 标签为 , , | 留下评论

python图章作画之彩树

python图章做画之彩树

python图章做画之彩树

import turtle

turtle.shape('triangle')   # 设定造型为三角形 
turtle.left(90)            # 左转90度
turtle.bk(150)

turtle.shapesize(11)
turtle.color('green')     # 设定颜色为绿色
turtle.stamp()
turtle.fd(50)

turtle.shapesize(9)
turtle.color('yellow')   # 设定颜色为绿色
turtle.stamp()
turtle.fd(50)

turtle.shapesize(7)
turtle.color('orange')   # 设定颜色为绿色
turtle.stamp()
turtle.fd(50)

turtle.shapesize(5)
turtle.color('red')      # 设定颜色为绿色
turtle.stamp()
turtle.fd(50)

turtle.color('brown')    # 设定颜色为棕色
turtle.pensize(10)       # 设定画笔线宽为10
turtle.penup()           # 抬笔
turtle.bk(265)           # 倒退265
turtle.ht()              # 隐藏
turtle.pendown()         # 落笔
turtle.bk(100)

turtle.done()            # 事件循环,一定要在程序最后一行

发表在 python, turtle | 标签为 , | 留下评论

你的Python课程检测评估单来了_附参考答案与视频讲解mp4

风火轮编程内部的Python初级考试卷,以下内容为word文档,直接粘贴,程序缩进不对,敬请谅解。需要doc文档,请提供真实姓名进入QQ群225792826下载,文件名为:Python考试_空白test3.doc。

Python课程检测评估单

首先在计算机桌面上新建自己姓名的文件夹,并把电子试卷和所编写的程序另存到这个文件夹。

考试完后,打包压缩再发给我。

一、单选题,把正确的答案编号写在问号后面,每题3分。

1、下面的哪个数据是列表类型?   

① [32 , 76]             ② {32 , 76 }           ③ {32:76}           ④ (32,76)


2、下面哪个命令让海龟向后转?   

① setheading(90)             ② right(90)           ③ left(180)           ④ seth(-90)


3for循环的本质是什么?   

① 迭代序列中的数据        ② 删除序列中的数据    ③ 打印数据           ④ 不断旋转海龟


4print命令的分隔符参数是下面哪个?  

① sep             ② end          ③ abs         ④ round


5int(False+True) 的运行结果是什么?   

① 0             ② 1           ③ “True”        ④ “False”


6max命令的用途是?  

① 求最大值             ② 求最小值           ③ 求和           ④ 求平均数


7IndexError是什么意思

① 名字错误          ② 语法错误        ③ 索引错误       ④ 超出范围


8id命令的用途是

① 求变量内存地址     ② 显示变量名字   ③ 打印           ④  取整


910 % 3 的运算结果是?

① 0                 ② [0]          ③ 1             ④ 3


10、元组中的数据是可变的吗?  

① 可变              ② 不可变


11、让海龟画一个正五边形,每次要旋转多少度?  

①  32             ② 360            ③ 36             ④ 72


 12x初始值为10,则x += 3.0 的运行结果的数据类型是?     

① 13                ② list               ③ float              ④ int


13、定义函数时,小括号里面的变量是下面哪种类型的参数?   

① 实际参数                ② 形式参数           ③ 全局参数            ④ 局部参数


14、如果在海龟画图中用元组表示颜色,下面哪个元组能表示绿色?  

① (0,255,255)               ② (255,0,0)          ③ (0,255,0)        ④ (255,255,0)


15Turtle(visible=False) 运行后返回什么?   

① 可见的海龟               ② 不可见的海龟      ③ 屏幕        ④ 正方形


16、下面哪段程序是对的 ?    

import turtle

for x in range(10)

turtle.fd(1)

import turtle

for x in range(10):

turtle.fd(1)

import turtle

for x range(10):

turtle.fd(1)


17、下面哪段程序的运行结果是一个米字形图案

import turtle

while True:

turtle.fd(10)

turtle.rt(90)

import turtle

for x in range(8):

turtle.fd(100)

turtle.rt(45)

import turtle

for x in range(8):

turtle.forward(100)

turtle.bk(100)

turtle.right(45)


18、下面哪段程序计算100以内的奇数的和?   

c = 0

s = 0

while c < 100:

c = c + 2

s = s + c

c = 1

s = 0

while c < 100:

s = s + c

c = c + 2

c = 0

s = 0

while c < 101:

c = c + 2

s = s + c


19、下面哪段程序没有错误?   

from turtle import Screen

t = turtle()

t.write(“萍乡”)

from turtle import Turtle

t = Turtle()

t.write(“萍乡”)

from turtle import *

t = Turlre()

t.write(“萍乡”)


20、下面哪段程序定义了画三角形的函数?   

import turtle


def draw_triangle(d):

for x in range(3):

turtle.fd(d)

turtle.rt(120)

import turtle


def draw_square(d):

for x in range(4):

turtle.fd(d)

turtle.rt(90)

import turtle


for y in ‘abcdefghij’:

for x in range(3):

turtle.fd(100)

turtle.rt(120)

turtle.fd(10)


21、下面哪个程序能正确地画一幅彩色的图形?  

from turtle import *


cs = [‘red’,’pink’,’cyan’]

haigui = Turtle()


c = 0

while c < 100:

颜色 = cs[c%3]

haigui.color(颜色)

haigui.fd(c)

haigui.rt(c)

c = c + 1

from turtle import *


cs = [‘red’,’pink’,’cyan’]

haigui = Turtle()


c = 0

while c < 100:

颜色 = cs[c]

haigui.color(颜色)

haigui.fd(c)

haigui.rt(c)

c = c + 1

from turtle import *


cs = [‘red’,’pink’,’cyan’]

haigui = Turtle()


c = 0

while c < 100:

颜色 = cs[0]

haigui.color(颜色)

haigui.fd(c)

haigui.rt(c)

c = c + 1


二、编程题

 22、从键盘输入10到30个左右的数字,如果是5的倍数就加到名为fives的列表,否则加到nofives列表。(8分,保存在桌面上文件名为:22.py)


23、编程在海龟画图屏幕上画各种不同颜色和大小的

五角星。(8分,保存在桌面上文件名为:23.py)


24、编程,画一个田字,然后让它绕中心点旋转起来。

(8分,保存在桌面上文件名为:姓名24.py)


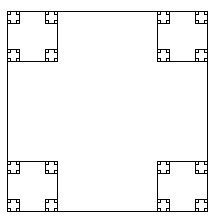
25、编程,画如右所示图形

Python递归画正方形

Python递归画正方形

(13分,保存在桌面上文件名为:姓名25.py)

需要本试卷的word文档,及参考答案,与视频讲解,请

成为会员后,登陆才能继续浏览!联系微信scratch8即可办理会员。
(会员专属:能浏览所有文章,下载所有带链接的Python资源。)

发表在 python, turtle, 视频教程 | 标签为 , | 留下评论

《Python昨晚我想你了》_开源的游戏海龟模块实例案例浅析

Python我想你了gameturtle案例分析

Python我想你了gameturtle案例分析

如何将多行文本转换成图像,还有描边效果呢?福利已经来到了,任何人都能免费下载安装gameturtle模块,从而简单地制作自己的Python作品。相比曾经笔者开发的Python精灵模块,这个模块可谓是个轻量级的模块。基本只专注于核心功能,最新版本是0.24版本,也只增加一个文本转图像的实用函数。这个函数名叫txt2image,相比笔者曾经编写的老版本,这个版本的txt2image支持多行文本转图像了。最新版本还支持描边效果!使用from gameturtle import txt2image即可使用这个函数了。

《Python昨晚我想你了》这个作品就使用了这个函数把文本转换成图像,再通过gameturtle里面Sprite类把它包装成角色,从而让作品中的汉字慢慢地显示出来,即淡入效果。就像下面这样:

python淡入效果

python淡入效果

下面说一下txg2image函数的用法 。
它共有五个参数,第一个参数叫txt,是要转换的文本,支持多行文本。
第二个参数叫fontfile。它能指定字体文件的路径,需要一个ttf字体文件。如
第三个参数叫fontsize。它指定字的大小,即字号。应该是一个整数。
第四个参数是color。它指定了要沉浸的字的颜色。应该是一个4元组,所以支持透明通道。
第五个参数是stroke。它是一个二元组,第一个值表示笔触宽度,第二个值表示描边颜色(四元组或者颜色字符串)。
下面这个小例子。它会把风火轮编程这几个字转换成有描边效果的图像。

from PIL import Image
from gameturtle import txt2image
​
im = txt2image('风火轮编程\nsince 2010',fontsize=128,
          color='orange', stroke=(4,'green'))
im.save('C:\\风火轮编程.png')

下面就是程序运行后在C盘根目录生成的图像文件。
萍乡Python李兴球风火轮编程

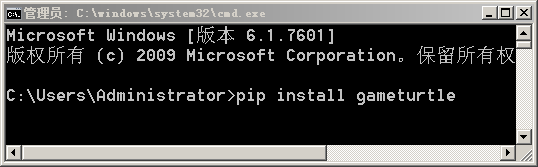
我们这里讲的《Python昨晚我想你了》这个作品,就是用gameturtle模块开发的。如果你的电脑没有安装gameturtle模块,是无法运行的。可喜的是,这个模块的源代码已经开源。任何人都能安装下载它,查看并阅读它的源代码以便学习。安装它很简单,用cmd打开管理员窗口,然后输入 pip install gameturtle 即可。
python pip install gameturtle
运行这个程序,首先会有美轮美奂的动态背景显示效果。读者可以从中学习到如何异步执行程序,而不需要使用多线程。下面是程序运行效果后的预览。

然后会有文字逐步的淡入,在文字淡入显示的同时,还会有相关文字从下面显示出来。当然,没有适合于气氛的背景音乐,作品就要黯然失色。在本作品中,配了背景音乐,名字就叫《想你》。伴随着优雅的背景音乐,还会有两颗心慢慢地合起来。
python两颗心

好了,下面先大致说一下如何使用gameturtle模块。
在gameturtle模块中,定义了一个叫GameTurtle的类,别名叫Sprite。
使用Sprite类至少要带上画布参数,所以要建窗口和画布。
下面是一个简单的示例代码。

from time import sleep
from tkinter import Tk,Canvas
from gameturtle import Sprite,txt2image
​
root = Tk()                                     # 创建窗口
cv = Canvas(width=480,height=360,bg='cyan')     # 创建画布
cv.pack()                                       # 放置画布
​
zhong = txt2image('中',fontsize=200,color='red')# 文字转图
hg = Sprite(cv,frames=zhong)                    # 创建角色
              
while 1:                                        # 无限循环  
    hg.rt(1)                                    # 右转1 度
    cv.update()                                 # 画布更新
    sleep(0.01)                                 # 等待0.01秒

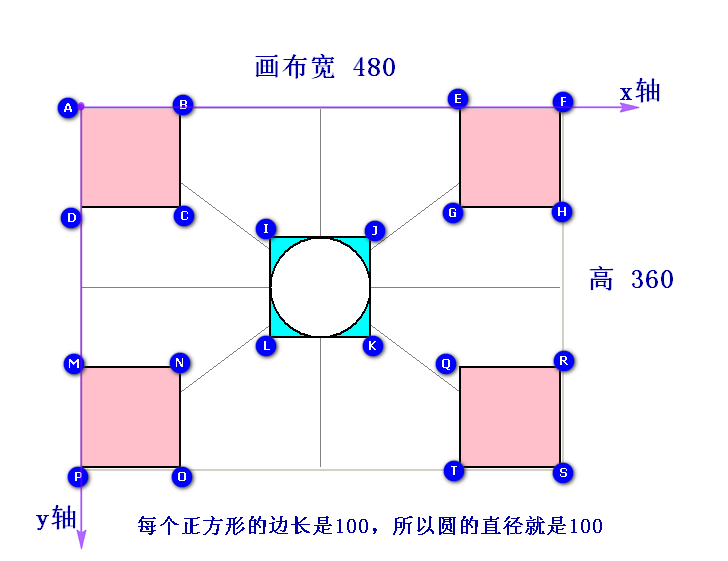
注意和turtle模块的最大不同是坐标系的不同。tkinter画布坐标系以左上角为原点,而海龟诞生时默认在画布中央,所以这个时候它的坐标并不是(0,0)。
如果画布宽度是480,高度是360,那么初始海龟的初始坐标是(240,180)。

如果读者需要本作品所有源代码和素材,关注公众号,回复imissyou,即可得到下载地址。寻找更多Python创意编程作品,请上笔者博客,网址是:www.lixingqiu.com。多年来一直致力于Python创意作品的制作,当然,你需要订制,也可以找笔者噢。

python music background

Python昨晚我想你了虚像淡入文字效果

Python昨晚我想你了虚像淡入文字效果

发表在 gameturtle, python, tkinter | 留下评论

Homework 16: SAT_逻辑学满足性问题_美国留学生作业答案_assignment answer

本人已完成此作业,需要请联系本人微信scratch8,以下是问题描述。

Let ?1,?2,p1,p2,… be propositional variables. A SAT problem, represented in conjunctive normal form, consists in a conjunction of disjunctions of propositional variables and their complements, such as

(?1?¯2?3)(?2?5).(p1∨p¯2∨p3)∧(p2∨p5).

We call each conjuct a clause; in the above example, we have two clauses, ?1=?1?¯2?3c1=p1∨p¯2∨p3 and ?2=?2?5c2=p2∨p5. The disjuncts in a clause are called literals: for example, the first clause ?1=?1?¯2?3c1=p1∨p¯2∨p3 contains the literals ?1p1?¯2p¯2, and ?3p3.

The satisfiability question is: can we find a truth assignment to the variables that makes the expression true? In the above case, the answer is yes: we can take:

?1=????,?5=????p1=True,p5=True

and any value for ?2,?3p2,p3.

SAT representation

To represent an instance of SAT, we represent literals, clauses, and the overall expression, as follows.

Literals. We represent the literal ??pk via the positive integer ?k, and the literal ?¯?p¯k via the negative integer ?−k.

Clauses. We represent a clause via the set of integers representing the clause literals.
For instance, we represent the clause ?1?¯3?4p1∨p¯3∨p4 via the set {1,3,4}{1,−3,4}.

SAT problem. We represent a SAT problem (again, in conjunctive normal form) via the set consisting in the representation of its clauses. For instance, the problem

(?1?¯2?3)(?2?5)(p1∨p¯2∨p3)∧(p2∨p5)

is represented by the set of sets:

{{1,2,3},{2,5}}.{{1,−2,3},{2,5}}.

There are various operations that we need to do on clauses, and on the overall SAT problem, to solve it. Thus, we encapsulate both clauses, and the SAT problem, in python classes, so we can associate the operations along with the representations.

Clauses

We first define an auxiliary function, which tells us whether a set contains both an integer and its negative. This will be used, for instance, to detect whether a clause contains both a literal and its complement.

Truth assignments

We are seeking a truth assignment for the propositional variables that makes the expression true, and so, that makes each clause true.

We represent the truth assignment that assigns True to ??pk via the integer ?k, and the truth assignment that assigns False to ??pk via ?−k. Thus, if you have a (positive or negative) literal ?i, the truth assignment ?i will make it true.

We represent truth assignments to multiple variables simply as the set of assignments to individual variables. For example, the truth assignment that assigns True to ?1p1 and False to ?2p2 will be represented via the set {1,2}{1,−2}.

Question 1: Define Clause simplification

To solve a SAT instance, we need to search for a truth assignment to its propositional variables that will make all the clauses true. We will search for such a truth assignment by trying to build it one variable at a time. So a basic operation on a clause will be:

Given a clause, and a truth assignment for one variable, compute the result on the clause.

What is the result on the clause? Consider a clause with representation ?c (thus, ?c is a set of integers) and a truth assignment ?i (recall that ?i can be positive or negative, depending on whether it assigns True or False to ??pi). There are three cases:

  • If ??i∈c, then the ?i literal of ?c is true, and so is the whole clause. We return True to signify it.
  • If ??−i∈c, then the ?−i literal of ?c is false, and it cannot help make the clause true. We return the clause ?{?}c∖{−i}, which corresponds to the remaining ways of making the clause true under assignment ?i.
  • If neither ?i nor ?−i is in ?c, then we return ?c itself, as ?c is not affected by the truth assignment ?i.

Based on the above discussion, implement a simplify method for a Clause that, given a truth assignment, returns either a simplified clause, if some literals

发表在 python | 留下评论

《八猫联动初体验》_来自游戏海龟模块的问候

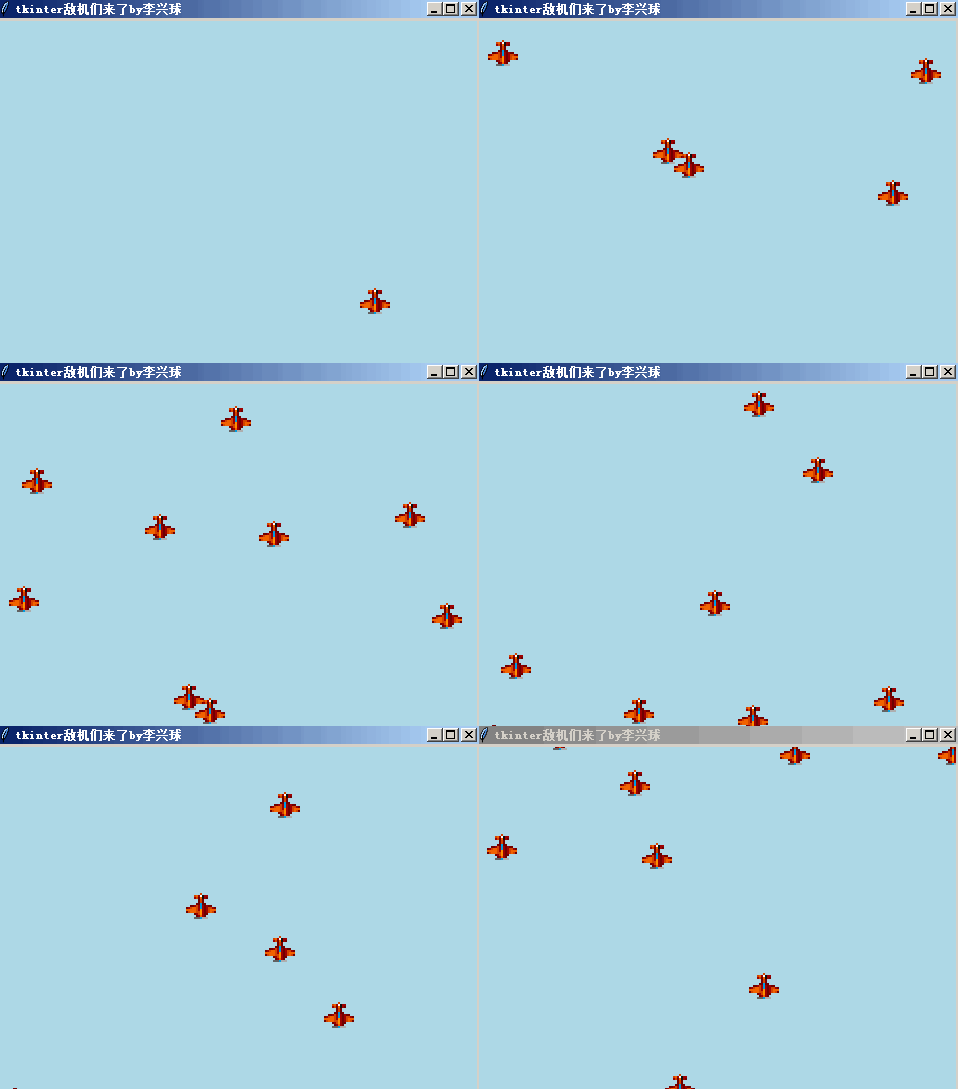
《八猫联动初体验》是用Python的游戏海龟模块制作的一个小程序。

在这个作品中使用了游戏海龟模块!英文名是gameturtle,话说什么是游戏海龟模块呢?原来,这个模块是一个“秘密”的模块。是笔者全新开发的一个用于制作游戏的模块。它支持像素级碰撞检测,使用简单,主要配合tkinter模块来开发制作有趣的游戏。

这个模块在《Python海龟宝典》下册原理篇中有详细的使用说明。如果你读懂了《Python海龟宝典》下册原理篇,那么就能自己开发一个gameturtle模块了。

读者可能又会问《Python海龟宝典》又是什么?《Python海龟宝典》也是笔者编写的。它分为上下两册,上册是超过200例的用原生的turtle模块制作的各种小案例,如动画,小游戏,绘画艺术等。

Python海龟宝典

下册则深入剖析了turtle模块内部,并且推出了自己的一个叫gameturtle的模块。只要你顺着作者的思路,相信你也能成为Python创意编程大师。

图片

我们这里讲的《八猫联动初体验》这个作品,

就是用gameturtle模块编写的。如果你的电脑没有安装gameturtle模块,是无法运行的。可喜的是,这个模块的源代码已经开源。任何人都能安装下载它,查看并阅读它的源代码以便学习。安装它很简单,用cmd打开管理员窗口,然后输入 pip install gameturtle 即可。

python pip install gameturtle

在gameturtle模块中,定义了一个叫GameTurtle的类,别名叫Sprite。使用Sprite类至少要带上画布参数,所以要建窗口和画布。

下面是一个简单的示例代码。

from gameturtle import *

root = Tk()
cv =Canvas(width=480,height=360)
cv.pack()

a = Sprite(cv)

程序最后一句没有写root.mainloop()这行代码,所以还可以直接在IDLE Shell中输入测试代码。

读者可以输入a.fd(100,a.forward(100),a.bk(100,a.rt(90),a.lt(90)等进行测试。这些和turtle模块基本一致。

不过最大不同是坐标系的不同。所以如果输入a.distance(100,100),返回的是161.24515496597098时不要惊讶。

tkinter canvas coordinate system

tkinter canvas coordinate system

因为tkinter画布坐标系以左上角为原点,而海龟诞生时默认在画布中央,所以这个时候它的坐标并不是(0,0)。在本例中,由于画布宽度是480,高度是360,所以海龟的坐标是(240,180)。

可能有人会问,上面的程序并没有导入tkinter模块的Tk和Canvas命令,但在程序中却可以直接使用,这是怎么回事呢?

这是由于在gameturtle模块中已经导入了!而在本程序第一行代码又是使用了*号,所以它会一股脑儿把所有在gameturtle曾经导入过的命令都导进来。

更好的办法是写from gameturtle import Sprite。这个时候,读者就要手工导入Tk和Canvas这两个命令(类)了。

为了显示多帧动画,下面的程序告诉了你,如何给Sprite命令传递多帧图像,从而生成具有多帧造型角色。

python multi frame costumes

python multi frame costumes

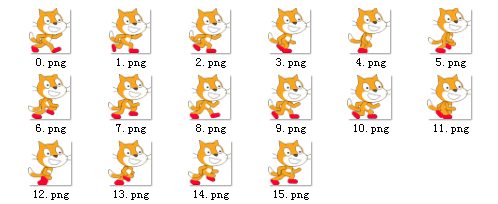
首先,有一个叫res的文件夹,它下面存储了从0.png到15.png的图像。

然后我们要把它们的相对路径(程序和res目录同一个文件夹)全部加载进来,用下面的代码:

frames = [f"res/{i}.png" for i in range(16)]

这是一行列表推导式,运行它就能把图像的相对路径全部放在列表中。

接着,用Image.open打开每张图(在gameturtle已经导入的pillow模块)。

代码就像下面这样:

ims = [Image.open(im) for im in frames]

由于我们要建8个角色,并且把它们全部放在cats列表中,所以用下面的代码:

cats = [Sprite(cvs[i],ims) for i in range(8)]

在Sprite类中,第一个参数是画布,其它参数的名字依次是:
frames,pos,visible,heading=0,tag。

frames表示造型帧图,可以传递一个图形,也能传递一个列表或元组。这些图形要是pillow模块中的图形对象。也就是要用Image.open或者Image.new或者Image.fromarray这几个命令加载的图表对象。

pos参数表示坐标,visible参数表示可见性,heading参数表示默认的方向。

tag参数表示角色的标签,这是为了便于分组。

最后为了让每只猫不断地原地踏步,让它们在无限循环中不断切换造型即可。

所有代码示例如下所示:

"""
八猫联动初体验.py
这个程序使用gameturtle模块,生成8块画布,在每块画布上生成一只小猫。

"""
try:
    from gameturtle import *
except:
    import subprocess
    p = subprocess.Popen(["pip","install","gameturtle"],shell=True)
    from tkinter import messagebox
    t ='风火轮编程提示:'
    p = '''没有找到gameturtle模块,程序无法运行。\n
程序会自动进行安装,如果重新启动程序后还无法运行。\n
请手动安装gameturtle模块,方法:\n用cmd命令打开管理员窗口,\n然后输入pip install gameturtle\n
如果还是不知道操作,请加李兴球微信scratch8提供技术支持。\n
gameturtle模块详细说明,请见《Python海龟宝典》下册原理篇。'''
    messagebox.showwarning(t,p)

root = Tk()
root.title('八猫联动初体验by李兴球')
colors = ['red','orange','yellow','green',
          'cyan','blue','purple','pink']

cvs = []
for counter in range(len(colors)):
    i = counter // 4                                     # 行号
    j = counter % 4                                      # 列号
    cv = Canvas(width=120,height=120,bg=colors[counter]) # 建画布
    cv.grid(row=i,column=j)                              # 布局  
    cvs.append(cv)                                       # 放表中
    

frames = [f"res/{i}.png" for i in range(16)]   # 猫的每帧造型图
ims = [Image.open(im) for im in frames]        # 用Image.open加载到内存
cats = [Sprite(cvs[i],ims) for i in range(8)]  # 生成8个角色
[cat.setrotmode(1) for cat in cats[4:] ]       # 后4个设定旋转模式为左右翻转
[cat.right(180) for cat in cats[4:] ]          # 后4个向后转

while True:
    [c.nextshape() for c in cats ]             # 每只猫切换造型         
    root.update()                              # 更新显示
    time.sleep(0.01)                           # 等待0.01秒

需要本程序所有源代码和素材,请关注公众号:李兴球Python,回复8catrun,即可得到下载网址。

发表在 gameturtle, python, tkinter | 标签为 , , , | 留下评论

Homework 15: The Holy Queens Problem神圣皇后问题(类八皇后问题)美国留学生作业assignment代作

本人已完成这个作业,有需要答案,请联系本人微信scratch8.

A chess queen can strike along the row, column, and the two diagonals. The classical ?-queens problem consists in placing ? queens on the chess board, so that no queen can eat another queen. 国际像棋上的皇后能攻击同行,同列,同斜线方向上的其它棋子。

We will study here the holy queen problem: the chessboard can have holes, and in fact, can have an arbitrary shape. The ability of a queen to move and attack is limited by the holes, and in general by the borders of the board: a queen cannot “jump” across a hole. Your goal is to check whether you can place ? queens on a given board, which may contain holes.

The board
For a board, we will use a Numpy representation as a matrix, with the following conventions for the content of each square:

0: the cell is available for a queen.
1: a queen is in the cell.
2: the cell is under attack from some queen (and thus not available).
3: the cell contains a wall/hole, and a queen cannot traverse it.
We provide for you here a function show_board that visualizes a board, using a Q for a queen, a dot for an empty location, a # for a hole or wall, and a * for a cell under attack.

QUEEN = 1
EMPTY = 0
FORBIDDEN = 2
WALL = 3

def show_board(board):
    rows, cols = board.shape
    for r in range(rows):
        s = ""
        for c in range(cols):
            if board[r, c] == QUEEN:
                s += "Q"
            elif board[r, c] == FORBIDDEN:
                s += "*"
            elif board[r, c] == WALL:
                s += "#"
            elif board[r, c] == EMPTY:
                s += "."
            else:
                s += "?"
        print(s)


import numpy as np

board=np.array([
                [0, 0, 0, 0, 0, 0],
                [0, 1, 0, 3, 3, 0],
                [0, 0, 0, 3, 3, 0],
                [0, 0, 1, 0, 0, 0],
                [0, 0, 0, 0, 0, 0]
])
show_board(board)

def read_board(string_list):
    rows = len(string_list)
    cols = len(string_list[0])
    board = np.zeros((rows, cols))
    for r, row in enumerate(string_list):
        assert len(row) == cols
        for c, s in enumerate(row):
            if s == "Q":
                board[r, c] = QUEEN
            elif s == "#":
                board[r, c] = WALL
            elif s == "*":
                board[r, c] = FORBIDDEN
    return board

bs = [
    "......", 
    ".Q.##.",
    "...##.",
    "..Q...",
    "......"
    ]
show_board(read_board(bs))

Question 1

Here is the class HolyQueens. You must define two methods:

The method propagate propagates the constraints, marking with FORBIDDEN all the locations that can be reached by the queens on the board.

The method search searches for a solution with a given number of queens. If a solution is found, it returns the board. If no solution is found, it returns None. The method search should implement the propagate-guess-recur framework: if not enough queens are present on the board, it first propagates the constraints from the current queens if any, then it guesses the position for a new queen, and then it recurs, looking for a solution in which one fewer queen needs to be placed.

We advise you to implement propagate first, and then search.


class HolyQueens(object):
    
    def __init__(self, board):
        self.board = board
        self.num_rows, self.num_cols = self.board.shape
        # Current number of queens in the board. 
        self.num_queens = np.sum(self.board == QUEEN)

    def show(self):
        show_board(self.board)

    def propagate(self):
        """Propagates the information on the board, marking with 2 the 
        positions where a queen cannot be."""
        # The solution can be written concisely in about 20 lines of code, 
        # but if you brute force it, it might be quite long. 
        ### YOUR CODE HERE
    
    def search(self, total_num_queens):
        """Searches for a solution, starting from the given board, 
        which contains exactly num_queens.  It returns the board, 
        if such a solution is found, or None, if none could be found
        after exhaustive search."""
        pass
        ### YOUR CODE HERE
    

## 5 points. Propagation. 

# Propagating this
bs = [
    "......", 
    ".Q.##.",
    "...##.",
    "..Q...",
    "......"
    ]
# should give this:
bs_prop = [
    "***...",
    "*Q*##.",
    "***##.",
    "**Q***",
    ".****."]

hq = HolyQueens(read_board(bs))
hq.propagate()
hq.show()
assert (hq.board == read_board(bs_prop)).all()

## 5 points. Propagation. 

# Propagating this
bs = [
    ".....Q", 
    "..Q##.",
    "...##.",
    ".#....",
    ".Q...."
    ]
# should give this:
bs_prop = [
    "*****Q",
    "**Q##*",
    ".**##*",
    "*#*..*",
    "*Q****"]

hq = HolyQueens(read_board(bs))
hq.propagate()
hq.show()
assert (hq.board == read_board(bs_prop)).all()


bs = [
    "......", 
    "...##.",
    "...##.",
    "......",
    "......"
    ]
hq = HolyQueens(read_board(bs))
r = hq.search(4)
assert r is not None
# You should get a solution with 4 non-interfering queens. 
show_board(r)


## 5 points: tests for search function 

bs = [
    "......", 
    "...##.",
    "...##.",
    "......",
    "......"
    ]
hq = HolyQueens(read_board(bs))
r = hq.search(6)
assert r is not None
# You should get a solution with 6 non-interfering queens. 
show_board(r)
发表在 python | 标签为 , | 留下评论

Homework 14: Sudoku数独求解问题_美国留学生作业assignment代做

本人已完成数独作业,有需要请和本人联系,微信scratch8。

Test Format

There are 6 questions, but not all of them require you to write code:

  • Question 1 asks you to complete the code for propagating a single cell.
  • Question 2 asks you to write the code to propagate all cells.
  • For Question 3, you just need to copy your solution to Question 2 in another place.
  • Question 4 asks you to implement a helper function that detects elements that occur in only one of a list of sets.
  • Question 5 asks you to implement the where can it go heuristic.
  • Question 6 simply checks that your code is efficient; you don’t need to write any code.

There are a total of 70 points.

Let us write a Sudoku solver. We want to get as input a Sudoku with some cells filled with values, and we want to get as output a solution, if one exists, and otherwise a notice that the input Sudoku puzzle has no solutions.

You will wonder, why spend so much time on Sudoku?

For two reasons.

First, the way we go about solving Sudoku is prototypical of a very large number of problems in computer science. In these problems, the solution is attained through a mix of search (we attempt to fill a square with a number and see if it works out), and constraint propagation (if we fill a square with, say, a 1, then there can be no 1’s in the same row, column, and 3×3 square).

Second, and related, the way we go about solving Sudoku puzzles is closely related to how SAT solvers work. So closely related, in fact, that while we describe for you how a Sudoku solver works, you will have to write a SAT solver as exercise.

Sudoku representation

First, let us do some grunt work and define a representation for a Sudoku problem.

One initial idea would be to represent a Sudoku problem via a 9×99×9 matrix, where each entry can be either a digit from 1 to 9, or 0 to signify “blank”. This would work in some sense, but it would not be a very useful representation. If you have solved Sudoku by hand (and if you have not, please go and solve a couple; it will teach you a lot about what we need to do), you will know that the following strategy works:

Repeat:

  • Look at all blank spaces. Can you find one where only one digit fits? If so, write the digit there.
  • If you cannot find any blank space as above, try to find one where only a couple or so digits can fit. Try putting in one of those digits, and see if you can solve the puzzle with that choice. If not, backtrack, and try another digit.

Thus, it will be very useful to us to remember not only the known digits, but also, which digits can fit into any blank space. Hence, we represent a Sudoku problem via a 9×99×9 matrix of sets: each set contains the digits that can fit in a given space. Of course, a known digit is just a set containing only one element. We will solve a Sudoku problem by progressively “shrinking” these sets of possibilities, until they all contain exactly one element.

Let us write some code that enables us to define a Sudoku problem, and display it for us; this will be very useful both for our fun and for debugging.

First, though, let’s write a tiny helper function that returns the only element from a singleton set.

def getel(s):
    """Returns the unique element in a singleton set (or list)."""
    assert len(s) == 1
    return list(s)[0]

import json

class Sudoku(object):

    def __init__(self, elements):
        """Elements can be one of:
        Case 1: a list of 9 strings of length 9 each.
        Each string represents a row of the initial Sudoku puzzle,
        with either a digit 1..9 in it, or with a blank or _ to signify
        a blank cell.
        Case 2: an instance of Sudoku.  In that case, we initialize an
        object to be equal (a copy) of the one in elements.
        Case 3: a list of list of sets, used to initialize the problem."""
        if isinstance(elements, Sudoku):
            # We let self.m consist of copies of each set in elements.m
            self.m = [[x.copy() for x in row] for row in elements.m]
        else:
            assert len(elements) == 9
            for s in elements:
                assert len(s) == 9
            # We let self.m be our Sudoku problem, a 9x9 matrix of sets.
            self.m = []
            for s in elements:
                row = []
                for c in s:
                    if isinstance(c, str):
                        if c.isdigit():
                            row.append({int(c)})
                        else:
                            row.append({1, 2, 3, 4, 5, 6, 7, 8, 9})
                    else:
                        assert isinstance(c, set)
                        row.append(c)
                self.m.append(row)


    def show(self, details=False):
        """Prints out the Sudoku matrix.  If details=False, we print out
        the digits only for cells that have singleton sets (where only
        one digit can fit).  If details=True, for each cell, we display the
        sets associated with the cell."""
        if details:
            print("+-----------------------------+-----------------------------+-----------------------------+")
            for i in range(9):
                r = '|'
                for j in range(9):
                    # We represent the set {2, 3, 5} via _23_5____
                    s = ''
                    for k in range(1, 10):
                        s += str(k) if k in self.m[i][j] else '_'
                    r += s
                    r += '|' if (j + 1) % 3 == 0 else ' '
                print(r)
                if (i + 1) % 3 == 0:
                    print("+-----------------------------+-----------------------------+-----------------------------+")
        else:
            print("+---+---+---+")
            for i in range(9):
                r = '|'
                for j in range(9):
                    if len(self.m[i][j]) == 1:
                        r += str(getel(self.m[i][j]))
                    else:
                        r += "."
                    if (j + 1) % 3 == 0:
                        r += "|"
                print(r)
                if (i + 1) % 3 == 0:
                    print("+---+---+---+")


    def to_string(self):
        """This method is useful for producing a representation that
        can be used in testing."""
        as_lists = [[list(self.m[i][j]) for j in range(9)] for i in range(9)]
        return json.dumps(as_lists)


    @staticmethod
    def from_string(s):
        """Inverse of above."""
        as_lists = json.loads(s)
        as_sets = [[set(el) for el in row] for row in as_lists]
        return Sudoku(as_sets)


    def __eq__(self, other):
        """Useful for testing."""
        return self.m == other.m

Let us input a problem (the Sudoku example found on this Wikipedia page) and check that our serialization and deserialization works.

# Let us ensure that nose is installed.
try:
    from nose.tools import assert_equal, assert_true
    from nose.tools import assert_false, assert_almost_equal
except:
    !pip install nose
    from nose.tools import assert_equal, assert_true
    from nose.tools import assert_false, assert_almost_equal

Collecting nose
Downloading https://files.pythonhosted.org/packages/15/d8/dd071918c040f50fa1cf80da16423af51ff8ce4a0f2399b7bf8de45ac3d9/nose-1.3.7-py3-none-any.whl (154kB)
|████████████████████████████████| 163kB 5.1MB/s eta 0:00:01
Installing collected packages: nose
Successfully installed nose-1.3.7

from nose.tools import assert_equal

sd = Sudoku([
    '53__7____',
    '6__195___',
    '_98____6_',
    '8___6___3',
    '4__8_3__1',
    '7___2___6',
    '_6____28_',
    '___419__5',
    '____8__79'
])
sd.show()
sd.show(details=True)
s = sd.to_string()
sdd = Sudoku.from_string(s)
sdd.show(details=True)
assert_equal(sd, sdd)

+---+---+---+
|53.|.7.|...|
|6..|195|...|
|.98|...|.6.|
+---+---+---+
|8..|.6.|..3|
|4..|8.3|..1|
|7..|.2.|..6|
+---+---+---+
|.6.|...|28.|
|...|419|..5|
|...|.8.|.79|
+---+---+---+
+-----------------------------+-----------------------------+-----------------------------+
|____5____ __3______ 123456789|123456789 ______7__ 123456789|123456789 123456789 123456789|
|_____6___ 123456789 123456789|1________ ________9 ____5____|123456789 123456789 123456789|
|123456789 ________9 _______8_|123456789 123456789 123456789|123456789 _____6___ 123456789|
+-----------------------------+-----------------------------+-----------------------------+
|_______8_ 123456789 123456789|123456789 _____6___ 123456789|123456789 123456789 __3______|
|___4_____ 123456789 123456789|_______8_ 123456789 __3______|123456789 123456789 1________|
|______7__ 123456789 123456789|123456789 _2_______ 123456789|123456789 123456789 _____6___|
+-----------------------------+-----------------------------+-----------------------------+
|123456789 _____6___ 123456789|123456789 123456789 123456789|_2_______ _______8_ 123456789|
|123456789 123456789 123456789|___4_____ 1________ ________9|123456789 123456789 ____5____|
|123456789 123456789 123456789|123456789 _______8_ 123456789|123456789 ______7__ ________9|
+-----------------------------+-----------------------------+-----------------------------+
+-----------------------------+-----------------------------+-----------------------------+
|____5____ __3______ 123456789|123456789 ______7__ 123456789|123456789 123456789 123456789|
|_____6___ 123456789 123456789|1________ ________9 ____5____|123456789 123456789 123456789|
|123456789 ________9 _______8_|123456789 123456789 123456789|123456789 _____6___ 123456789|
+-----------------------------+-----------------------------+-----------------------------+
|_______8_ 123456789 123456789|123456789 _____6___ 123456789|123456789 123456789 __3______|
|___4_____ 123456789 123456789|_______8_ 123456789 __3______|123456789 123456789 1________|
|______7__ 123456789 123456789|123456789 _2_______ 123456789|123456789 123456789 _____6___|
+-----------------------------+-----------------------------+-----------------------------+
|123456789 _____6___ 123456789|123456789 123456789 123456789|_2_______ _______8_ 123456789|
|123456789 123456789 123456789|___4_____ 1________ ________9|123456789 123456789 ____5____|
|123456789 123456789 123456789|123456789 _______8_ 123456789|123456789 ______7__ ________9|
+-----------------------------+-----------------------------+-----------------------------+

Constraint propagation

When the set in a Sudoku cell contains only one element, this means that the digit at that cell is known. We can then propagate the knowledge, ruling out that digit in the same row, in the same column, and in the same 3×3 cell.

We first write a method that propagates the constraint from a single cell. The method will return the list of newly-determined cells, that is, the list of cells who also now (but not before) are associated with a 1-element set. This is useful, because we can then propagate the constraints from those cells in turn. Further, if an empty set is ever generated, we raise the exception Unsolvable: this means that there is no solution to the proposed Sudoku puzzle.

We don’t want to steal all the fun from you; thus, we will give you the main pieces of the implemenetation, but we ask you to fill in the blanks. We provide tests so you can catch any errors right away.

Question 1: Propagating a single cell


class Unsolvable(Exception):
    pass


def sudoku_ruleout(self, i, j, x):
    """The input consists in a cell (i, j), and a value x.
    The function removes x from the set self.m[i][j] at the cell, if present, and:
    - if the result is empty, raises Unsolvable;
    - if the cell used to be a non-singleton cell and is now a singleton
      cell, then returns the set {(i, j)};
    - otherwise, returns the empty set."""
    c = self.m[i][j]
    n = len(c)
    c.discard(x)
    self.m[i][j] = c
    if len(c) == 0:
        raise Unsolvable()
    return {(i, j)} if 1 == len(c) < n else set()

Sudoku.ruleout = sudoku_ruleout

The method propagate_cell(ij) takes as input a pair ij of coordinates. If the set of possible digits self.m[i][j] for cell i,j contains more than one digit, then no propagation is done. If the set contains a single digit x, then we:

Remove x from the sets of all other cells on the same row, column, and 3×3 block.
Collect all the newly singleton cells that are formed, due to the digit x being removed, and we return them as a set.
We give you an implementation that takes care of removing x from the same row, and we ask you to complete the implementation to take care of the column and 3×3 block as well.

### Exercise: define cell propagation

def sudoku_propagate_cell(self, ij):
    """Propagates the singleton value at cell (i, j), returning the list
    of newly-singleton cells."""
    i, j = ij
    if len(self.m[i][j]) > 1:
        # Nothing to propagate from cell (i,j).
        return set()
    # We keep track of the newly-singleton cells.
    newly_singleton = set()
    x = getel(self.m[i][j]) # Value at (i, j).
    # Same row.
    for jj in range(9):
        if jj != j: # Do not propagate to the element itself.
            newly_singleton.update(self.ruleout(i, jj, x))
    # Same column.
    ### YOUR CODE HERE
    for ii in range(9):
        if ii != i: # Do not propagate to the element itself.
            newly_singleton.update(self.ruleout(ii, j, x))
    # Same block of 3x3 cells.
    ### YOUR CODE HERE
    # Returns the list of newly-singleton cells.
    return newly_singleton

Sudoku.propagate_cell = sudoku_propagate_cell

本作业还有更多问题,在此不再列举出。

发表在 python | 标签为 | 留下评论

Homework13 Finding the Cheapest Path查找最便宜路径_美国留学生作业assignment

本人已完成这份作业,需要答案,请联系本人,以下是作业部分内容。

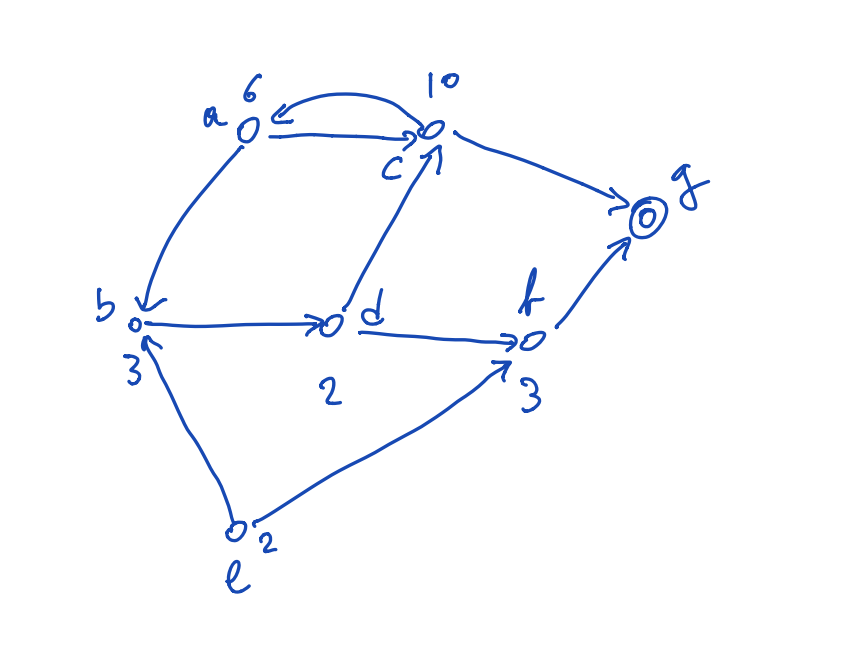
python find cheapest path查找成本最低路径

python find cheapest path查找成本最低路径

Problem Setting

You are given a graph (?,?)(V,E), where each vertex ??x∈V has a set of successors ?(?)s(x). There is one goal vertex ??g∈V, that one must try to reach. The cost of visiting a vertex ??x∈V is ?(?)>0c(x)>0.

The goal of the homework is to find, from every graph vertex ??x∈V, the path to reach the goal ??g∈V with minumum cost, and to compute for each vertex ??x∈V its value ?(?)v∗(x), which corresponds to the minimum cost of reaching the goal.

You can compute ?(?)v∗(x) for every ??x∈V via dynamic programming. First, you set:

?(?)={0+if ?=?;if ??.(1)v(x)={0if x=g;+∞if x≠g.(1)

Basically, this encodes the fact that if you are at ?g, you are at the goal, and you pay nothing. If you are not at ?g, as we have not yet explored any path, the cost is infinite, as you don’t know how to go to ?g (yet) .

Then, for every ??x≠g, you update the cost ?(?)v(x) of ?x via:

?(?):=?(?)+min??(?)?(?).(2)v(x):=c(x)+miny∈s(x)v(y).(2)

This because, to reach ?g from ??x≠g, one must first pay the price ?(?)c(x) of being at ?x, and then one must go to a successor ?y of ?g. If the cost of then reaching ?g from ?y is ?(?)v(y), the total cost ?(?)v(x) from ?x is ?(?)+?(?)c(x)+v(y). If ?x has many successors, it is convenient to choose the successor with minimum cost: hence the minmin in the above equation.

So one way of solving the problem is this.

Initially, set ?(?)v(x) via (1). Then, repeat:

  • Update the value ?(?)v(x) at each ??x≠g via (2)

Until nothing changes when the update is done.

The last part of the problem consists in finding a minimum-cost path to the goal. But this is easy to do: all you need to do is, when you update the costs ?(?)v(x) of a vertex via (2), you remember which successor ??(?)y∈s(x) gave you the minimum value (if there is more than one ??(?)y∈s(x) that gives you the minimum value, pick one of them at random). Call this the optimal successor ?(?)b(x) (for, “best at ?x“) of ?x:

?(?)=argmin??(?)?(?).(3)b(x)=arg⁡miny∈s(x)v(y).(3)

Then, to reach ?g with minimum cost, you simply take the edge from ?x to ?1=?(?)y1=b(x), then to ?2=?(?1)y2=b(y1), and so forth, until you reach ?g. That is, you do not need to remember from each state its path to ?g. You just need to remember the best successor of every state: following this chain of best successors will lead you to ?g with minimum cost.

Here is the representation of a vertex, including its cost ?()c(⋅), value ?()v(⋅), and best successor ?()b(⋅).

class Vertex(object):
    """This represents a vertex of the graph."""

    def __init__(self, cost, name=""):
        assert cost > 0
        assert len(name) > 0
        self.cost = cost
        self.name = name
        # This will be computed later
        self.value = None
        self.best_successor = None

    def __hash__(self):
        return hash(self.name)

    def __repr__(self):
        return "{}(c={},v={})".format(self.name, self.cost, self.value)

We define infinity, to implement (1). Yes, you can represent infinity in Python.

INFINITE = float("inf")

Question 1.

Here is our definition of the graph. In it, you need to complete the compute_values and best_path methods.

  • The compute_values method should perform the computation of the minimum cost for reaching the goal from each vertex, and should update x.value and x.best_successor for every vertex.
  • The best_path method should return the best path from a vertex to the goal, including both the initial vertex, and the goal vertex.
from collections import defaultdict

class Graph(object):

    def __init__(self):
        self.vertices = set()
        self.successors = defaultdict(set)
        self.goal = None # We will set this later. 

    def add_vertex(self, x, successors):
        """Adds a vertex x, with a specified set of successors."""
        # First, we want to make sure that both x and its successors are in the set
        # of graph vertices. 
        self.vertices.add(x)
        self.vertices.update(successors)
        # Then, we want to keep track of the successors of x. 
        self.successors[x] = successors

    def add_goal(self, x):
        """Adding a goal is similar to adding a vertex, except that the goal has 
        no successors (you have already arrived!). """
        self.goal = x
        self.add_vertex(x, set())

    def compute_values(self):
        """This function should compute the values x.value for each vertex 
        x of the graph, along with the best successor x.best_successor of each 
        vertex."""
        pass
        # This can be done in about a dozen lines of code.
        ### YOUR CODE HERE

    def best_path(self, x):
        """This function should output a list of vertices, starting at x, 
        and ending at the goal vertex, that consists of a minimum-cost path
        to the goal."""
        pass
        # This can be done in 5-6 lines of code. 
        ### YOUR CODE HERE

下面更多内容,在此不在列举..................
发表在 python | 标签为 , , | 留下评论

Homework 12: Scheduling with Dependencies 美国留学生作业assignment答案

本人已完成以下作业,需要答案请联系本人微信scratch8

About This Homework   关于这个家作

The homework consists of 4 questions, for a total of 90 points. 这份家作由4个问题组成,90个点。

The instructions for working on homework assignments are available on Canvas; as a summary:

  • Write your code only where indicated via
      # YOUR CODE HERE

    If you write code in other places, it will be discarded during grading.

  • Do not add/remove cells.
  • The tests are implemented with assert statements: if they fail, you will see an error (a Python exception). If you see no error, you can assume that they pass.

Once you are done working on it, you can download the .ipynb and submit to this Google Form.


Assume you have to prepare Pasta Carbonara. My version of the recipe goes like this:

Dice onions and pancetta, and fry in a mix of olive oil and butter, slowly. Separately, put in a bowl as many eggs as there are dinner guests; you can either put in the bowls the yolks only, or you can add a few whites if you wish. Beat the eggs.
Bring water to a boil, and when it boils, salt it. Put the pasta in (I like Penne Rigate). When cooked, colander the water away, and quickly unite in the bowl the beaten eggs, the pasta, and the pancetta. Mix well and serve immediately.

If you have to invite people over, you could do this recipe sequentially, and first worry about cooking the pasta: warming the water, putting the pasta in, then colandering it. Then you could worry about cooking the pancetta and onions. When that’s done, you can start to beat the eggs. Finally, you could unite everything. Technically, that would work, but there would be two problems. The first is that, of course, the pasta would be rather cold by the time it would be served, a capital sin (pasta must be served immediately after it is cooked). Secondly, even if you rehash the order so that you first cook the pancetta, then beat the eggs, then cook the pasta, then technically this works — but it would take you well over one hour to have everything ready. You want to do things in parallel, cooking the pancetta while heating up the water for the pasta, and so forth. You want to discover what are the things that need to be done one after the other, and what are the things that can be done in parallel, and in which order to do everything.

Great cooking, by the way, is much about the perfect timing, not only the perfect preparation. You have to have the various preparations ready at the same time, to unite them just right. We will worry about timing in the second part of this chapter; first, we worry about what we can do and in which order.

As an aside for those of you who are more interested in compiling code than in cooking, the problem of how to compile C or C++ code is very similar. A makefile defines dependencies between tasks: you have to have compiled pathlib.c before you can link the result together with something else. The task of the make program is to figure out how to parallelize the compilation, so that independent tasks can happen in different processes (possibly on different CPU cores), while respecting the precedence constraints between tasks. We will mention this application in some of the exercises of the chapter.

Scheduling dependent tasks

We first disregard the problem of cooking (or compiling) time, and ask about the order in which we should be doing the tasks. We want to create a Scheduler object, that can tell us what to do at the same time. What operations should this object support?

  • add_task: we should be able to add a task, along with the task dependencies.
  • reset: indicating that we are about to run the sequences of tasks again.
  • available_tasks: this property should return the set of things that we can do in parallel.
  • mark_completed: used to notify the scheduler that we have completed a task. This should return the set of new tasks that we can do due to this task being completed; we can do these tasks in parallel alongside with the others that we are already doing.
  • all_done: returns True/False according to whether we have completed all tasks.

Choosing these operations is perhaps the most important step in the design of the scheduler. The operations need to have a simple, clear definition, and be useful in a concrete implementation of the service which will run the tasks. Of the above operations, they are all uncontroversial, except for the choice of behavior of completed. In theory, there is no need for completed to return the set of new tasks that can now be undertaken. If one remembers the set of tasks ?1T1 one can a do before a task ??1t∈T1 is completed, and marks ?t as completed, one can simply ask the scheduler for the set of tasks ?2T2 that can now be done, and add those in ?21?=?2({?}?1)T21t=T2∖({t}∪T1) for execution. However, we guess (as we have not yet written the task execution engine) that being told this set of tasks directly will simplify the design of the task execution engine.

Our scheduler class will be implemented in similar fashion to our graph class, with tasks corresponding to graph vertices, and dependencies represented as edges. The difference is that here, given a vertex (that is, a task) ?v, it will be useful to be able to access both:
  • the predecessors of ?v, that is, the tasks ?u that are declared as prerequisites of ?v, and
  • the successors of ?v, that is, the tasks ?u such that ?v was declared as a prerequisite for ?u.

When we add a task, we would have to initialize its set of successors and predecessors to empty. This is somewhat tedious, and so we resort to a defaultdict, which is a special type of dictionary such that, if the mapping for a key has not been defined, it returns a default value; in our case, an empty set. You can read more about defaultdict and related types here.

Our first implementation of the class is as follows. We let you complete the available_tasks and mark_completed methods.

from collections import defaultdict
import networkx as nx # Library for displaying graphs.
import matplotlib.pyplot as plt

class DependencyScheduler(object):

    def __init__(self):
        self.tasks = set()
        # The successors of a task are the tasks that depend on it, and can
        # only be done once the task is completed.
        self.successors = defaultdict(set)
        # The predecessors of a task have to be done before the task.
        self.predecessors = defaultdict(set)
        self.completed_tasks = set() # completed tasks

    def add_task(self, t, dependencies):
        """Adds a task t with given dependencies."""
        # Makes sure we know about all tasks mentioned.
        assert t not in self.tasks or len(self.predecessors[t]) == 0, "The task was already present."
        self.tasks.add(t)
        self.tasks.update(dependencies)
        # The predecessors are the tasks that need to be done before.
        self.predecessors[t] = set(dependencies)
        # The new task is a successor of its dependencies.
        for u in dependencies:
            self.successors[u].add(t)

    def reset(self):
        self.completed_tasks = set()

    @property
    def done(self):
        return self.completed_tasks == self.tasks


    def show(self):
        """We use the nx graph to display the graph."""
        g = nx.DiGraph()
        g.add_nodes_from(self.tasks)
        g.add_edges_from([(u, v) for u in self.tasks for v in self.successors[u]])
        node_colors = ''.join([('g' if v in self.completed_tasks else 'r')
                           for v in self.tasks])
        nx.draw(g, with_labels=True, node_color=node_colors)
        plt.show()

    @property
    def uncompleted(self):
        """Returns the tasks that have not been completed.
        This is a property, so you can say scheduler.uncompleted rather than
        scheduler.uncompleted()"""
        return self.tasks - self.completed_tasks

    def _check(self):
        """We check that if t is a successor of u, then u is a predecessor
        of t."""
        for u in self.tasks:
            for t in self.successors[u]:
                assert u in self.predecessors[t]

Question 1: implement available_tasks and mark_completed.

### Implementation of `available_tasks` and `mark_completed`.

def scheduler_available_tasks(self):
    """Returns the set of tasks that can be done in parallel.
    A task can be done if all its predecessors have been completed.
    And of course, we don't return any task that has already been
    completed."""
    ### YOUR CODE HERE

def scheduler_mark_completed(self, t):
    """Marks the task t as completed, and returns the additional
    set of tasks that can be done (and that could not be
    previously done) once t is completed."""
    ### YOUR CODE HERE

DependencyScheduler.available_tasks = property(scheduler_available_tasks)
DependencyScheduler.mark_completed = scheduler_mark_completed

Let us check if this works.

s = DependencyScheduler()
s.add_task('a', ['b', 'c'])
s.add_task('b', ['c', 'e'])
s._check()
s.show()

We note that in the above drawing, the edges denote temporal succession, that is, an edge from ?c to ?a means that ?c must happen before ?a. Let us execute the schedule manually.

Here are some tests for available_tasks and mark_completed.


### Simple tests. 5 points. 

s = DependencyScheduler()
s.add_task('a', [])
assert s.available_tasks == {'a'}

s = DependencyScheduler()
assert s.available_tasks == set()


### Slightly more complicated. 4 points. 

s = DependencyScheduler()
s.add_task('a', ['b', 'c'])
s.add_task('b', ['c', 'e'])
assert s.available_tasks == {'e', 'c'}

s = DependencyScheduler()
s.add_task('a', ['b'])
s.add_task('b', ['a'])
assert s.available_tasks == set()

### Now, let's test `mark_completed`.  Simple tests first. 2 points. 

s = DependencyScheduler()
s.add_task('a', [])
assert s.available_tasks, {'a'}
r = s.mark_completed('a')
assert r == set()

s = DependencyScheduler()
s.add_task('a', ['b'])
assert s.available_tasks == {'b'}
r = s.mark_completed('b')
assert r == {'a'}

### Slightly more complicated. 4 points. 

def assert_equal(a, b):
    assert a == b

s = DependencyScheduler()
s.add_task('a', ['b', 'c'])
assert_equal(s.available_tasks, {'b', 'c'})
r = s.mark_completed('b')
assert_equal(r, set())
assert_equal(s.available_tasks, {'c'})
r = s.mark_completed('c')
assert_equal(r, {'a'})

s = DependencyScheduler()
s.add_task('a', ['b', 'c'])
s.add_task('b', ['c', 'e'])
s.add_task('c', [])
assert_equal(s.available_tasks, {'c', 'e'})
r = s.mark_completed('e')
assert_equal(r, set())
r = s.mark_completed('c')
assert_equal(r, {'b'})
r = s.mark_completed('b')
assert_equal(r, {'a'})
r = s.mark_completed('a')
assert_equal(r, set())
assert_equal(s.available_tasks, set())


Executing the tasks

Here is an execution engine for our tasks with dependencies.

import random

def execute_schedule(s, show=False):
    s.reset()
    in_process = s.available_tasks
    print("Starting by doing:", in_process)
    while len(in_process) > 0:
        # Picks one random task to be the first to be completed.
        t = random.choice(list(in_process))
        print("Completed:", t)
        in_process = in_process - {t} | s.mark_completed(t)
        print("Now doing:", in_process)
        if show:
            s.show()
    # Have we done all?
    if not s.done:
        print("Error, there are tasks that could not be completed:", s.uncompleted)
s = DependencyScheduler()
s.add_task('a', ['b', 'c'])
s.add_task('b', ['c', 'e'])
s._check()
s.show()

下面还有很多文字,在这里就不列出来了.
发表在 python | 留下评论

Python昨晚我想你了_创意动画虚像效果文字_淡入文字

Python虚像淡入文字效果

要作品提供所有源代码与素材,关注公众号:李兴球Python,回复imissyou,即可得到下载地址.

Python昨晚我想你了虚像淡入文字效果

Python昨晚我想你了虚像淡入文字效果

import os
try:
    from gameturtle import *
except:
    import subprocess
    p = subprocess.Popen(["pip","install","gameturtle"],shell=True)
    from tkinter import messagebox
    t ='风火轮编程提示:'
    p = '''没有找到gameturtle模块,程序无法运行。\n
程序会自动进行安装,如果重新启动程序后还无法运行。\n
请手动安装gameturtle模块,方法:\n用cmd命令打开管理员窗口,\n然后输入pip install gameturtle\n
如果还是不知道操作,请加李兴球微信scratch8提供技术支持。\n
gameturtle模块详细说明,请见《Python海龟宝典》下册原理篇。'''
    messagebox.showwarning(t,p)
    
from winsound import PlaySound,SND_LOOP,SND_ASYNC
    
def xsleep(cv,t):
    start = time.time()
    while time.time() - start < t:
        cv.update()

def sprite_fade_in(sp):
    """sp:角色,本函数让角色淡入,前提是有很多透明度不同的造型"""
    sp.setindex(0)                                   # 设定造型索引号为0
    sp.show()
    for _ in range(sp._shape_amounts-1):
        sp.nextshape()
        sp._canvas.update()        
        time.sleep(0.008)
        
def make_one_sentence(string,canvas):
    """生成一个句子(一系列汉字角色),返回列表"""
    cors = [(50 + x*36,100) for x in range(len(string))]# 每个角色的坐标    
    sprites = []
    for char,xy in zip(string,cors):
        frames = [txt2image(char,fontsize=32,color=(255,0,255,alpha),
                  stroke=(2,(200,200,200,alpha))) for alpha in range(0,256,4)]
        s = Sprite(canvas,frames,visible=False,pos=xy)
        sprites.append(s)
    return sprites

def show_sone_sentence(sprites):
    """sprites:角色们"""
    cv = sprites[0]._canvas
    [sprite_fade_in(sprite) for sprite in sprites]
    xsleep(cv,1)
    [sprite.hide() for sprite in sprites]
    xsleep(cv,1)
     
def alt_background(bgsprite):
    """切换背景图片"""    
    cv = bgsprite._canvas    
    bgsprite.nextshape()
    cv.update()
    cv.after(100,lambda :alt_background(bg))

def move_advertise():
    if left.counter < 200:
        cv = left._canvas
        [cv.move(zi,0,-1) for zi in allzi]
        left.counter += 1
        cv.after(100,move_advertise)            
    
def move_heart_pic():
    cv = left._canvas 
    if left.xcor()<120:        
       left.addx(1)
       right.addx(-1)
       cv.after(100,move_heart_pic)
    else:
       left.counter = 0           # 仅为了不使用全局变量借用的一个属性 
       move_advertise()
    
if __name__ =='__main__':

    root = Tk()
    root.geometry('480x604+0+0')
    root.title('昨晚我想你了,关注公众号:李兴球Python,回复 imissyou 即可获得')
    cv = Canvas(width=480,height=604,bg='light gray')
    cv.pack()

    bgimages = [f"ims/{i:04d}.png" for i in range(1,90)]
    bgframes = [Image.open(im) for im in bgimages]
    bg = Sprite(cv,bgframes)      # 背景图片
    alt_background(bg)

    PlaySound('TRY想你伴奏.wav',SND_LOOP|SND_ASYNC)
    # 左右心合起来
    xsleep(cv,1)
    left = Sprite(cv,Image.open('heart_left.png'),pos=(120-240,302))
    right = Sprite(cv,Image.open('heart_right.png'),pos=(360+240,302))
    move_heart_pic()
    
    sentences =[ '昨晚我梦见你了。','不知道是我想你了。','还是你想我了。',
                 '醒来后很难过。','原来我们已经很久没见面了。',
                 '你还好吗?我想你了.....。']
    
    ft = ('黑体',12,'normal')
    zi1 = cv.create_text(240,472+200,text='本作品由Python编程实现',fill='lime',font=ft)
    zi2 = cv.create_text(240,502+200,text='所有源代码和素材皆免费赠送',fill='yellow',font=ft)
    zi3 = cv.create_text(240,532+200,text='关注公众号:李兴球Python',fill='white',font=ft)
    zi4 = cv.create_text(240,562+200,text='回复 imissyou 即可获得',fill='cyan',font=ft)
    allzi = [zi1,zi2,zi3,zi4]           # 所有要显示的字幕文本

    sprites = [make_one_sentence(s,cv) for s in sentences]
    while 1:[show_sone_sentence(s) for s in sprites]
          
 
发表在 gameturtle, numpy, pillow, python, tkinter | 标签为 , , , | 留下评论

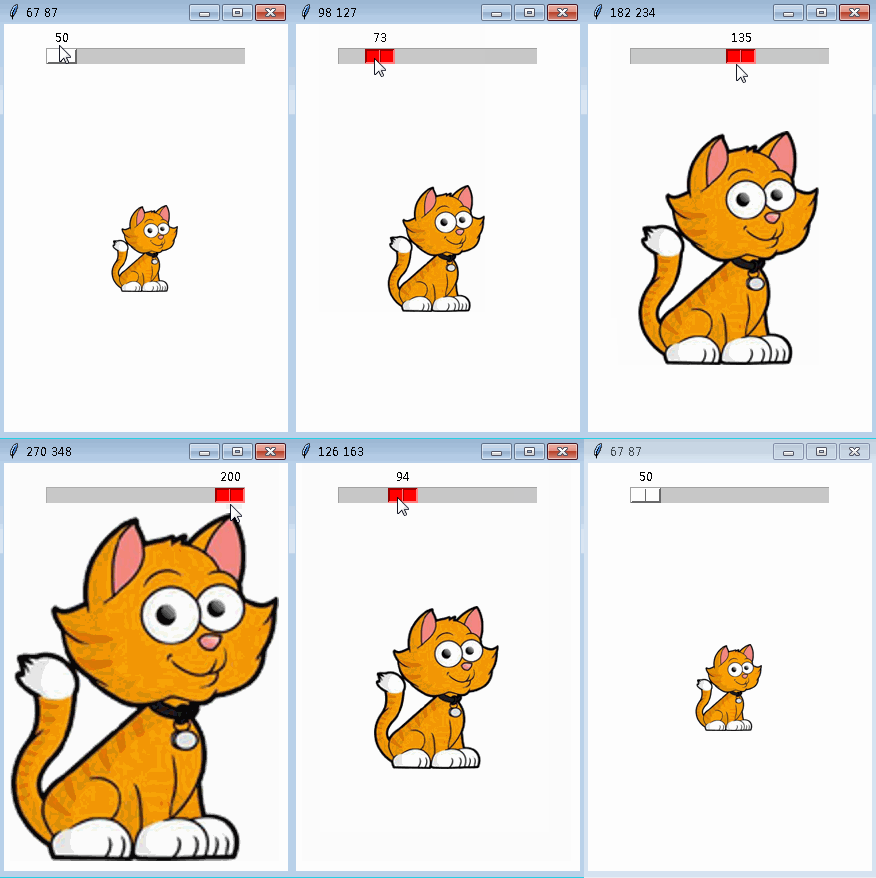
滑块调节透明度程序的问题(已解决)

这是需要透明化的图形, 
加上背景,为了衬托半透明效果。

python半透明调节器

python半透明调节器

本问题已经解决,具体请看文章最下面。

"""
  这个程序运行后,能通过滑块调节图形的透明度。
  
  本程序的问题在于,某些像素本来就是透明的,这些像素不需要调节!
  那么调节的时候就会把它变成不透明,所以呈现的效果就像演示的那样。
  本来透明的区域出现了图形,理想的结果就是这些透明像素不需要变化。
  那么如何解决这个问题呢?
"""
from tkinter import *
import numpy as np
from PIL import Image,ImageTk

def modify_alpha(event):
    global photo                        # 这个必需要全局变量
    a = s1.get()                        # 获取滑块值
    imarray = np.array(rawim)           # 从原始图转换成array
    imarray[:,:,3] = a                  # 修改alpha通道的值为a
    i = Image.fromarray(imarray)        # 从数组中加载为图像
    photo = ImageTk.PhotoImage(i)       # 形成tkinter能显示的图形对象
    cv.itemconfig(pic,image=photo)      # 重新配置pic的图形
    
root = Tk()                             # 新建根窗口 
cv = Canvas(width=640,height=360)       # 新建画布
cv.pack()                               # 放置画布

bgpic = ImageTk.PhotoImage(file='bg.png')# 背景图片,衬托透明
bg = cv.create_image(320,180,image=bgpic)# 创建背景item对象

rawim = Image.open('redturtle.png')      # 原始图形
photo = ImageTk.PhotoImage(rawim)        # 包装成画布能显示的图形对象
pic = cv.create_image(320,180,image=photo)# 在画布上创建图形

v = StringVar()
s1 = Scale(root,from_=0,to=255,orient=HORIZONTAL,command=modify_alpha,
           resolution=1,tickinterval=10,length=600,variable=v)
s1.pack()

root.mainloop()

本人已解决此问题,需要答案关注微信公众号:李兴球Python,回复 alphaquestion 即可获取答案。


或者成为会员,登陆即可得到核心代码:

成为会员后,登陆才能继续浏览!联系微信scratch8即可办理会员。
(会员专属:能浏览所有文章,下载所有带链接的Python资源。)

发表在 numpy, pillow, python, tkinter | 标签为 | 留下评论

三月里的小雨_python_turtle多媒体作品

亲爱的,

这是我看到窗外不停地下着小雨,有感而发用python的海龟模块编写的一个小程序,希望你喜欢。

回复我的公众号pythonxiaoyu,可得到此作品所有源代码与素材,赶快行动吧!

这些年来我还创造了很多Python创意程序,大多放在我的博客里,网址是: www.lixingqiu.com

__author__ = '李兴球'
__blog__ = 'www.lixingqiu.com'

import os
import re
import time
from turtle import *
from winsound import *

def xsleep(s):
    start = time.time()
    while time.time() - start< s:
        screen.update()
        
# 给原生海龟对象增加play方法
def RawTurtle_play(self,song_file,lrc_file=None,fontstyle=("",24,"normal"),loop=False ):
    """在海龟屏幕显示歌词并播放歌曲,本函数只支持无损wav文件。
       self:海龟对象或其子类的实例
       song_file:歌曲文件
       lrc_file:歌词文件,诸如:[00:00.00]月满西楼
                                 [01:00.12]红藕香残 玉簟秋
       上面这样的歌词文件。
       fontstyle为三元组,表示用write写字时的字体风格。
       loop:为假示不循环播放,为True表示循环播放
    """
    if loop == True:
        PlaySound(song_file, SND_ASYNC|SND_LOOP)# 异步循环播放音效
    else:
        PlaySound(song_file, SND_ASYNC)         # 异步播放音效
    if lrc_file==None:return                    # 无歌词文件则返回

    if not os.path.exists(lrc_file):
       print("歌词文件没有找到!")
       return
    f = open(lrc_file)                          # 打开歌词文件
    words_=f.readlines()                        # 读取歌词文件
    f.close()                                   # 关闭文件
    
    # 正则表达式检测歌词文件内容
    reg='\[\d\d:\d\d\.\d\d\]'
    result = re.findall(reg,"".join(words_))   # 如果有[00:00.33]这样的则会返回非空列表
    if not result:
       print("歌词文件貌似有问题!")
       return
     
    x,y = self.position()              # 歌词中央坐标
    fgcolor = self.pencolor()          # 歌词前景色 
    bgcolor = self.fillcolor()         # 歌词背景色
   
    words_list=[]                      # 歌词列表
    words_index=0                      # 歌词索引

    words_list=[ line.strip() for line in words_ if len(line)>1]
    words_lines=len(words_list)        

    def get_time_axis(index):
        """获取时间轴"""
        songtime=words_list[index]
        songtime=songtime.split("]")[0]
        songtime=songtime.split(":")
        songtimef=songtime[0][1:3]
        songtimef=int(songtimef)*60    
        songtimem=float(songtime[1])
        return int((songtimef+songtimem)*1000)
    
    words_index=0
    begin_time=time.time()
    def display_subtitle():
        """随着音乐显示歌词函数"""
        nonlocal words_index            # 歌词索引号
        nonlocal words_lines            # 歌词line数          
        current_time=time.time()
        running_time=(current_time-begin_time)*1000
        # 如果逝去的时间大于歌词文件中那个时间点就换歌词
        if running_time > get_time_axis(words_index):
            self.clear()
            display_words_=words_list[words_index].split("]")[1]
            self.goto(x,y)
            self.color(bgcolor)
            # 在左上一个单位印字
            self.write(display_words_,align='center',font=fontstyle)
            self.goto(x-1,y+1)
            self.color(fgcolor)
            self.write(display_words_,align='center',font=fontstyle)    
            words_index=words_index+1            
        if words_index < words_lines:        
            self.screen.ontimer(display_subtitle,100)
    # 调用显示标题的函数
    display_subtitle()
RawTurtle.play = RawTurtle_play
RawTurtle.addy = lambda self,dy:self.sety(self.ycor() + dy)

Sprite = Turtle

screen = Screen()
screen.setup(535,760)
screen.delay(0)

bgs = [f'frames/{i:04d}.png' for i in range(1,61)]
index = 0
stop = False
def alt_background():
    global index
    if stop:return
    screen.bgpic(bgs[index])
    index += 1
    index %= len(bgs)
    screen.ontimer(alt_background,100)
alt_background()

music = '张明敏 - 三月里的小雨.wav'
lrc = '歌词2.txt'
a = Sprite(visible=False)
a.penup()
a.speed(0)
a.color('blue')
a.sety(300)
a.play(music,lrc,loop=True)

xsleep(10)

for _ in range(560):
    screen.cv.move(screen._bgpic,0,1)
    xsleep(0.01)
    
stop = True
screen.bgpic('nopic')
bgs = [f'loves/{i:04d}.png' for i in range(1,4)]
stop = False
screen.bgcolor('black')
index = 0
alt_background()

for _ in range(570):
    screen.cv.move(screen._bgpic,0,-1)
    xsleep(0.01)

ft = ('楷体',14,'normal')
b = Turtle(visible=False)
b.penup()
b.speed(0)
b.sety(-280)
b.color('yellow')

infos = ['本程序主要由Python turtle模块编写而成',
         '作者:李兴球 @ 2021/3/5 www.lixingqiu.com',
         '关注公众号回复pythonxiaoyu得到此作品的源代码',
         '感谢,观看本程序运行结果。']
for info in infos:
    b.write(info,align='center',font=ft)
    b.addy(-25)

gf = '李兴球Python公众号.gif'
screen.addshape(gf)
g = Turtle(visible=False)
g.penup()
g.speed(0)
g.sety(-170)
g.shape(gf)
g.showturtle()

screen.mainloop()


发表在 python, turtle | 标签为 , , , | 留下评论

美国留学生Python项目作业与答案:Graphs图,判断图是树和数孤岛数量

以下全是问题描述,需要答案请联系博客微信scratch8

How should we represent a graph? A general principle of software development — really, of life — is: failing special reasons, always go for the simplest solution.
我们要怎么表示一张图呢? 在软件开发原则中, 和生活中的原则一样,用最简单的办法。
So our first attempt consists in storing a graph exactly according to its definition: as a set of vertices and a set of edges.
所以,我们根据图的定义,直接存储一些点和边来定义一张图。

class Graph(object):

    def __init__(self, vertices=None, edges=None):
        # We use set below, just in case somebody passes a list to the initializer.
        self.vertices = set(vertices or [])
        self.edges = set(edges or [])

g = Graph(vertices={'a', 'b', 'c', 'd', 'e', 'f', 'g'},
          edges={('a', 'b'), ('a', 'c'), ('a', 'd'), ('b', 'd'),
                 ('c', 'a'), ('c', 'e'), ('d', 'b'), ('d', 'c'),
                 ('f', 'g'), ('g', 'f')})

Great, but, how do we display graphs? And what can we do with them?
很好,可是我们如何显示图呢? 我们还能玩些啥?
Let’s first of all add a method .show() that will enable us to look at a graph; this uses the library networkx.
让我们添加一个show方法看看图到底长啥样,使用networkx模块即可!

import networkx as nx # Library for displaying graphs.

class Graph(object):

    def __init__(self, vertices=None, edges=None):
        # We use set below, just in case somebody passes a list to the initializer.
        self.vertices = set(vertices or [])
        self.edges = set(edges or [])

    def show(self):
        g = nx.DiGraph()
        g.add_nodes_from(self.vertices)
        g.add_edges_from(self.edges)
        nx.draw(g, with_labels=True)

g = Graph(vertices={'a', 'b', 'c', 'd', 'e', 'f', 'g'},
          edges={('a', 'b'), ('a', 'c'), ('a', 'd'), ('b', 'd'),
                 ('c', 'a'), ('c', 'e'), ('d', 'b'), ('d', 'c'),
                 ('f', 'g'), ('g', 'f')})
g.show()

One-Step Reachability and Graph Representations

What are conceivable operations on graphs? There are some basic ones, such as adding a vertex and adding an edge. These are easily taken care of.可以想像常见的对于图的操作是添加顶点和边,这是非常简单的。

import networkx as nx # Library for displaying graphs.

class Graph(object):

    def __init__(self, vertices=None, edges=None):
        # We use set below, just in case somebody passes a list to the initializer.
        self.vertices = set(vertices or [])
        self.edges = set(edges or [])

    def show(self):
        g = nx.DiGraph()
        g.add_nodes_from(self.vertices)
        g.add_edges_from(self.edges)
        nx.draw(g, with_labels=True)

    def add_vertex(self, v):
        self.vertices.add(v)

    def add_edge(self, e):
        self.edges.add(e)

Further, a graph represents a set of connections between vertices, so a very elementary question to ask is the following: if we are at vertex ? , can we get to another vertex ? by following one or more edges?
此外,图表示顶点之间的一组连接,因此需要问的一个非常基本的问题是:如果我们在顶点?,我们可以通过跟随一条或多条边到达另一个顶点?吗?
As a first step towards the solution, we want to compute the set of vertices reachable from ? in one step, by following one edge; we call these vertices the successors of ? .
作为求解的第一步,我们希望通过沿着一条边,一步计算从?可到达的顶点集;我们称这些顶点为?的后继顶点。
Writing a function g.successors(u) that returns the set of successors of ? is simple enough. Note that the code directly mimicks the mathematical definition:
编写一个函数g.successivers(u)来返回一组?的后续顶点非常简单。请注意,代码直接模拟了数学定义:
Successors(?)={?∈?∣(?,?)∈?}.

import networkx as nx # Library for displaying graphs.

class Graph(object):

    def __init__(self, vertices=None, edges=None):
        # We use set below, just in case somebody passes a list to the initializer.
        self.vertices = set(vertices or [])
        self.edges = set(edges or [])

    def show(self):
        g = nx.DiGraph()
        g.add_nodes_from(self.vertices)
        g.add_edges_from(self.edges)
        nx.draw(g, with_labels=True)

    def add_vertex(self, v):
        self.vertices.add(v)

    def add_edge(self, e):
        self.edges.add(e)

    def successors(self, u):
        """Returns the set of successors of vertex u"""
        return {v for v in self.vertices if (u, v) in self.edges}

g = Graph(vertices={'a', 'b', 'c', 'd', 'e', 'f', 'g'},
          edges={('a', 'b'), ('a', 'c'), ('a', 'd'), ('b', 'd'),
                 ('c', 'a'), ('c', 'e'), ('d', 'b'), ('d', 'c'),
                 ('f', 'g'), ('g', 'f')})
g.successors('a')

But there’s a rub. The method successors, as written, requires us to loop over the whole set of vertices. Because self.edges is a set, represented as a hash table, once we have a pair (u, v),
这有个问题就是,上面的方法遍历了所有的顶点,由于self.edges是个集合,用哈希表来存储的,
checking (v, u) in self.edges is efficient. But typically, graphs have a locality structure, so that each node is connected only to a small subset of the total vertices; having to loop over all vertices to find the successors of a vertex is a great waste. It is as if I asked you to what places you can get from San Francisco with a direct flight, and to answer, you started to rattle off all of the world’s cities, from Aachen, Aalborg, Aarhus, …, all the way to Zürich, Zuwarah, Zwolle, and for each city you checked if there’s a flight from San Francisco to that city! Clearly not the best method.

Given that our main use for graphs is to answer reachability-type questions, a better idea is to store the edges via a dictionary that associates with each vertex the set of successors of the vertex. The vertices will simply be the keys of the dictionary.

import networkx as nx # Library for displaying graphs.
from collections import defaultdict

class Graph(object):

    def __init__(self, vertices=None, edges=None):
        self.s = {u: set() for u in vertices or []}
        for u, v in (edges or []):
            self.add_edge((u, v))

    def show(self):
        g = nx.DiGraph()
        g.add_nodes_from(self.s.keys())
        g.add_edges_from([(u, v) for u in self.s for v in self.s[u]])
        nx.draw(g, with_labels=True)

    def add_vertex(self, v):
        if v not in self.s:
            self.s[v] = set()

    def add_edge(self, e):
        u, v = e
        self.add_vertex(u)
        self.add_vertex(v)
        self.s[u].add(v)

    @property
    def vertices(self):
        return set(self.s.keys())

    def successors(self, u):
        """Returns the set of successors of vertex u"""
        return self.s[u]
g = Graph(vertices={'a', 'b', 'c', 'd', 'e', 'f', 'g'},
          edges={('a', 'b'), ('a', 'c'), ('a', 'd'), ('b', 'd'),
                 ('c', 'a'), ('c', 'e'), ('d', 'b'), ('d', 'c'),
                 ('f', 'g'), ('g', 'f')})
g.show()
print(g.successors('a'))

Graph Reachability

下面描述的是从一个点能到达的所有点的描述。
We now come to one of the fundamental graph algorithms, in fact, perhaps the most fundamental algorithm for graphs: computing the set of vertices reachable from a given starting vertex. Exploring what is reachable from a graph vertex is a truly basic task, and variations on the algorithm can be used to answer related questions, such as whether a vertex is reachable from a given starting vertex.

The algorithm keeps two sets of vertices:

The set of open vertices: these are the vertices that are known to be reachable, and whose successors have not yet been explored.
The set of closed vertices: these are the vertices that are known to be reachable, and whose successors we have already explored.
Intially, the set of open vertices contains only the starting vertex, and the set of closed vertices is empty, as we have completed no exploration. Repeatedly, we pick an open vertex, we move it to the closed set, and we put all its successor vertices — except those that are closed already — in the open set. The algorithm continues until there are no more open vertices; at that point, the set of reachable vertices is equal to the closed vertices.

If there is one graph algorithm that you must learn by heart, and that you should be able to write even when you hang upside down from monkeybars, this is it.

Let us write the algorithm as a function first.

def reachable(g, v):
    """Given a graph g, and a starting vertex v, returns the set of states
    reachable from v in g."""
    vopen = {v}
    vclosed = set()
    while len(vopen) > 0:
        u = vopen.pop()
        vclosed.add(u)
        vopen.update(g.successors(u) - vclosed)
    return vclosed
print(reachable(g, 'a'))
print(reachable(g, 'g'))

To visualize the algorithm, let us write a version where at each iteration, open vertices are drawn in red and closed ones in green。下面写了一个可视化的函数,可以显示。

import matplotlib.pyplot as plt
def color_draw(g, vopen, vclosed):
    gg = nx.DiGraph()
    gg.add_nodes_from(g.vertices)
    gg.add_edges_from([(u, v) for u in g.vertices for v in g.successors(u)])
    node_colors = ''.join([('r' if v in vopen else 'g' if v in vclosed else 'b')
                           for v in g.vertices])
    nx.draw(gg, with_labels=True, node_color=node_colors)
    plt.show()

def reachable(g, v):
    """Given a graph g, and a starting vertex v, returns the set of states
    reachable from v in g."""
    vopen = {v}
    vclosed = set()
    color_draw(g, vopen, vclosed)
    while len(vopen) > 0:
        u = vopen.pop()
        vclosed.add(u)
        vopen.update(g.successors(u) - vclosed)
        color_draw(g, vopen, vclosed)
    return vclosed

reachable(g, 'a')

Great! Let’s now endow our graph with a method that yields the vertices reachable from any given starting vertex.

import networkx as nx # Library for displaying graphs.

class Graph(object):

    def __init__(self, vertices=None, edges=None):
        self.s = {u: set() for u in vertices or []}
        for u, v in (edges or []):
            self.add_edge((u, v))

    def show(self):
        g = nx.DiGraph()
        g.add_nodes_from(self.s.keys())
        g.add_edges_from([(u, v) for u in self.s for v in self.s[u]])
        nx.draw(g, with_labels=True)

    def add_vertex(self, v):
        if v not in self.s:
            self.s[v] = set()

    def add_edge(self, e):
        u, v = e
        self.add_vertex(u)
        self.add_vertex(v)
        self.s[u].add(v)

    @property
    def vertices(self):
        return set(self.s.keys())

    def successors(self, u):
        """Returns true iff one can get from vertex v to vertex u by following
        one edge."""
        return self.s[u]

    def __eq__(self, other):
        """We need to define graph equality."""
        if self.vertices != other.vertices:
            return False
        for v, d in self.s.items():
            if d != other.s[v]:
                return False
        return True

    def __repr__(self):
        r = "Graph:"
        for v in self.vertices:
            r += "\n %r : %r" % (v, self.s.get(v))
        return r

    def show(self):
        g = nx.DiGraph()
        g.add_nodes_from(self.vertices)
        g.add_edges_from([(u, v) for u in self.vertices for v in self.s[u]])
        nx.draw(g, with_labels=True)

    def add_vertex(self, v):
        self.vertices.add(v)
        # We must be careful not to overwrite the successor relation
        # in case v might already be present in the graph.
        self.s[v] = self.s.get(v, set())

    def add_edge(self, e):
        """Adds an edge e = (u, v) between two vertices u, v.  If the
        two vertices are not already in the graph, adds them."""
        u, v = e
        self.vertices.update({u, v})
        # Initializes the successor function if needed.
        self.s[u] = self.s.get(u, set()) | {v}
        self.s[v] = self.s.get(v, set())

    def successors(self, u):
        """Returns the set of successors of a vertex u"""
        return self.s[u]

    def reachable(self, v):
        """Returns the set of vertices reachable from an initial vertex v."""
        vopen = {v}
        vclosed = set()
        while len(vopen) > 0:
            u = vopen.pop()
            vclosed.add(u)
            vopen.update(self.s[u] - vclosed)
        return vclosed

Testing the implementation

This seems to be a reasonable implementation. Let us do some tests, to check that everything works as expected. The nose tools are very handy for testing. We have written a _check function that enables us to test whether the definition of a graph is self consistent. Writing such consistency checks is very useful. In development, we may call them often. In production code, we may choose to call them at key points in the code, to prevent the propagation of errors to distant places in the code.

import random
vertices = list('abcdefghilmnopqrstuvz')

def random_vertices():
    """Returns a set of random vertices."""
    return set(random.choices(vertices, k=12))

def random_edges(vs):
    """Returns a set of random edges, given a set of vertices."""
    vxv = [(u, v) for u in vs for v in vs]
    return set(random.choices(vxv, k=min(len(vxv), 50)))

def random_graph():
    vs = random_vertices()
    e = random_edges(vs)
    return Graph(vertices=vs, edges=e)

for _ in range(100):
    g = Graph()
    vs = random_vertices()
    es = random_edges(vs)
    for e in es:
        g.add_edge(e)

for _ in range(100):
    vs = random_vertices()
    es = list(random_edges(vs))
    g1 = Graph(vertices=vs, edges=es)
    g2 = Graph(vertices=vs)
    g3 = Graph(vertices=vs)
    esp = es[:] # Creates a copy.
    random.shuffle(esp)
    for e in es:
        g2.add_edge(e)
    for e in esp:
        g3.add_edge(e)
    assert g1 == g2
    assert g1 == g3

Graph Operations

图的操作
What are useful, general graph operations we may implement? Here are a few.

Union and intersection.
Induced: given a graph ?=(?,?) and a set of vertices ? , we return the graph with set of vertices ?∩? and set of edges ?∩(?∩?×?∩?) . This is the portion of the original graph that only involves vertices in V.
Difference: Remove, from a graph ? , all vertices in a specified set ? , along with the edges that have an endpoint in ? .
We will have you implement graph union.

import networkx as nx # Library for displaying graphs.

class Graph(object):

    def __init__(self, vertices=None, edges=None):
        self.s = {u: set() for u in vertices or []}
        for u, v in (edges or []):
            self.add_edge((u, v))

    def show(self):
        g = nx.DiGraph()
        g.add_nodes_from(self.s.keys())
        g.add_edges_from([(u, v) for u in self.s for v in self.s[u]])
        nx.draw(g, with_labels=True)

    def add_vertex(self, v):
        if v not in self.s:
            self.s[v] = set()

    def add_edge(self, e):
        u, v = e
        self.add_vertex(u)
        self.add_vertex(v)
        self.s[u].add(v)

    @property
    def vertices(self):
        return set(self.s.keys())

    @property
    def edges(self):
        return {(u, v) for u, d in self.s.items() for v in d}

    def successors(self, u):
        """Returns the set of successors of vertex u"""
        return self.s[u]

    def __eq__(self, other):
        """We need to define graph equality."""
        if self.vertices != other.vertices:
            return False
        for v, d in self.s.items():
            if d != other.s[v]:
                return False
        return True

    def __repr__(self):
        r = "Graph:"
        for v in self.vertices:
            r += "\n %r : %r" % (v, self.s.get(v))
        return r

    def show(self):
        g = nx.DiGraph()
        g.add_nodes_from(self.vertices)
        g.add_edges_from([(u, v) for u in self.vertices for v in self.s[u]])
        nx.draw(g, with_labels=True)

    def add_vertex(self, v):
        self.vertices.add(v)
        # We must be careful not to overwrite the successor relation
        # in case v might already be present in the graph.
        self.s[v] = self.s.get(v, set())

    def add_edge(self, e):
        """Adds an edge e = (u, v) between two vertices u, v.  If the
        two vertices are not already in the graph, adds them."""
        u, v = e
        self.vertices.update({u, v})
        # Initializes the successor function if needed.
        self.s[u] = self.s.get(u, set()) | {v}
        self.s[v] = self.s.get(v, set())

    def successors(self, u):
        """Returns the set of successors of a vertex u"""
        return self.s[u]

    def reachable(self, v):
        """Returns the set of vertices reachable from an initial vertex v."""
        vopen = {v}
        vclosed = set()
        while len(vopen) > 0:
            u = vopen.pop()
            vclosed.add(u)
            vopen.update(self.s[u] - vclosed)
        return vclosed

    def __and__(self, g):
        """Returns the intersection of the current graph with a
        specified graph g."""
        return Graph(vertices=self.vertices & g.vertices,
                     edges=self.edges & g.edges)

    def induced(self, vertex_set):
        """Returns the subgraph induced by the set of vertices vertex_set."""
        common_vertices = vertex_set & self.vertices
        gg = Graph(vertices = common_vertices)
        for v in common_vertices:
            gg.s[v] = self.s[v] & common_vertices
        gg._check()
        return gg

Question 1: Is a graph a tree?

问题一,判断图是否是一颗树,需要答案请联系微信pythonxia

A tree is a graph (?,?) with two special properties:

Every vertex has at most one incoming edge.
Either there are no vertices, or there is a vertex with no incoming edges, called the root, from which all other vertices are reachable.
If the second property does not hold, incidentally, the graph is called a forest.

Write an is_tree property that has value True if the graph is a tree, and has value False otherwise.

#@title Implementation of tree test

def graph_is_tree(self):
    """Returns True iff the graph is a tree."""
    ### YOUR CODE HERE

Graph.is_tree = property(graph_is_tree)
 ### 10 points: Tests for tree. 

g = Graph(vertices=[1, 2, 3], edges=[(1, 2), (1, 3)])
assert g.is_tree

g = Graph(vertices=[1, 2, 3], edges=[(1, 2), (2, 3), (1, 3)])
assert not g.is_tree

g = Graph(vertices=[1, 2, 3], edges=[(1, 3), (2, 3)])
assert not g.is_tree

g = Graph(vertices=['a', 'b'], edges=[('a', 'b')])
assert g.is_tree

g = Graph(vertices=['a', 'b'], edges=[('a', 'b'), ('b', 'a')])
assert not g.is_tree

### 10 points: More tests for `is_tree`

g = Graph()
assert g.is_tree

g = Graph(vertices=['a', 'b', 'c', 'd'], edges=[('a', 'b'), ('c', 'd')])
assert not g.is_tree

g = Graph(vertices=['a', 'b', 'c', 'd'], edges=[('a', 'b'), ('b', 'c'), ('c', 'd')])
assert g.is_tree

Question 2: Count the Islands

问题2,数孤岛,需要答案请联系博主微信pythonxia
You need to write a function count_the_islands, which counts the islands of 1s in a matrix whose elements can be 0 or 1. Two 1s belong to the same island if they are adjacent horizontally or vertically. For example, the matrix:

000000000
001000001
011110011
001100110
000000000
contains two islands:

………
..1……
.1111….
..11…..
………
and

………
……..1
…….11
……11.
………
As another example, the matrix:

00010000
00001100
00000000
contains two islands, one containing one 1, the other containing two 1s, as being adjacient via the diagonal only does not count.

Your task is simple: write a function that, given as input a numpy matrix containing 0/1, returns an integer, indicating the number of islands. You should not modify the matrix that is passed to you.

Hint
There are two ways to solve this problem.

The first way consists in translating the matrix into a graph, where each node represents a position in the matrix containing a 1. For instance, the second matrix above would be translated into a graph with nodes (0, 3), (1, 4), (1, 5). Edges connect adjacent nodes. You can then use the algorithm for graph reachability to tell which nodes belong to the same island.

The second way consists in implementing the reachability algorithm on top of the matrix directly.

You can choose either way.

Note that if you have a matrix a as above,

np.argwhere(a)
returns the positions in a that are 1.

import numpy as np

# You can define here any auxiliary function you wish. 
### YOUR CODE HERE

def count_the_islands(m):
    """Returns the number of islands in the matrix m."""
    # My solution takes 14 lines of code. 
    ### YOUR CODE HERE
### 4 points: simple tests. 

a = np.array([
    [0, 0, 1, 1, 0, 0],
    [0, 1, 1, 0, 0, 1],
    [0, 1, 0, 0, 1, 1]
])
assert count_the_islands(a) == 2

a = np.zeros((10, 12))
assert count_the_islands(a) == 0

a = np.ones((10, 12))
assert count_the_islands(a) == 1

a = np.array([
    [0, 0, 1, 1, 0, 0],
    [0, 1, 1, 0, 0, 1],
    [0, 1, 0, 0, 1, 1],
    [0, 1, 1, 0, 0, 1],
    [0, 1, 0, 0, 1, 1]

])
assert count_the_islands(a) == 2
assert count_the_islands(1 - a) == 2

a = np.identity(7)
assert count_the_islands(a) == 7
assert (a == np.identity(7)).all()

发表在 python | 留下评论

美国留学生关于Python机器学习自动梯度计算等的作业与答案

下面是一些文字叙述

ML in a nutshell

Optimization, and machine learning, are intimately connected. At a very coarse level, ML works as follows.

First, you come up somehow with a very complicated model ?̂ =?(?,?)y^=M(x,θ), which computes an output ?̂ y^ as a function of an input ?x and of a vector of parameters ?θ. In general, ?x?y, and ?θ are vectors, as the model has multiple inputs, multiple outputs, and several parameters. The model ?M needs to be complicated, because only complicated models can represent complicated phenomena; for instance, ?M can be a multi-layer neural net with parameters ?=[?1,,??]θ=[θ1,…,θk], where ?k is the number of parameters of the model.

Second, you come up with a notion of loss ?L, that is, how badly the model is doing. For instance, if you have a list of inputs ?1,,??x1,…,xn, and a set of desired outputs ?1,,??y1,…,ym, you can use as loss:

?(?)=?=1?||???̂ ?||=?=1?||???(??,?)||.L(θ)=∑i=1n||yi−y^i||=∑i=1n||yi−M(xi,θ)||.

Here, we wrote ?(?)L(θ) because, once the inputs ?1,,??x1,…,xn and the desired outputs ?1,,??y1,…,yn are chosen, the loss ?L depends only on ?θ.

Once the loss is chosen, you decrease it, by computing its gradient with respect to ?θ. Remembering that ?=[?1,,??]θ=[θ1,…,θk],

??=[??1,,???].∇θL=[∂L∂θ1,…,∂L∂θk].

The gradient is a vector that indicates how to tweak ?θ to decrease the loss. You then choose a small step size ?δ, and you update ?θ via ?:=????θ:=θ−δ∇θL. This makes the loss a little bit smaller, and the model a little bit better. If you repeat this step many times, the model will hopefully get (a good bit) better.

Autogradient

The key to pleasant ML is to focus on building the model ?M in a way that is sufficiently expressive, and on choosing a loss ?L that is helpful in guiding the optimization. The computation of the gradient is done automatically for you. This capability, called autogradient, is implemented in ML frameworks such as TensorflowKeras, and PyTorch.

It is possible to use these advanced ML libraries without ever knowing what is under the hood, and how autogradient works. Here, we will insted dive in, and implement autogradient.

Building a model ?M corresponds to building an expression with inputs ?x?θ. We will provide a representaton for expressions that enables both the calculation of the expression value, and the differentiation with respect to any of the inputs. This will enable us to implement autogradient. On the basis of this, we will be able to implement a simple ML framework.

We say we, but we mean you. You will implement it; we will just provide guidance.

下面是要完成的问题,第一个是编写自动梯度计算的函数。本人已完成所有作业,需要答案的请联系本人。

Question 1 With these clarifications, we ask you to implement the compute_gradient method, which again must:
Question 2: Rounding up the implementation
Question 3: Implementation of the fit function


发表在 python | 标签为 , , | 留下评论

Python之禅字幕显示_仿抖音渐显文字

大家好,我是萍乡李兴球,专业从事Python教研的,主要方向为Python创意程序的编写与教学。编程是细活,在本次要讲的程序中,我们要听到一首曲子。它是日本民谣四季歌。让我们先来听一下这首歌曲吧。

下面是歌词:

喜爱春天的人儿啊 心地纯洁的人,象紫罗兰的花儿一样,是我知心的朋友。
喜爱夏天的人儿啊 意志坚强的人,象冲击岩石的波浪一样,是我敬爱的父亲。
喜爱秋天的人儿啊 感情深重的人,象抒发爱情的海涅一样,是我心上的人。
喜爱冬天的人儿啊 胸怀宽广的人,象融化冰雪的大地一样,是我亲爱的母亲。

李兴球Python公众号四季歌背景

相信能慢慢地聆听完这首歌的人,都是有耐心的人,恭喜你,已经具备学习编程的重大品质之一了!

李兴球Python公众号女人打太极拳

所谓,快不如慢,意思就是说,我们有时候需要慢,才能体会到过程中的乐趣。在我们上网的时候,有时候网速很慢,我们能看到图片是逐像素显示出来的。在本次程序介绍中,我们是人为地让一幅图形逐行像素地慢慢显示出来。就像下面这样:

本次编程需要用到的模块有兰姆派模块,即numpy模块。如果计算机中没有安装兰姆派模块,那么在命令提示符下使用pip install numpy即可安装。


还有就是要有枕头模块,即pillow模块。安装方法也一样,输入pip install pillow即可。

李兴球Python公众号枕头模块

最后,要有一个显示图形的模块,这里选用的是tkinter模块。当然用turtle模块也可以。

李兴球Python公众号萌小海龟

俗话说,打蛇打七寸,这里先说一下将要编写的程序的主要工作原理。

蛇李兴球Python公众号蛇

那就是用numpy模块的split命令把数组辟开成若干行,每一行都是一行像素!接下来就转换成高度只有一个像素的图形列表。看到这里,读者蒙了吧。我们先从简单的开始。

李兴球Python公众号使劲劈

下面用’red’,’orange’等来表示一个像素值!按照我老李的习惯,先上代码:

>>> import numpy as np
>>> cs = [['red','orange','yellow','green'],
          ['white','cyan','blue','magenta'],
          ['gray','blue','orange','lime']]
>>> colors = np.array(cs)                # 把cs转换成np二维数组
>>> a = len(colors)                      # a表示数组的行数,本例是3行
>>> rows = np.split(colors,a)            # 辟开为a行,
>>> rows                                 # rows是一个列表,存储了3行np数组
[array([['red', 'orange', 'yellow', 'green']], dtype='<U7'),
 array([['white', 'cyan', 'blue','magenta']], dtype='<U7'), 
array([['gray', 'blue', 'orange', 'lime']], dtype='<U7')] >>> rows[0]
array([['red', 'orange', 'yellow', 'green']], dtype='<U7') >>>

在上面的程序中,给兰姆派取了一个叫np的别名。有一个叫cs的嵌套列表,colors则是np二维数组。关键就是np.split命令,就是它把colors数组一行一行的辟开了!每一行都放在了rows列表中。也就是说rows[0]就是红橙黄绿,rows[1]就是白青蓝品红,rows[2]就是灰蓝橙亮绿!

在一幅图像中,我们把图像也辟开成一行一行的像素,然后把每行像素在tkinter的画布的不同位置显示出来,那么就能看到逐行显示图像的效果。下面就是核心函数!代码如下所示:

def split_image(pic):
    """pic是一张图片,返回图片的每行像素"""
    im = Image.open(pic)                          # 打开图形
    ims = np.array(im)                            # 转为数组
    rows = np.split(ims,len(ims))                 # 按行辟开
    return [Image.fromarray(row) for row in rows] # 返回每行 

接下来,我们只要把每一行像素在画布的不同位置显示即可。由于画布的坐标系和图像是一样的。所以,每行像素在画布显示的y坐标逐步加1即可。以下是逐行像素显示图形的所有代码!

"""
   逐行像素显示图形.py
"""
__author__ = '李兴球'
__blog__ = 'www.lixingqiu.com'
__date__ = '2021/2/20'

import time
import numpy as np
from tkinter import *
from PIL import Image,ImageTk

def split_image(pic):
    """pic是一张图片,返回图片的每行像素"""
    im = Image.open(pic)                          # 打开图形
    ims = np.array(im)                            # 转为数组
    rows = np.split(ims,len(ims))                 # 按行辟开
    return [Image.fromarray(row) for row in rows] # 返回每行 

root = Tk()                                       # 新建窗口
cv = Canvas(width=480,height=360,bg='white')      # 新建画布
cv.pack()                                         # 放置画布           

turtle = cv.create_image(240,180,image='')        # 创建图形对象

rows = split_image('turtle.png')                  # 调用函数辟开图
a = len(rows)                                     # 行数

ps = [ImageTk.PhotoImage(im) for im in rows]  # 包装每行为PhotoImage对象
items = [cv.create_image(240,180+i,image='') for i in range(a)]

for i in range(a):
    cv.itemconfig(items[i],image=ps[i])          # 配置一行像素
    cv.update()                                  # 更新画布显示
    time.sleep(0.1)                              # 等待0.1秒

root.mainloop()

在上面的代码中,ps列表是每行像素的PhotoImage包装。items则是所有要在画布上显示的图形!为什么要准备这么多图形的item?这是由于,虽然我们是显示一幅图,但是由于要慢慢地显示这幅图,所以把它拆成了很多很多的图像来显示。这些图的高度只有一个像素!宽度则和原图相同。

李兴球Python公众号一像素高

如果显示一张名为turtle.png图的宽度是220像素,高度是166像素。通过split命令及转换后,把它拆分成了166张图。它们的宽度都是220,高度都是1个像素。在最后的for循环中,就是重新配置每一个item编号的图形。

好了,上面已经讲了如何逐行像素的显示图形了。下面就是发挥想像力,制作的一个小作品。视频效果如下所示:

实现上面效果的程序有本次讲的程序稍有区别,主要是采用了面向对象编程的思想。在程序中设计了一个名叫Shower的类。它有display方法,实现慢慢地显示图形。它有disappear方法,实现慢慢地消失图形。关注公众号: 李兴球Python,回复pythonzhi可免费得到本程序源代码及所有素材。谢谢你认真阅读了我写的文章。

发表在 numpy, pillow, python, tkinter | 留下评论

轮换的彩点

python轮换的彩点

"""
   轮换的彩点.py
   本程序由于打的点越来越多,所以速度越来越慢,这个问题可以解决的。
   但这不是关键,关键是我们能看到颜色在往右边移动。
   比如,红色不断地往右移动,然后从左边又出现,如此循环。
"""
import turtle

pixels = ['red','orange','yellow','green','cyan']

turtle.delay(0)                        # 绘画延时
turtle.penup()                         # 抬起笔来
turtle.hideturtle()                    # 隐藏海龟
turtle.bgcolor('black')                # 背景为黑
turtle.setup(480,360)                  # 设定宽高

while True:                            # 当真
    turtle.home()                      # 回家 
    for c in pixels:                   # 每种颜色 
        turtle.dot(20,c)               # 用c色打点
        turtle.fd(20)                  # 前进20单位
    pixels = pixels[-1:] + pixels[:-1] # 修改列表
     

发表在 python, turtle | 留下评论

彩虹欢迎字幕_可做滚动背景turtle和tkinter版

李兴球python numpy彩虹欢迎字幕滚动背景


下面是tkinter版的完整源代码:

"""
   彩虹欢迎字幕_tkinter.py
   可用在游戏中做为滚动的背景。
   其中图片也可以用Image生成,这里用的是现成的图片。
"""
import numpy as np
from tkinter import *
from PIL import Image,ImageTk

root = Tk()

cv = Canvas(width=480,height=360,bg='black')    # 创建画布 
cv.pack()                                       # 放置画布

pic = '李兴球Python.png'                        # 李兴球Python公众号png图片
pic_im = Image.open(pic)                        # 打开图片
pic_np = np.array(pic_im)                       # 转换成numpy数组
pic_ph = ImageTk.PhotoImage(pic_im)             # 包装成tkinter能显示的图 

pic_item = cv.create_image(240,180,image=pic_ph)# 在画布上创建图形

while True:                                     # 当成立的时候
    pic_np = np.roll(pic_np,-2,axis=1)          # 在轴1上滚动像素  
    pic_im = Image.fromarray(pic_np)            # 从np数组加载成图像
    pic_ph = ImageTk.PhotoImage(pic_im)         # 转换成tkinter能显示的图
    cv.itemconfig(pic_item,image=pic_ph)        # 重新配置pic_item的图
    cv.update()                                 # 刷新画布显示 

本人也用海龟画图模块编写了同样效果的版本,以下是部分源代码,需要所有源代码请联系本人。

"""
   彩虹欢迎字幕_turtle.py
   可做滚动背景的一个turtle与numpy及枕头模块结合的程序。
   其中图片也可以用Image生成,这里用的是现成的图片。
"""
import turtle
import numpy as np
from PIL import Image,ImageTk

turtle.setup(480,360)
turtle.bgcolor('black')
turtle.delay(0)

pic = '李兴球Python.png'
pic_im = Image.open(pic)
pic_np = np.array(pic_im)

pass

成为会员后,登陆才能继续浏览!联系微信scratch8即可办理会员。
(会员专属:能浏览所有文章,下载所有带链接的Python资源。)

发表在 python, tkinter, turtle | 标签为 , | 留下评论

美国留学生的Python作业之interval,rectangle,region区间,矩形区域homework7

下面是题目,需要作业答案请联系本人微信scratch8

"""
## About This Homework 关于家庭作业

The homework consists of 12 questions, for a total of 86 points. 家作由12个问题组成,共86个要点。

In this module, we will write code to represent regions of space. 在本模块中,我们要写代码,表示空间中的区域。
We will represent a _region_ as the union of rectangles whose sides are parallel to the Cartesian axes.我们将使用一些和笛卡尔坐标系平等的矩形来表示区域。

Of course, this does not suffice to represent all possible regions of space,当然这并不能表示所有的空间区域。
but by using lots of small rectangles, we can at least approximate most (continuous, etc) regions. 但是靠细分矩形,我们能近似的表示大多数区域。

Since a region is the union of rectangles, let us turn our attention to rectangles. 由于区域由一些矩形组成,我们专注于矩形。

## Rectangles 矩形

A 1D rectangle is simply an interval.  一维矩形只是个间隔。
We can think of a 2D rectangle, rather than as a collection of vertices,我们认为2维矩形是间隔的集合。
as the intersection of two intervals: one for the x-axis, and one for the y-axis.由于是两个间隔,一个为x轴, 一个为y轴。
Similarly, a 3D rectangle can be thought of as the intersection of three intervals, on the x, y, and z axes.三维矩形就是在x,y,z三个轴上的间隔。
To compute the intersection of two rectangles, 计算矩形重叠,
we just need to compute the intersection of their intervals,我们只要计算间隔的重叠即可。
on the respective axes.  Thus, intervals provide a simple representation that generalizes well to multiple dimensions. 在各自的轴上,表示一个间隔非常简单,可以很好地推广到多个维度。
We start building our representation from intervals.  We then use lists of intervals to represent rectangles,我们将从如何表示一个间隔开始,用一系列间隔,来表示矩形。
and unions of rectangles to represent regions of space. 用多个矩形来表示一个区域。

## Intervals  间隔

An interval is defined by its two endpoints. 一个间隔用两个端点来定义。
We keep them sorted, which will make it (a lot) easier to operate on them. 这两个端点将进行排序,这样以后更方便操作。
"""

class Interval(object):

    def __init__(self, x0, x1):
        # 对端点进行排序,确保 x0 <= x1.
        x0, x1 = (x0, x1) if x0 < x1 else (x1, x0)
        assert x0 < x1 # No point intervals. self.x0 = x0 self.x1 = x1 @property def length(self): return self.x1 - self.x0 def endpoints(self): return (self.x0, self.x1) def __getitem__(self, i): """定义访问端点的方法.""" if i == 0: return self.x0 elif i == 1: return self.x1 raise KeyError() def __repr__(self): return "[{},{}]".format(self.x0, self.x1) """The main operations we need on intervals, to do anything interesting, are: “间隔”类需要的主要方法,在下面一一说明: * **Intersection.** 交叉 Given two intervals `i` and `j`, 给定两个间隔,i和j。 we want to define `__and__` for an interval so that `i & j` will be either `None`,if `i` and `j` have no intersection,如果没有交叉,i&j返回None。 or the interval corresponding to the intersection of `i` and `j`. 如果有交叉,就返回新的交叉区域的间隔。 * **Union.** 联合 The union of two intervals is not necessarily an interval; it could also be _two_ intervals, 两个间隔的联合不一定是一个间隔,或许是两个间隔。 if the original intervals are disjoint and there is a gap in between. 如果两个间隔是没有关联的,中间有间隙。 Thus, we define `__or__` so that `i | j` returns a _list_ consisting of 1 or 2 intervals. 那么,我们定义__or__方法,让i|j返回一个或者两个间隔的列表。 * **Difference.** 差集 The difference `i - j` is the portion of `i` that is not in `j`. 让i减去j,结果是保留i的,但去除i和j所相同的间隔。 The result is a _list_ of intervals, containing 0 intervals (if `j` includes `i`), 结果是个列表,如果j完全在i中,则是空列表。 one interval (if `j` does not overlap `i`, or if it overlaps only from one side of `i`),如果j不和i重叠,或者j在另一端和i重叠,则列表中就只有一个间隔。 or two intervals (if `j` falls in the middle of `i`). 如果j在i中间,则列表中有两个间隔。 * **Equality.** 相等 Two intervals are equal if, well, they are equal. 如果两个间隔(端点)都相等,则它们是相等的。 * **Membership.** 成员 We test for a point belonging to an interval. 我们测试一个点是否在间隔之间 In defining these operations, we disregard isolated points, and we blur the distinction between open and closed intervals. After all, we only care about representing regions of space, and so isolated points and things that have no extension, or no volume, are not a concern of ours. So for instance, if we subtract the interval $[3, 5]$ from $[0, 4]$, the result will be simply the interval $[4, 5]$: we do not track whether the interval is open or closed at 5. Likewise, point-wise intervals such as $[5, 5]$ are simply not considered. 在定义这些操作时,我们忽略了孤立点,模糊了开区间和闭区间的区别。毕竟,我们只关心表示空间的区域,因此没有扩展或没有体积的孤立点和事物不是我们关心的问题。例如,如果我们从$[0,4]$中减去区间$[3,5]$,结果就是区间$[4,5]$:我们不跟踪区间是在5处打开还是关闭。同样地,像$[5,5]$这样的逐点区间也不被考虑。 ## Question 1: Interval Equality 问题1,内部相等 Let us start by implementing equality. We leave this to you.让我们从实现相等开始,我们把这个问题留给你做。 """ ### Defining Equality def interval_equality(self, other): """如果内部数据相等,则返回真,否则返回假""" ### YOUR CODE HERE (下面是我写的代码,下同) Interval.__eq__ = interval_equality i = Interval(3, 5) j = Interval(4, 5) i == j # Tests for equality. 5 points. i = Interval(3, 5) j = Interval(4, 5) assert i != j assert Interval(5, 7) == Interval(5, 7) assert Interval(2.3, 3.4) == Interval(2.3, 3.4) """### Union We define union for you, to give you an example. 我们给你定义好了,这是给你一个例子 """ def interval_or(self, other): """Union of self and other. Returns a list of 1 or 2 non-overlapping intervals.""" Interval.__or__ = interval_or # The union of these two intervals is a list of two intervals. Interval(3, 5) | Interval(7, 10) # The union of these two intervals is a single interval. Interval(3, 5) | Interval(4, 10) """## Question 2: Interval Intersection The intersection of two intervals `i` and `j` consists either of a single interval, or `None`, if the two intervals have no intersection. We leave it to you to implement it. """ ### Interval intersection def interval_and(self, other): """Intersection; returns an interval, or None.""" ### YOUR CODE HERE Interval.__and__ = interval_and # These two intervals should have empty intersection assert Interval(3, 4) & Interval(5, 6) is None # These two intervals should have non-empty intersection. assert Interval(3, 10) & Interval(6, 20) == Interval(6, 10) # 5 points: tests for intersection. assert Interval(3, 4) & Interval(5, 6) is None assert Interval(3, 10) & Interval(6, 20) == Interval(6, 10) assert Interval(-3, 10) & Interval(4, 5) == Interval(4, 5) """## Question 3: Interval Membership Given an interval `i`, and a floating point number `x`, we can write a method `__contains__` of an interval, which checks if `x` belongs to the interval. In this way, writing `x in i` will return `True` if `x` belongs to `i`, and `False` otherwise. For the purpose of this method, you can consider an interval closed, so that 3 in Interval(3, 5) returns `True`. """ ### Membership of a point in an interval def interval_contains(self, x): ### YOUR CODE HERE Interval.__contains__ = interval_contains assert 3 in Interval(3, 5) assert not (1 in Interval(3, 5)) # 5 points: tests for interval membership. assert 3 in Interval(3, 5) assert 2 not in Interval(3, 5) assert 8 not in Interval(3, 5) """## Question 4: Interval Difference 内部差 For intervals `i`, `j`, the difference of `i - j` consists of 0, 1, or 2 non-overlapping intervals. Again, we leave the implementation to you. """ ### Interval difference def interval_sub(self, other): """Subtracts from this interval the interval other, returning a possibly empty list of intervals.""" ### YOUR CODE HERE Interval.__sub__ = interval_sub assert Interval(4, 6) - Interval(5, 8) == [Interval(4, 5)] assert Interval(0, 10) - Interval(4, 5) == [Interval(0, 4), Interval(5, 10)] # 5 points: tests for interval difference. assert Interval(4, 6) - Interval(5, 8) == [Interval(4, 5)] assert Interval(0, 10) - Interval(4, 5) == [Interval(0, 4), Interval(5, 10)] assert Interval(0, 2) - Interval(-3, 6) == [] assert Interval(0, 10) - Interval(0, 5) == [Interval(5, 10)] assert Interval(-4, -2) - Interval(-3, -2) == [Interval(-4, -3)] assert Interval(4, 5) - Interval(4, 5) == [] """Another way of testing this code is the following. Let's generate many random intervals $I_1$ and $I_2$. Denoting with $-$ the difference of intervals and with $\cap$ their intersection, and denoting the length of an interval $I$ by $l(I)$, the following invariant must be true: $$ l(I_1 - I_2) + l(I_2 - I_1) + 2l(I_1 \cap I_2) = l(I_1) + l(I_2) $$ To verify this, let us start by defining this total length function precisely. """ import numpy as np def total_length(x): if x is None: return 0. elif type(x) == list: return np.sum([i.length for i in x]) else: return x.length print(total_length(None)) i1 = Interval(0, 1) i2 = Interval(3, 5) print("i1:", total_length(i1)) print("i2:", total_length(i2)) print("i1+i2:", total_length([i1, i2])) # 5 points: more tests for interval difference. import random def test_random(): i1 = Interval(random.random(), random.random()) i2 = Interval(random.random(), random.random()) d1 = i1 - i2 d2 = i2 - i1 inters = i1 & i2 assert (total_length(d1) + total_length(d2) + 2. * total_length(inters) == i1.length + i2.length) for _ in range(100): test_random() """### Rectangles 现在,让我们来开发个小项目来表示矩形,用区间的交集表示。 Let us now develop a representation of a rectangle, in terms of intersection of intervals. 我们定义的程序能在任何维度上都能正常工作,而不是(打个比方说),只在3维空间有效。 We will phrase the definition in such a way that it works in any number of dimensions, storing the intervals as a list, as opposed to (say) storing the three intervals separately for 3D. """ import string class Rectangle(object): def __init__(self, *intervals, name=None): """A rectangle is initialized with a list, whose elements are either Interval, or a pair of numbers. It would be perhaps cleaner to accept only list of intervals, but specifying rectangles via a list of pairs, with each pair defining an interval, makes for a concise shorthand that will be useful in tests. Every rectangle has a name, used to depict it. If no name is provided, we invent a random one.""" self.intervals = [] for i in intervals: self.intervals.append(i if type(i) == Interval else Interval(*i)) # I want each rectangle to have a name. if name is None: self.name = ''.join( random.choices(string.ascii_letters + string.digits, k=8)) else: self.name = name def __repr__(self): """Function used to print a rectangle.""" s = "Rectangle " + self.name + ": " s += repr([(i.x0, i.x1) for i in self.intervals]) return s def clone(self, name=None): """Returns a clone of itself, with a given name.""" name = name or self.name + "'" return Rectangle(*self.intervals, name=name) def __len__(self): """Returns the number of dimensions of the rectangle (not the length of the edges). This is used with __getitem__ below, to get the interval along a dimension.""" return len(self.intervals) def __getitem__(self, n): """Returns the interval along the n-th dimension""" return self.intervals[n] def __setitem__(self, n, i): """Sets the interval along the n-th dimension to be i""" self.intervals[n] = i @property def ndims(self): """Returns the number of dimensions of the interval.""" return len(self.intervals) @property def volume(self): return np.prod([i.length for i in self.intervals]) print(Rectangle(Interval(3., 4.), Interval(1., 4.))) r = Rectangle(Interval(1., 2.), (5., 6.), name="my_rectangle") print(r) print(r.clone()) """### Drawing rectangles Before we go much further, it is useful to be able to draw rectangles. Rectangles can have any number of dimensions, and we will write here code to draw them on 2D, projecting away all other dimensions. """ import matplotlib import matplotlib.pyplot as plt import matplotlib.path as mpath import matplotlib.patches as mpatches from matplotlib.collections import PatchCollection matplotlib.rcParams['figure.figsize'] = (6.0, 4.0) def draw_rectangles(*rectangles, prefix=""): """Here, rectangles is a rectangle iterator; it could be a list, for instance.""" fig, ax = plt.subplots() patches = [] # We keep track of the limits. lo_x, hi_x = [], [] lo_y, hi_y = [], [] for r in rectangles: x0, x1 = r[0].endpoints() y0, y1 = r[1].endpoints() lo_x.append(x0) hi_x.append(x1) lo_y.append(y0) hi_y.append(y1) # Prepares the "patch" for the rectangle, see # https://matplotlib.org/api/_as_gen/matplotlib.patches.Rectangle.html p = mpatches.Rectangle((x0, y0), x1 - x0, y1 - y0) y = (y0 + y1) / 2. - 0.0 x = (x0 + x1) / 2. - 0.0 plt.text(x, y, prefix + r.name, ha="center", family='sans-serif', size=12) patches.append(p) # Draws the patches. colors = np.linspace(0, 1, len(patches) + 1) collection = PatchCollection(patches, cmap=plt.cm.hsv, alpha=0.3) collection.set_array(np.array(colors)) ax.add_collection(collection) # Computes nice ax limits. Note that I need to take care of the case # in which the rectangle lists are empty. lox, hix = (min(lo_x), max(hi_x)) if len(lo_x) > 0 else (0., 1.)
    loy, hiy = (min(lo_y), max(hi_y)) if len(lo_y) > 0 else (0., 1.)
    sx, sy = hix - lox, hiy - loy
    lox -= 0.2 * sx
    hix += 0.2 * sx
    loy -= 0.2 * sy
    hiy += 0.2 * sy
    ax.set_xlim(lox, hix)
    ax.set_ylim(loy, hiy)
    plt.gca().set_aspect('equal', adjustable='box')
    plt.grid()
    plt.show()

r1 = Rectangle((3., 5.), (1., 4.), name="A")
r2 = Rectangle((1., 4.), (2., 6.), name="B")
r3 = Rectangle((2., 3.5), (1.5, 5.), name="C")
draw_rectangles(r1, r2, r3)

"""There are three main operations on rectangles: intersection, union, and difference. 
Among them, only intersection is guaranteed to return another rectangle.
In general, the union of two rectangles is ... two rectangles,
and the difference between two rectangles is ... a whole lot of rectangles,
as we will see.

We let you implement rectangle equality, intersection, and membership of a point in a rectangle.  

**Equality:** Two rectangles $R$ and $T$ are equal if they have the same number of dimensions,
and if for every dimension $k$, the interval of $R$ along $k$ is equal to the interval of $T$ along $k$. For example, 

    Rectangle((2, 3), (4, 5)) == Rectangle((2, 3), (4, 5))
    Rectangle((2, 3), (4, 5)) != Rectangle((4, 5), (2, 3))
    Rectangle((2, 3), (4, 5)) != Rectangle((2, 3), (4, 5), (6, 7))
    
**Intersection:** The intersection is defined only if the rectangles have the same number of dimensions.
The intersection is computed by taking the intersection of the intervals of the two rectangles for corresponding dimensions. 

**Membership:** For an $n$-dimensional point $(x_0, x_1, \ldots, x_n)$ and an $n$-dimensional rectangle $R$, we have $(x_0, x_1, \ldots, x_n) \in R$ if the point is in the region $R$.  For instance: 

        (2.5, 4.5) in Rectangle((2, 3), (4, 5))
        (2, 3) in Rectangle((2, 3), (4, 5))
        (1, 3) not in Rectangle((2, 3), (4, 5))
        
If the point and the rectangle have different dimensions, you can raise a `TypeError`.

## Question 5: Rectangle Equality
"""

def rectangle_eq(self, other):
    ### YOUR CODE HERE


Rectangle.__eq__ = rectangle_eq

# 5 points: tests for rectangle equality. 

assert Rectangle((2, 3), (4, 5)) == Rectangle((2, 3), (4, 5))
assert Rectangle((2, 3), (4, 5)) != Rectangle((4, 5), (2, 3))
assert Rectangle((2, 3), (4, 5)) != Rectangle((2, 3), (4, 5), (6, 7))

"""## Question 6: Rectangle Intersection """

### Rectangle intersection

def rectangle_and(self, other):
    if self.ndims != other.ndims:
        raise TypeError("The rectangles have different dimensions: {} and {}".format(
            self.ndims, other.ndims
        ))
    # Challenge: can you write this as a one-liner shorter than this comment is?
    # There are no bonus points, note.  Just for the fun. 
    ### YOUR CODE HERE


Rectangle.__and__ = rectangle_and

# Let's see how your rectangle intersection works. 
r1 = Rectangle((2, 3), (0, 4))
r2 = Rectangle((0, 4), (1, 3))
draw_rectangles(r1, r2)
draw_rectangles(r1 & r2)

# 10 points: tests for rectangle intersection. 

r1 = Rectangle((2, 3), (0, 4))
r2 = Rectangle((0, 4), (1, 3))
assert r1 & r2 == Rectangle((2, 3), (1, 3))

r1 = Rectangle((2, 3), (0, 4))
r2 = Rectangle((0, 4), (1, 5))
assert r1 & r2 == Rectangle((2, 3), (1, 4))

r1 = Rectangle((-1, 5), (0, 6))
r2 = Rectangle((0, 4), (-1, 3))
assert r1 & r2 == Rectangle((0, 4), (0, 3))

r1 = Rectangle((2, 6), (0, 4))
r2 = Rectangle((0, 6), (0, 3))
assert r1 & r2 == Rectangle((2, 6), (0, 3))

"""## Question 7: Point Membership in a Rectangle"""

### Membership of a point in a rectangle.

def rectangle_contains(self, p):
    # The point is a tuple with one element per dimension of the rectangle.
    if len(p) != self.ndims:
        raise TypeError()
    ### YOUR CODE HERE (下面的代码只适合二维,需要改成和维数无关,请参考上面的自行修改)


Rectangle.__contains__ = rectangle_contains

# 5 points: tests for membership. 

assert (2, 3) in Rectangle((0, 4), (1, 5))
assert (0, 4) in Rectangle((0, 4), (4, 5))
assert (4, 5) in Rectangle((0, 4), (4, 5))
assert (0, 0, 0) not in Rectangle((3, 4), (0, 3), (0, 8))

"""## Regions

The problem with rectangles is that they are not closed under union: the union of two rectangles is not necessarily a rectangle.  

We want a representation for objects in space that is closed under union, intersection, and difference. 
To this end, we introduce _regions_, which are unions of rectangles. 

"""

class Region(object):

    def __init__(self, *rectangles, name=None):
        """A region is initialized via a set of rectangles."""
        self.rectangles = list(rectangles)
        if name is None:
            self.name = ''.join(
                random.choices(string.ascii_letters + string.digits, k=8))
        else:
            self.name = name

    def draw(self):
        draw_rectangles(*self.rectangles, prefix=self.name + ":")

    def __or__(self, other):
        """Union of regions."""
        return Region(*(self.rectangles + other.rectangles), name=self.name + "_union_" + other.name)

# Let us try.
r = Rectangle((0., 4.), (0., 4.), name="R")
t = Rectangle((1.5, 3.5), (1., 5.), name="T")

reg1 = Region(r, name="Reg1")
reg2 = Region(t, name="Reg2")

(reg1 | reg2).draw()

"""## Question 8: Membership of a Point in a Region

A point belongs into a region if it belongs into some rectangle of the region.  We let you implement this. 
"""

### Membership of a point in a region

def region_contains(self, p):
    ### YOUR CODE HERE


Region.__contains__ = region_contains

assert (2, 1) in Region(Rectangle((0, 2), (0, 3)), 
                        Rectangle((4, 6), (5, 8)))
assert (2, 1) not in Region(Rectangle((0, 1), (0, 3)), 
                            Rectangle((4, 6), (5, 8)))

"""## Monte-Carlo Methods

There are some obvious things we might want to do with a region, namely, compute its volume,
compute whether two regions are equal, and compute the center of mass of a region. 

There are two approaches to this.

One is to develop a precise approach.  The problem in computing the volume of a region is that the rectangles in it might overlap.
To solve this, one can use our method for computing disjoing differences to put regions in _normal form_,consisting of non-overlapping rectangles. 
The idea is to keep a region as a list of non-overlapping rectangles.
When we add a rectangle $S$ from a region consisting of non-overlapping rectangles $R_1, \ldots, R_n$,
we first subtract from $S$ each of $R_1, \ldots, R_n$ in turn, getting as result a bunch of subrectangles of $S$;
we can then add these subrectangles to the region. 

But this sounds like work! 

An alternative is to develop a _randomized_ approach.

### A Monte-Carlo algorithm for region area

We can develop a randomized approach to measuring the area of a region as follows.  First,
we compute a _bounding box_ around it, which is simply the smallest rectangle guaranteed to contain the region.
We simply take, for each coordinate, the min and max values of that coordinate of any rectangle in the region. 

Once we have a bounding box $B$ for a region $\cal R$, we simply pick at random a lot of points $x \in B$,
using our Python `random` function.   We can use our test $x \in \cal R$, written in code as `x in my_region`,
to check whether a point $x$ belongs to region $\cal R$.  Let $N$ be the number of points we generate,
and $M$ be the number of points that end up in $\cal R$.  The volume $V_{\cal R}$ of the region $\cal R$ can be simply written as: 

$$
V_{\cal R} = \frac{M}{N} \cdot V_B \; ,
$$

where $V_B$ is the volume of the bounding box.  We will lead you to implement this code in steps. 

This method is an example of a [Monte Carlo method](https://en.wikipedia.org/wiki/Monte_Carlo_method),
a method which gives an answer to a question via repeated randomized experiments, rather than via mathematical computation,
which may be complex or unfeasible.

## Question 9: Compute Bounding Boxes

First, write a method `bounding_box` of a region, which returns the bounding box as a rectangle.
The bounding box is the smallest rectangle that contains the region.
"""

### Compute the bounding box of a region

def region_bounding_box(self):
    """返回区域最小包围矩形(绑定盒)
     Returns the bounding box of the region, as a rectangle.
    This returns None if the region does not contain any rectangle."""
    if len(self.rectangles) == 0:
        return None
    ### YOUR CODE HERE


Region.bounding_box = property(region_bounding_box)

# 10 points: tests for bounding boxes

reg = Region(Rectangle((0, 2), (1, 3)), Rectangle((4, 6), (5, 8)))
assert reg.bounding_box == Rectangle((0, 6), (1, 8))

reg = Region(
    Rectangle((0, 5), (4, 5), (1, 9)),
    Rectangle((4, 20), (-2, 3), (4, 21)),
    Rectangle((7, 99), (3, 7), (2, 3))
)
assert reg.bounding_box == Rectangle((0, 99), (-2, 7), (1, 21))

"""### Select random points from a rectangle

Next, we write a Rectangle method `random_point`, which returns a point of a rectangle chosen uniformly at random each time it is called.
To this end, it is easier first to write the corresponding method for an interval.  [In Python](https://docs.python.org/3/library/random.html#real-valued-distributions), 

    random.random()

returns a random value uniformly distributed between 0 and 1, and 

    random.uniform(a, b)

returns a random value uniformly distributed between a and b.  We can use this to define the interval method: 
"""

import random

def interval_random_point(self):
    return random.uniform(self.x0, self.x1)

Interval.random_point = interval_random_point

# Or if we wanted to be concise, we could just have written:

Interval.random_point = lambda self : random.uniform(self.x0, self.x1)

"""## Question 10: Random Point in a Rectangle

To select a random point from a rectangle, we just need to return a tuple formed by choosing a random point from each of the rectangle's intervals.
We leave this to you.  Remember that the intervals of a rectangle `self` are in `self.intervals`. 
"""

### Random point of a rectangle

def rectangle_random_point(self):
    ### YOUR CODE HERE


Rectangle.random_point = rectangle_random_point

# 3 points: random point of a rectangle.

r = Rectangle((0, 2), (1, 3))

for i in range(5):
    p = r.random_point()
    assert isinstance(p, tuple)
    assert len(p) == 2
    assert p in r
    print(p)

# 3 points: random point of a rectangle. 

import numpy as np

r = Rectangle((1, 2), (1, 6))
xs, ys = [], []
for _ in range(10000):
    p = r.random_point()
    assert p in r
    xs.append(p[0])
    ys.append(p[1])
assert np.std(xs) * 4.9 < np.std(ys) < np.std(xs) * 5.1

"""## Question 11: Volume via Monte Carlo

We are now ready to compute the volume of a region $\cal R$ using Monte Carlo methods.  The form of your code is: 

* Compute the bounding box $B$
* Pick $N$ points at random from $B$, and count the number $M$ of them that fall in $\cal R$. 
* Return $B.volume \cdot (M/N)$. 
"""

### Monte carlo Volume

def region_montecarlo_volume(self, n=1000):
    """Computes the volume of a region, using Monte Carlo approximation
    with n samples."""
    # The solution, written without any particular trick, takes 7 lines.
    # If you write a much longer solution, you are on the wrong track.
    ### YOUR CODE HERE

   
Region.montecarlo_volume = region_montecarlo_volume

"""The approximation becomes the more precise, the more samples we have. """

reg = Region(Rectangle((0, 4), (0, 2)), Rectangle((1, 2), (0, 4)))
reg.draw()
print("   10 samples:", reg.montecarlo_volume(n=10))
print("  100 samples:", reg.montecarlo_volume(n=100))
print(" 1000 samples:", reg.montecarlo_volume(n=1000))
print("10000 samples:", reg.montecarlo_volume(n=10000))

# 10 points: Volume via Monte Carlo

reg = Region(Rectangle((0, 1), (0, 4)), Rectangle((0, 4), (0, 1)))
reg.draw()
print("   10 samples:", reg.montecarlo_volume(n=10))
print("  100 samples:", reg.montecarlo_volume(n=100))
print(" 1000 samples:", reg.montecarlo_volume(n=1000))
print("10000 samples:", reg.montecarlo_volume(n=10000))

v = reg.montecarlo_volume(n=10000)
assert 6.2 < v < 7.8

"""We could quantify the standard deviation of the result, but it is beyond the scope of this class.

**Exercise:** Develop a Monte-Carlo method for computing the center of mass of a region.
The idea consists in sampling uniformly at random from the bounding box, retaining only the points that are in the region.
The center of mass of the sampled points in the region provides an approximation for the center of mass of the region.

## Question 12: A Monte-Carlo method for region equality

We can apply Monte Carlo methods also to the question of deciding region equality. 

One way to decide whether two regions $\cal R_1$ and $\cal R_2$ are equal consists in subtracting $\cal R_2$ from $\cal R_1$ and
checking that the result is empty, and then subtracting $\cal R_1$ from $\cal R_2$, and checking that it is also empty. 

But again, this sounds like work, and why work if we can just guess? 

The idea is to compute the bounding box $B$ of $\cal R_1 \cup \cal R_2$, and to sample points from $B$.
If we find a point $p$ that belongs to one region but not the other, we declare the regions distinct.
If we do not find such "distinguishing" point after $N$ trials, we declare the regions identical,
and the point serves as a witness to their difference. 

We leave the implementation to you.
"""

### Monte Carlo difference and equality between regions

def region_montecarlo_difference(self, other, n=1000):
    """Checks whether a region self is different from a region other, using
    a Monte Carlo method with n samples.  It returns either a point p that
    witnesses the difference of the regions, or None, if no such point is found."""
    # This can be done without hurry in 6 lines of code.
    ### YOUR CODE HERE


Region.montecarlo_difference = region_montecarlo_difference

def region_montecarlo_equality(self, other, n=1000):
    return self.montecarlo_difference(other, n=n) is None

Region.montecarlo_equality = region_montecarlo_equality

reg1 = Region(Rectangle((0, 4), (0, 2)), Rectangle((1, 2), (0, 4)), name="reg1")
reg2 = Region(Rectangle((0, 4), (0, 2)), Rectangle((1, 2), (1, 4)), name="reg2")
reg3 = Region(Rectangle((0, 4), (0, 2)), Rectangle((1, 2), (0, 3)), name="reg3")
reg1.draw()
reg2.draw()
reg3.draw()
print("reg1 vs reg2", reg1.montecarlo_equality(reg2))
print("reg1 vs reg2", reg1.montecarlo_equality(reg3))
print("reg1 vs reg3", reg1.montecarlo_difference(reg3))

# 10 points: Equality of regions via Monte Carlo. 

reg1 = Region(Rectangle((0, 4), (0, 2)), Rectangle((1, 2), (0, 4)), name="reg1")
reg2 = Region(Rectangle((0, 4), (0, 2)), Rectangle((1, 2), (1, 4)), name="reg2")
reg3 = Region(Rectangle((0, 4), (0, 2)), Rectangle((1, 2), (0, 3)), name="reg3")
assert reg1.montecarlo_equality(reg2)
assert not reg1.montecarlo_equality(reg3)

发表在 python | 标签为 , , | 留下评论

奇怪的Python代码,谁能帮我解释一下??

"""
   奇怪的Python代码,谁能帮我解释一下??
"""

x = 0
y = 0
def fun():                  # 定义fun函数
    x = 1            
    y = 1
    class Test:             # 定义Test类
        global x,y
        print(x,y)
        x = 10
fun()                       # 调用fun函数
"""

这个程序定义了两个全局变量,分别叫做x和y。
在名为fun的函数中,定义了同名的叫x,y的局部变量。
在fun函数里面的Test类。它会打印x,y的值,并且改变x的值。
在这个print语句中,打印的是全局变量的x和y的值还是局部变量的x,y的值呢?
如果打印的是全局变量的值,那么输出都为0。
如果打印的是fun内的局部变量的值,那么输出都应该为1。

如果在print语句前明确的申明x,y为global,那么肯定输出0,0。代码就像下面这样:

如果明确的申明x,y为nonlocal,那么肯定输出1,1。

代码就像下面这样:

可是本程序没有明确,结果也出乎意料,输出的都不是以上所设想的值。
“””

发表在 python | 留下评论

python创意程序_牛年快乐多媒体贺卡.py

李兴球Python牛年快乐多媒体贺卡


这是一个用python的海龟画图模块制作的贺卡。

下面是完整版代码:

"""
   牛年快乐多媒体贺卡.py
   本程序由Python海龟画图模块制作。
"""
import sys
import time
from turtle import *
from winsound import *
from bitmapfont import *
from winsound import PlaySound,SND_ASYNC,SND_LOOP

__author__ = '李兴球'
__date__ = '2021/2/8'

def xsleep(tm):
    """不断刷新屏幕等待一定的时间"""
    start = time.time()
    while time.time() - start < tm:
        screen.update()
        
def show_charactar(char,scale):
    """显示点阵汉字,返回宽高与坐标点"""
    alldots = []
    fontSet = open("./HZK16", "rb")
    arrays = getCharacterMatrixMode(fontSet, char)
    rows = len(arrays)
    cols = len(arrays[0])
    for row in range(rows):                                # 每一行
        for col in range(cols):                            # 每一列
            c = arrays[row][col]           
            if int(c):alldots.append([row*scale,col*scale])    
    height = rows * scale                                  # 字的高度
    width = cols * scale                                   # 字的宽度 
    return width,height,alldots

def display_chinese(char,c):
    """显示一个汉字,并且放在列表中"""
    w,h,zhong = show_charactar(char,10)
    # 求每个点应该呆的坐标,这样字刚好在屏幕中间
    cors = [[h//2-row,col-w//2] for row,col in zhong] 
    for cy,cx in cors:
        t = Turtle(visible=False,shape='circle')
        t.speed(0)
        t.penup()
        t.shapesize(0.5)
        t.goto(cx,cy)
        t.color('cyan',c)
        t.showturtle()
        time.sleep(0.01)
        
    xsleep(1)
    for t in screen.turtles():
        a = t.towards(0,0)
        t.setheading(a)
        t.right(180)
    c = 0
    while c < len(cors):
        for t in screen.turtles():
            if not t.isvisible():continue
            if t.distance(0,0)<350:
                t.fd(10)
            else:
                t.ht()
                c += 1

screen = Screen()
screen.setup(550,760)
screen.delay(0)
screen.colormode(255)
screen.bgcolor(0,0,0)

display_chinese('祝','black')
display_chinese('您','orange')
display_chinese('牛','yellow')
display_chinese('年','lime')
display_chinese('快','cyan')
display_chinese('乐','pink')

screen.bgcolor(254,0,0)
PlaySound('华语群星 - 恭喜发财+好日子+新年快乐+有钱没钱回家过年+年轻的朋友来相会.wav',SND_LOOP|SND_ASYNC)

frames = [f'ims/{i:04d}.png' for i in range(1,21)]
frames = [screen._image(im) for im in frames]
frames = [Shape('image',im) for im in frames]
[screen.addshape(str(i),frames[i]) for i in range(len(frames))]

# 背景不断切换程序段
background = Turtle(visible=False)
counter = 0
def alt_shape():
    global index,counter
    background.shape(str(index))
    index += 1
    index %= len(frames)
    if index==1 and counter>10:
        screen.ontimer(alt_shape,1000)
    else:
        screen.ontimer(alt_shape,100)
    counter += 1
index = 0
background.st()
alt_shape()

成为会员后,登陆才能继续浏览!联系微信scratch8即可办理会员。
(会员专属:能浏览所有文章,下载所有带链接的Python资源。)

发表在 python, turtle | 标签为 , | 留下评论

tkinter蓝光记事本.py

李兴球python可视化tkinter记事本开发

"""
   蓝光记事本.py
   一个简单的记事本,还没有添加右键菜单。
"""
import tkinter as tk
from tkinter import messagebox
from tkinter.filedialog import askopenfilename, asksaveasfilename

def open_file():
    """打开文件进行编辑"""
    filepath = askopenfilename( filetypes=[("Text Files", "*.txt"), ("All Files", "*.*")])
    if not filepath: return                    # 如果此文件不存在,直接返回
    txt_editor.delete(1.0, tk.END)             # 删除文本框所有内容
    with open(filepath, "r") as input_file:
        text = input_file.read()
        txt_editor.insert(tk.END, text)
    window.title(f"{filepath} 蓝光记事本")

def save_file():
    """保存文件"""
    filepath = asksaveasfilename(defaultextension="txt",
        filetypes=[("Text Files", "*.txt"), ("All Files", "*.*")], )
    if not filepath: return
    with open(filepath, "w") as output_file:
        text = txt_editor.get(1.0, tk.END)
        output_file.write(text)
    window.title(f"{filepath} 蓝光记事本")

window = tk.Tk()
window.title("蓝光记事本 www.lixingqiu.com")
window.rowconfigure(0, minsize=800, weight=1)
window.columnconfigure(1, minsize=800, weight=1)

成为会员后,登陆才能继续浏览!联系微信scratch8即可办理会员。
(会员专属:能浏览所有文章,下载所有带链接的Python资源。)

发表在 python, tkinter | 留下评论

tkinter旋转的二维码

李兴球Python旋转的二维码tkinter旋转图形


想学习如何在tkinter中旋转图形的瞧仔细了。

import time
from tkinter import *
from PIL import Image,ImageTk

root = Tk()
root.title('旋转的二维码')

cv = Canvas(root,width=600,height=600,bg='cyan')
cv.pack()

im = Image.open('python侠二维码.jpg').convert('RGBA')
pic = ImageTk.PhotoImage(im)
erweima = cv.create_image(300,300,image=pic)

成为会员后,登陆才能继续浏览!联系微信scratch8即可办理会员。
(会员专属:能浏览所有文章,下载所有带链接的Python资源。)

发表在 pillow, python, tkinter | 标签为 , | 留下评论

人造地球系统让人类文明充满整个宇宙之Python32768版(附 流浪地球作业参考答案)

嗨,大家好,我是萍乡李兴球。在萍乡专业教青少儿的Python计算机语言。
话说公元3721年2月5号,一艘编号为1024768的“人造地球”飞船在宇宙中游荡。所谓的“人造地球”,就是完美地模拟了地球上的生态环境,人们在里面可以自给自足,只要输入能量就能全自动运行的一艘宇宙飞船,其内核是迷你黑洞,能源源不断地产生能量。它已经实现量产,有一个火星般大的3D打印机在不断地生产着人造地球。巧合的是,这台3D打印机的后台运维程序是用Python编写的。那个时候,Python已经发展到了32768版本了。为了纪念Python计算机语言的设计者,所以并没有改变Python计算机语言的名字。更为奇妙的是,Python32768版竟然还能兼容2021年2月5号的程序。这是由于它早已经实现了超级人工智能,只要一扫,它就能调用相应年代版本的编译器对程序进行解释,从而运行出程序的结果。

人造太阳李兴球Python海龟继承举例

那个时候的人造地球,有的只有100个足球场那么大,有的有一个萍乡那么大,萍乡有多大?自己百度一下吧。还有的有一个江西省那么大。不过它们模拟的重力都是地球的重力,还模拟了春夏秋冬。当然,是全自动运行的程序在控制着。如果距离恒星太近了,那么会改变方向。如果离黑洞到了一定的距离,还会对黑洞进行分析。对规模不大的黑洞会采取捕获措施,即把它的能量吸光!下面是一个原始人编写的Python程序。在程序中,就会判断是否离太阳太近,如果太近,就会反弹回去。当然,读者可以把碰到黑洞的情形也自己发挥一下,我这里就抛个砖,希望引个玉出来。程序如下所示:

"""
   流浪地球作业之类的练习。
   在下面的程序中,新建了一个叫Earth的类。它继承自Turtle。
   实例化Earth后,让它不断地移动,碰到边缘会反弹,碰到红色的小太阳们也会反转方向。
   这4个红色的点,表示太阳。这4个太阳的代码非常相似,由于没有给它们写一个类,导致代码较长。
   请读者新建一个叫Sun太阳的类,让所有的太阳都从这个类进行实例化。
"""
import time
from random import uniform,randint
from turtle import Turtle,Screen

class Earth(Turtle):
    def __init__(self):
        Turtle.__init__(self,visible=False,shape='circle')
        self.penup()                            # 抬起笔来  
        self.speed(0)                           # 速度最快 
        self.color('blue')                      # 蓝 色 的
        self.setheading(uniform(1,360))         # 随机方向
        self.sw = self.screen.window_width()    # 屏幕宽度
        self.sh = self.screen.window_height()   # 屏幕高度        
        self.showturtle()
        
    def detect(self,tag):
        """检测同一类标签的对象,返回最短距离值"""
        # 所有的有label属性的海龟对象
        objs = [t for t in self.screen.turtles() if hasattr(t,'label')]
        # 所有的label属性的值为tag的对象
        objs = [t for t in objs if t.label==tag]
        # 所有的sun和它们到self的距离所形成的字典
        d = {sun: sun.distance(self) for sun in objs}
        suns = sorted(d, key=d.get)             # 按值排序,返回suns列表
        return d.get(suns[0])                   # 返回最小距离
    
    def bounce_on_edge(self):
        """碰到边缘就反弹"""
        if abs(self.ycor()) > self.sh/2:        # 超过上下边缘
            self.setheading(-self.heading())
        if abs(self.xcor()) > self.sw/2:        # 超过左右边缘
            self.setheading(180-self.heading())         

if __name__ == "__main__":
        
    screen = Screen()

    screen.bgcolor('black')
    screen.delay(0)
    sun1 = Turtle(shape='circle')
    sun1.penup()
    sun1.goto(132,76)
    sun1.label = 'sun'
    sun1.color('red')

    sun2 = Turtle(shape='circle')
    sun2.penup()
    sun2.goto(-132,76)
    sun2.label = 'sun'
    sun2.color('red')

    sun3 = Turtle(shape='circle')
    sun3.penup()
    sun3.goto(-132,-76)
    sun3.label = 'sun'
    sun3.color('red')

    sun4 = Turtle(shape='circle')
    sun4.penup()
    sun4.goto(132,-76)
    sun4.label = 'sun'
    sun4.color('red')

    e = Earth()

    while True:
        e.fd(1)
        e.bounce_on_edge()
        
        到恒星的距离 = e.detect('sun')
        if 到恒星的距离 < 20:
            a = 180 + randint(-10,10)
            e.right(a)
        time.sleep(0.001)

我们看到,在这个Python程序中,设计了一个Earth类。这个类是继承自海龟即Turtle类的。在这个类中最复杂的方法是detect方法。它有一个叫tag的参数。哎呀呀,这是什么意思。这个tag是标签的意思。它是检测同一类“标签”的对象的。如果离哪个最近,就返回到那个对象的距离。在这个方法中的第一个列表推导式,是把所有的有label属性的海龟对象形成一个列表。第二个列表推导式是把所有的label属性的值为tag的海龟对象形成一个列表。在这个方法中接下来有一个字典推导式。它的意思是每一个有label属性并且其值为tag的海龟对象,它们到self的距离的一一映射。在本例中,这些是一个个的太阳,也就是检测每个太阳到地球的距离,所形成的字典。键是太阳,值是它们到地球的距离。为了返回最小的值,对字典进行了排序,其实对字典进行排序是没有意义的。因为它天生无序。在detect方法中,用的b = sorted(d, key=d.get)语句。sorted命令是对序列进行排序的。它的关键词参数key指定用哪个值进行排序,返回的是一个列表。这个列表中就是一个个的小太阳了。其中列表的第一太阳,它离地球的距离就是最近的!

人造地球李兴球Python海龟继承举例

设计好了Earth类后。对它进行了测试,用Turtle命令新建了4个红色的小太阳。它们其实都是一个个海龟对象。注意给每个小太阳都自定义了一个叫label的属性。这代表的就是它的标签,在程序中是给它赋值为’sun’。在进入while循环之前,实例化了一个叫e的地球。在while循环中,让e不断地移动,碰到边缘就反弹。还会判断e到每个太阳的距离,如果到其中之一的距离小于20,那么就让e大概向后转。

好了,今天的程序讲解到这里大概结束了。我们在祖国的青山上继续等你哟。

看看你编写的类是不是像下面这样的,下面参考答案:

"""
   流浪地球作业参考答案。
   在下面的程序中,新建了一个叫Earth的类。它继承自Turtle。
   实例化Earth后,让它不断地移动,碰到边缘会反弹,碰到红色的小太阳们也会反转方向。
   有一个叫Sun太阳的类,所有的太阳都是从这个类进行实例化的。
   更多Python创意程序: https://www.lixingqiu.com
"""
import time
from random import uniform,randint
from turtle import Turtle,Screen

class Earth(Turtle):
    """继承自Turtle类的Earth类"""
    def __init__(self):
        Turtle.__init__(self,visible=False,shape='circle')
        self.penup()                            # 抬起笔来  
        self.speed(0)                           # 速度最快 
        self.color('blue')                      # 蓝 色 的
        self.setheading(uniform(1,360))         # 随机方向
        self.sw = self.screen.window_width()    # 屏幕宽度
        self.sh = self.screen.window_height()   # 屏幕高度        
        self.showturtle()
        
    def detect(self,tag):
        """检测同一类标签的对象,返回最短距离值"""
        # 所有的有label属性的海龟对象
        objs = [t for t in self.screen.turtles() if hasattr(t,'label')]
        # 所有的label属性的值为tag的对象
        objs = [t for t in objs if t.label==tag]
        # 所有的sun和它们到self的距离所形成的字典
        d = {sun: sun.distance(self) for sun in objs}
        suns = sorted(d, key=d.get)             # 按值排序,返回suns列表
        return d.get(suns[0])                   # 返回最小距离
    
    def bounce_on_edge(self):
        """碰到边缘就反弹"""
        if abs(self.ycor()) > self.sh/2:        # 超过上下边缘
            self.setheading(-self.heading())
        if abs(self.xcor()) > self.sw/2:        # 超过左右边缘
            self.setheading(180-self.heading())         

class Sun(Turtle):
    """继承自Turtle类的Sun类"""
    def __init__(self,x,y):
        Turtle.__init__(self,shape='circle',visible=False)
        self.penup()
        self.speed(0)
        self.label='sun'
        self.color('red')
        self.goto(x,y)
        self.showturtle()

def main():
    """主要执行函数"""

    cors = [(132,76),(-132,76),(-132,-76),(132,-76)]
    [Sun(x,y) for x,y in cors]                 # 按坐标实例化太阳
        
    screen = Screen()
    screen.delay(0)
    screen.bgcolor('black')    

    e = Earth()                                # 实例化一个地球

    while True:
        e.fd(1)
        e.bounce_on_edge()        
        到恒星的距离 = e.detect('sun')         # 检测到每一个太阳的距离
        if 到恒星的距离 < 20:
            a = 180 + randint(-10,10)
            e.right(a)
        time.sleep(0.001)
        
if __name__ == "__main__":

    main()
发表在 python, turtle | 标签为 , , | 留下评论

深夜,是什么把你的大脑搞成一团浆糊!再谈少儿编程!

大家好,我是萍乡李兴球,在江西省萍乡市安源区专业教青少儿的Python等计算机语言。

萍乡李兴球Python未来简史想像

现在社会分工愈加细化了。互联网把人类社会联系成一个密不可分的整体。
它也像是人的大脑的外部存储器了。听说有些人连电话号码都记不住了,完全交给了外部设备。什么都拿个手机或电脑去查,养成了这样的习惯。你说这是进步还是退步呢?人类社会的发展总是这样,有所谓的“进步”,就一定有所谓的“退步”。其实用这两个词语就是个“错误”。我们把这种现象叫演变,更合理一些,你说是吗?

人类社会演变到了越来越需要依赖所谓的科技了。精英们主导了这个科技社会的发展,设计创新了一个又一个,让人们爱不释手的玩意儿。抖音非常好玩,想看什么拈之即来。各种游戏也是非常好玩,让人们废寝忘食,让90后,00后们熬夜玩乐。让年轻的人们依旧趋之若鹜。

你现在会不会相信,有居心不良的人,会“故意”创新,让人们跟着他们的节奏跑,以便大赚money呢。我相信,在利益的驱使下,什么都有可能!实际上,“免费的”是最贵的。人们的注意力被吸走了,时间被吸走了,隐私被“偷”了。

想像一下“万物互联”的时代,连一块石头都有一个IP地址。不过,你再也不能任性了。想玩绿野迷踪,天上有好多“眼睛”盯着你呢。除非不要带手机。你的行踪早就通过各种网络活动,包括你经常买什么菜,在哪个小商贩买的,扫码的时候的具体地址都清楚。所以,要寻找到你是比以前年代容易了。想像一下某一天细如针眼的无人机能在晚上从窗口进入你的卧室,然后从耳朵里进入你的大脑,把你的大脑搞成一团浆糊吧。再想像一下,一个秘密种族灭绝行动已经计划十年了,一夜之间某个国家所有的国民都不再醒来吧。已经有视频进行了相关的演示,我也是看了视频才这么写的,也就是说,这个社会只会越来越复杂,根本不会越来越简单。

打个比方就是刷脸,推出这个功能的公司当然是说安全性极高一样,结果呢?刷一下脸银行里的钱就没了。任何一件事情都是道高一尺魔高一丈的。道理大家都懂,实践更显英豪。如果不懂,那么在社会你就是被人宰割的羔羊,会失去了自由。当然,社会能保障你天天有饭吃。要不然,就玩不下去了。前些年,有人靠关系好不容易开了个卖火车票的小店铺,可是如今没过几年这些小店铺全部关门大吉了。大家都懂吧,谁在抢他们的饭碗。或许可以说是程序员吧。如果那个卖火车票的的还没懂,那么他的下一个创业项目,由于不多久就实现了自动化,所以一样,被程序员抢去饭碗。如果懂了,那么主导权就在自己。所以人们需要不断学习提升自己,这是社会发展的原生动力之一。

如果懂了编程最好,知道原理了。我能编个程序,让我的手机随机定位,让别人找不到我多好哇。我再编个程序,让扫码的时候,截获取所传输的信息,修改一下,这样就不会泄露我的各种信息了。反正,懂了,我们就成了上帝了,可以反其道而行之。其实不懂编程也可以玩一玩,反反大数据,不要留下这么多数据或者故意留下错误的数据,逗逗那些所谓的“高级算法”。

那么,在这个纷繁复杂的社会,究竟哪个才是最重要学习的东西呢?父母为文盲的家长,终身也体会不到高等数学解题的乐趣。像现在的少儿学习编程这些就更不用说了。这里没有任何贬低的意思,但文化水平低的这一批父母们的孩子们下一代大概率的也是文化水平低的。因为他的眼界决定了上限。你让他给自己的孩子报编程班,他不懂,也就不敢给孩子报了。只有等大多数人才报了编程,才敢报。这也是很正常的现象,不过为时已晚。因为那个时候人人都学编程了,小孩学编程也不是什么稀奇事儿,所以也就落后了。二八定律总是存在,否则社会就不会发展了。

写到这里了,朋友们看到,噢,原来你在推广少儿编程啊。其实我不是推广,推广的重任早就落在了各大集团了。资本的力量很强大,可以决定小孩子们从小学什么。可以去和政府签协议,让那里的小孩子参加某某比赛,只能用某某他们自己开发的编程软件。在利益最大化前面,什么都得靠边站。关于这些,就不再深入下去了….

家长们还是要问,我的小孩为什么要学编程!那我就问,为什么要上美术课,毕竟几乎没有几个人会成为画家。还有为什么要上数学课,还要一直学,学到高等数学。毕竟绝大多数人只要知道加减乘除就行了。更花时间的还有英语,一门老外的语言,花大把时间去学习。结果呢?生活中我们还是讲中文,用到英文的机会很少。更要命的是,人工智能翻译的社会来了。全球化遇阻了,老外主动要学中文了,那我还学什么英文啊。手机里不是有app能自动给我翻译好吗。

其实,小孩学习编程不是为了成为程序员,就像学习音乐不是为了成为音乐家一样。学习编程有助于了解这个数字的运行规则。这个规则就是,现在的数字社会,一切都是程序在运行!未来所蕴含的无限机会,你会相信都和编程有关系吗? 高科技农业、工业化4.0、服务业,那种种的服务机器人。到时候比人还要灵活,不过他们也有坏的时候吧。机器人去修理机器人的时代还没这么快到来,只能让人去修理及编写程序。未来,噢,不,现在,程序已经是社会的基石了,知道编程,在未来就更能适合于社会的发展。

总之,从小学习编程,这是一个划得来的投资。懂编程的家长可以去下载Scratch。先自己先玩玩,然后就能教自己小孩了。这是图形化计算机语言。美国麻省理工学院开发的,不过现在上不了那个下载Scratch官网了。但是我这有所有版本都可以免费发给你。这个软件适合于8岁以上儿童学编程。学了Scratch图形化搭积木式的编程后,最适合的就是Python编程了,要先练好打字哦!关于Python,它俨然已经是深根叶茂的参天大树了。世人都晓编程好,派森话题少不了。好了,今天就唠叨到这里了,拜拜。
图片
对了,上面是我的商务微信号,欢迎世界各地朋友加一下。还有一个好消息就本人建了风火轮编程团购群,下面是A群。有兴趣可以加入,大家一起购买,价格才会降到最低哦。

风火轮编程python微信A群


江西省萍乡市欢迎你的到来!

发表在 python | 留下评论

pygame世界你好变色的文字

李兴球pygame世界你好变色的文字


很久没用pygame编程了,这两天竟然有两个人找我用pygame做几个作品,顺便复习一下。免费提供一个程序给读者。这个程序运行后会让文字的颜不断地变,用了pillow模块的ImageColor把颜色单词转换成RGB三元组。

import pygame
from PIL import ImageColor

cs = ['red','orange','yellow','green','cyan',
      'blue','purple','pink','magenta','lime']
cs = [ImageColor.getrgb(c) for c in cs]

pygame.init()
font = pygame.font.SysFont('simhei', 50)
text = font.render('世界,你好', True, cs[0])
window = pygame.display.set_mode((300, 100))         # 这是一张在内存中的图片
clock = pygame.time.Clock()                          # 新建时钟对象

i = 0
running = True
framecounter = 0
while running:
    framecounter += 1                                # 帧计数器 
    for event in pygame.event.get():                 # 遍历事件
        if event.type == pygame.QUIT:
            running = False

    window.fill(0)
    if framecounter % 20 == 0 :                     # 一定的时间才变色
       c = cs[i]
       i = i + 1
       i %= 8
       text = font.render('世界,你好', True, c)
    window.blit(text, text.get_rect(center = window.get_rect().center))
    pygame.display.flip()
    clock.tick(60)
    
pygame.quit()
 

发表在 pillow, pygame, python | 留下评论

scale组件缩放图像大小_tkinter显示与pillow图形处理

李兴球Pythonscale组件tkinter缩放图像pillow调整图像大小

李兴球Pythonscale组件tkinter缩放图像pillow调整图像大小

from tkinter import *
from PIL import Image,ImageTk

def resize(value):
    global catimg 
    k = int(value) / 100
    w,h = cat.size
    w,h = int(w * k),int(h * k)
    cat2 = cat.resize((w,h))
    root.title(cat2.size)
    catimg = ImageTk.PhotoImage(cat2)
    cv.itemconfig(pic,image=catimg)
    #cv.update()
    
root = Tk()

b1= Scale(root,length=200,orient=HORIZONTAL,from_=50,to=200,
            activebackground='red',command=resize)
b1.pack()

cat = Image.open('cat.png')
catimg = ImageTk.PhotoImage(cat)
cv = Canvas(root,width=280,height=360,bg='white')
cv.pack()

pic = cv.create_image(140,180,image=catimg,anchor='center')
resize('50')

root.mainloop()

发表在 pillow, python, tkinter | 留下评论

tkinter图像查看器

李兴球Python简易图像查看器tkinter


单击按钮,选择图像,就会显示图像。使用了文件对话框中的askopenfilename命令。

"""
图像查看器.py,不支持查看gif动图版
"""
from tkinter import *
from tkinter import filedialog

def _blankimage():
"""返回空白图形对象
"""
img = PhotoImage(width=1, height=1)
img.blank()
return img

def openimage():
global pmg
f = filedialog.askopenfilename(title='打开图像',
filetypes=[("PNG图像",".png"), ("JPG图像",".jpg"), ("GIF图像",".gif")])
pmg = PhotoImage(file=f)

cv.config(width=pmg.width(),height=pmg.height())
cv.itemconfig(pic,image=pmg)
return f

成为会员后,登陆才能继续浏览!联系微信scratch8即可办理会员。
(会员专属:能浏览所有文章,下载所有带链接的Python资源。)

发表在 python, tkinter | 留下评论

神童诗tkinter旋转文字版

李兴球tkinter旋转文字与字幕显示多媒体动画课件


这是2021年寒假Python班所上的一节课,文字会旋转哦。

import time
from tkinter import *
 
root = Tk()
cv = Canvas(root,width=800,height=600)
cv.pack()

im = PhotoImage(file='s.png')     # 加载s.png到内存
cv.create_image(400,300,image=im) # 在画布上创建图形
 
ft = ('楷体',8,'normal')          # 元组,在这里用来描述字体风格
title = cv.create_text(400,300,text='神 童 诗',fill='white',font=ft)

成为会员后,登陆才能继续浏览!联系微信scratch8即可办理会员。
(会员专属:能浏览所有文章,下载所有带链接的Python资源。)

发表在 python, tkinter | 留下评论

tkinter小鸟收集金币教学版

李兴球Python寒假tkinter课程小鸟收集金币鼠标指针


用鼠标指针操作小鸟去收集金币的一个例子。

from tkinter import *
from random import randint

def follow(event):
    cv.coords(bird,event.x,event.y)
    x1,y1,x2,y2 = cv.bbox(bird)
    items = cv.find_overlapping(x1,y1,x2,y2)
    for item in items:
        if item==bird:continue
        cv.delete(item)
    
root = Tk()

cv = Canvas(root,width=800,height=600,bg='lightblue')
cv.pack()

coin_image = PhotoImage(file='coin.png')
coins = []
for c in range(100):
    x = randint(0,800)
    y = randint(0,600)
    co = cv.create_image(x,y,image=coin_image)
    coins.append(co)

成为会员后,登陆才能继续浏览!联系微信scratch8即可办理会员。
(会员专属:能浏览所有文章,下载所有带链接的Python资源。)

发表在 python, tkinter | 留下评论

tkinter敌机们来了by李兴球

李兴球Python tkinter敌样们来了


一个简单的程序,首先讲画布坐标系,然后讲如何创建飞机,接着讲画布的move命令,最后让飞机不断地从上面移到下面。
程序编好后,如何让飞机从最上面的随机x坐标出现呢?还有,如何让多架敌机不断地飞出来呢?等同学们都编好后,提问题:
1.如何让飞机倒着飞?2.如何让飞机从左到右或者从右到左不断地移动?这是我们Python寒假班的一节课,以下是源代码:

import time
from tkinter import *
from random import randint

root = Tk()
root.title('tkinter敌机们来了by李兴球')

cv = Canvas(root,width=480,height=360,bg='lightblue')
cv.pack()

im = PhotoImage(file='f.png')
es = []
for x in range(10):
    x = randint(0,480)
    y = randint(-360,0)
    e = cv.create_image(x,y,image=im)
     
    es.append(e)

成为会员后,登陆才能继续浏览!联系微信scratch8即可办理会员。
(会员专属:能浏览所有文章,下载所有带链接的Python资源。)

发表在 python, tkinter | 标签为 | 留下评论

Python练习_tkinter画布create_line画格子图

李兴球Python画格子图tkinter create_line

import time
from tkinter import *

root = Tk()

cv = Canvas(root,width=480,height=360,bg='cyan')
cv.pack()

for r in range(10):
    cv.create_line(0,r * 36,480,r*36,fill='red',width=2)
 
for c in range(10):
    cv.create_line(c*48,0,c*48,360,fill='red',width=2)

发表在 python, tkinter | 标签为 | 留下评论

tkinter趣味颜色记忆游戏

李兴球Pythontkinter趣味颜色记忆游戏

"""
   tkinter趣味颜色记忆游戏.py
   
"""
from tkinter import *
from tkinter import simpledialog
from tkinter import messagebox

def clickme():
    global index
    global score
    s = simpledialog.askstring('版权所有','请输入颜色单词')
    if s == cs[index]:
        messagebox.showinfo('版权所有','回答正确,加10分')
        score = score + 10
    else:
        messagebox.showinfo('版权所有','回答错误')
    index = index + 1
    if index < 10:
       b.config(bg=cs[index])                       # 配置下一个颜色
    else:
        messagebox.showinfo('版权所有','游戏结束!')        
    b.focus_force()
        
messagebox.showinfo('hello','欢迎来到趣味颜色记忆游戏')
messagebox.showinfo('hello','本游戏用Python开发,目的是为了学习tkinter可视化编程')
messagebox.showinfo('hello','接下来请单击红色按钮,然后在弹出的对话框中输入相应的颜色单词。')

index = 0
score = 0
cs = ['red','orange','yellow','green','cyan',
      'blue','purple','pink','magenta','lime']

root = Tk()

b = Button(root,text='我是什么颜色的?',bg=cs[0],font=('',100,'normal'),command=clickme)
b.pack()
b.focus_force()

root.mainloop()

发表在 python, tkinter | 标签为 , , | 留下评论

Python tkinter create创建图形作业

李兴球Python tkinter create创建图形作业


画以上图形的代码在下面,请自行阅读,作业: 请说出以上图形中每个点的坐标。


from tkinter import *

root = Tk()                                         # 创建窗口

cv = Canvas(root,width=480,height=360,bg='white')   # 创建画布
cv.pack()                                           # 放置画布

cv.create_line(0,180,480,180,fill='gray',width=1)   # 创建线条
cv.create_line(240,0,240,360,fill='gray',width=1)   # 创建线条
cv.create_line(480,0,0,360,fill='gray',width=1)     # 创建线条
cv.create_line(0,0,480,360,fill='gray',width=1)     # 创建线条

# 以矩形(长方形)的左上角和右下角坐标来唯一确定一个矩形)
cv.create_rectangle(190,130,290,230,fill='cyan',width=2)  # 创建矩形

 # 创建圆形,以最小包围矩形的左上角和右下角来唯一确定一个矩形
cv.create_oval(190,130,290,230,fill='white',width=2)     # 创建矩形

cv.create_rectangle(0,0,100,100,fill='pink',width=2)     # 创建矩形
cv.create_rectangle(380,0,480,100,fill='pink',width=2)   # 创建矩形

cv.create_rectangle(0,260,100,360,fill='pink',width=2)   # 创建矩形
cv.create_rectangle(380,260,480,360,fill='pink',width=2) # 创建矩形

root.mainloop()

发表在 python, tkinter | 标签为 | 留下评论

代码简约的秒表

李兴球python turtle秒表


这个程序提供了秒表功能! 按一下蓝色的按钮,秒表会跑起来并且变成红色,再按一下红色的按扭,秒表会停止。

import turtle

# 下面提供了核心函数,其实要补充的代码很简单了,就当成一个作业,留给读者了,如果做不出来,可以扫码付款后再下载查看所有源码.
def start_run(x,y):
    global state    
    state = not state
    def run():
        nonlocal seconds
        seconds += 1
        w.clear()
        w.write(seconds,align='center',font=ft)
        if state==1:turtle.ontimer(run,10)
    if state==1:
        turtle.color('red')
        seconds= 0
        run()
    else:
        turtle.color('blue')
    turtle.update()
    
pass                                # 这里省略了一点代码.

成为会员后,登陆才能继续浏览!联系微信scratch8即可办理会员。
(会员专属:能浏览所有文章,下载所有带链接的Python资源。)

发表在 python, turtle | 标签为 , | 留下评论

turtle按键检测示例程序

李兴球Python海龟按键检测

"""
  turtle按键检测示例程序,程序运行后海龟不断向前移动。
  按空格键暂停或继续移动,按上下左右健改变方向
"""
import turtle

def stop_or_continue():
    global go
    go = not go

go = True
turtle.pensize(5)
turtle.color('red')
turtle.shape('turtle')
turtle.bgcolor('black')
turtle.onkeypress(stop_or_continue,"space")
turtle.onkeypress(lambda:turtle.setheading(90),"Up")
turtle.onkeypress(lambda:turtle.setheading(0),"Right")
turtle.onkeypress(lambda:turtle.setheading(-90),"Down")
turtle.onkeypress(lambda:turtle.setheading(180),"Left")

turtle.listen()

成为会员后,登陆才能继续浏览!联系微信scratch8即可办理会员。
(会员专属:能浏览所有文章,下载所有带链接的Python资源。)

发表在 python, turtle | 留下评论

求一个列表的所有非降子列表

本程序先生成一个列表的所有子列表,然后把那些子列表中数值越来越小的列表去掉,即求一个列表的所有非降子列表。

##from itertools import chain, combinations
##
##def all_sublists(l):
##    """itertools.chain()可接受一个或多个可迭代对象作为参数,
##       然后会创建一个迭代器,该迭代器可连续访问并返回提供的
##       每个可迭代对象中的元素;
##    """
##    return chain(*(combinations(l, i) for i in range(len(l) + 1)))

def nondecsub(l):
    from itertools import chain, combinations
    finish = []
    r = chain(*(combinations(l, i) for i in range(len(l) + 1)))
    for a in r:
       flag = True  #[-1,0,3,4,3,5]
       for i in range(len(a)-1):
           if a[i]>a[i+1]:
               flag = False
               break
       if flag:finish.append(list(a))
    return finish
           
arr = [4]
arr = [-1,0,3,4,3,5]
print(nondecsub(arr))

发表在 python | 留下评论

生成海龟图_pillow模块的ImageDraw的polygon方法使用示例

李兴球Python用pillow画海龟

from PIL import Image,ImageDraw

size = (49,37)

# 下面的坐标点来自turtle模块的以下命令
# screen._pointlist(t.turtle._item)
# 而图像的坐标原点在左上角,所以需要转换
cors = [(32.0, 0.0), (28.0, 4.0), (20.0, 2.0), (14.0, 8.0),
        (18.0, 14.0), (16.0, 18.0), (10.0, 12.0), (2.0, 14.0),
        (-6.0, 10.0), (-12.0, 16.0), (-16.0, 12.0), (-10.0, 8.0),
        (-14.0, 0.0), (-10.0, -8.0), (-16.0, -12.0), (-12.0, -16.0),
        (-6.0, -10.0), (2.0, -14.0), (10.0, -12.0), (16.0, -18.0),
        (18.0, -14.0), (14.0, -8.0), (20.0, -2.0), (28.0, -4.0)]
xy = []
for i in range(len(cors)):
    xy.append( (cors[i][0]+16,cors[i][1]+18) )
    
cors = tuple(xy)

print(cors)                         # 打印转换后的各坐标点

im = Image.new("RGBA",size)
d  = ImageDraw.Draw(im)
d.polygon(cors,fill='green')
im.save('c:/turtle.png')

发表在 pillow, python | 标签为 | 留下评论

红日初升_Python缓冲课

Python入门课体验课红日初升


这里提供一个简单的创意,适合做入门课,体验课,启蒙课,缓冲课,预热课,已编入风火轮编程的预热课当中了。

import turtle

turtle.setup(480,360)            # 设定窗口宽高
turtle.bgcolor('PapayaWhip')     # 设定背景颜色
turtle.title('红日初升')         # 设定标题

turtle.color('red')              # 设定海龟颜色
turtle.shape('circle')           # 设定造型为圆形
turtle.shapesize(5)              # 造型变大
turtle.stamp()                   # 盖图章
turtle.penup()                   # 抬笔 

turtle.right(90)                 # 右转90度
turtle.fd(140)                   # 前进140个单位
turtle.color('MediumSeaGreen')   # 设定海龟颜色
turtle.shape('square')           # 设定造型为方形 
turtle.shapesize(25,5)           # 变形

turtle.done()                    # 事件循环 

发表在 python, turtle | 留下评论

质数产生器

python prime number generator


定义一个产生器,能产生所有的质数!

def prime_numer_generator():
    i = 2
    while True:
        flag = True
        for x in range(2,i):
            if i%x==0:
                flag = False
                break
        if flag:yield i
        i += 1

# 下面是质数产生器测试代码
i = 0
for n in prime_number_generator():
    print(n)
    i += 1
    if i== 10:break


for n in prime_number_generator():
    if n== 33:
        raise Exception()
    elif n==37:
        break
发表在 python | 留下评论

关于纯少儿编程课程进化的自然选择

大家好,我是李兴球。我来说下纯粹的少儿编程,不加任何硬件的。我也一直在实践所谓的纯少儿编程。我从2010年开始探索少儿编程,最开始探索了各种Basic语言的方言。用basic语言编制各种游戏之类。2012年左右,我发现了Scratch,然后一直到现在还在教Scratch。很自然的,就会想到教完Scratch最适合的计算机语言是什么。开始的时候是教Visual Basic。后来不断在外国网站上找,找到了Python。一直到现在以教Python为主。有些学生是可以直接学习C++语言,但它不适合大众。Python在设计之初就有一套哲学,垫定了它能作为大众化普及的东西,是人人都应该学习的。社会也需要一种这样的普及性的通用型的计算机语言。这就是为什么国家已经在某些省份进行Python试点的原因之一。


Python就像Scratch和C++之间的桥梁。没有这座桥梁,大部分学生更难跨越到C++。所以学习了Scratch之后,绝大部分学生的最佳选择是Python而不是C++。这是一种“自然选择”的结果。有人或者会说,直接学C++,Python以后直接一看就会了。这有点像是说:直接学初中数学,那么以后看小学的数学一看就会了。是有少部分学生可以直接学C++,那一般都是学霸级别的,相当于跳级。对于大多数学生来说,先学Scratch,再学Python,用Python能创造有趣的作品,能激发兴趣,这是一条正确的道路。学习都是从简单到复杂,而不是反过来,否则就是拔苗助长,灭了大部分学生的兴趣。80年代就开始了信息学奥赛,到几十年都没有普及,到现在也没有普及。但现在有这么好的条件了,学编程的学生越来越多了,所以信息学奥赛参加的人数也会越来越多。最佳学习路径就是Scratch到Python到C++,其实本质就是为了学个算法,为国家提供顶尖计算机人才铺路。

Python承前启后的作用相当不错。一般至少可以学个两年,学后就对编程有了相当的理解,而且在学习的过程中也会涉及一些不太难的算法。以后用其它计算机语言学算法就容易很多,而算法不一定需要用计算机语言来描述,用流程图即可。有趣的是,Python这种非常接近自然语言的计算机语言,它的代码有时候甚至比伪代码还要简单。理想的少儿学习编程的路径或许是,二三年级Scratch,四五年级Python,六七年级C++,八九年级要中考根本没空学。其实学纯代码类的编程入门并不难,学生要克服的主要障碍是不会打字。

少儿编程不像数学,英语,语文,课程都经历了几十年甚至上百年的更新迭代。已经有了完整的师资体系建设,课程体系。我认为少儿编程在今后十几年中最多也就能取得个像体育或者音乐课美术课一样的地位。发展到今天的Scratch -> Python -> C++这样分阶段学习,这是数字社会发展的必然。这是三种计算机语言。具体到一年级上学期学什么编程,下学期学什么编程?二年级、三年级、四年级….一直到高中,大学。而且社会的发展又是这么越来越快速。但中小学阶段,主要学习的是相对不变的东西。这其中算法就是其中之一。Python一样可以写算法,而且更优雅简单,而算法才是沉淀下来基本不变的东西。计算机语言的发展趋势是越来越接近自然语言,既然有更简单的能描述算法的好工具,那么人们一定会趋于使用更简单的,懒是人的天性。

势,是不可挡的。顺势而大有作为的是英雄,能看到势的是预言家。随着Python大军的壮大,用Python写算法的人会越来越多,用Python教算法的人也会越来越多。所以像《Python数据结构与算法分析》这样类型的书会越来越畅销。

说到底,从算法的角度来看。无论使用哪种计算机语言,最终都是为了具体化一个算法,即描述算法的工具。哪种工具最简单易用,人们最终当然会选择最简单的,而淘汰那些复杂的冗余的。

发表在 python, scratch, 杂谈 | 留下评论

生成方块gif图,显示在海龟画图屏幕上。《Python海龟宝典》代码示例程序

不同颜色图章10×10阵列python海龟宝典代码示例程序


Python代码力求可读性高,要有注释,注释最好也对齐。

"""
   生成方块gif图,显示在海龟画图屏幕上。
   这个程序使用了pillow模块,生成gif图像,
   然后海龟会使用这些gif图作为自己的造型,
   最后海龟会依次切换造型图以10X10阵列显示在屏幕上。
   问题:所盖的图章静止不动,你能让它们动起来吗?
   联系李兴球,免费发送答案!
"""
import os                                    # 导入os模块
import turtle                                # 导入turtle模块
from PIL import Image                        # 从pillow模块导入Image 
from random import randint                   # 从随机模块导入randint

def makecolor():
    """产生RGB颜色三元组"""
    r = randint(0,255)                       # 红色份量
    g = randint(0,255)                       # 绿色份量
    b = randint(0,255)                       # 蓝色份量 
    return r,g,b                             # 返回rgb

def makegif(path,amounts):
    """在path路径下生成gif文件
       path:文件夹路径
       amounts:数量
    """
    size = (10,10)                           # gif文件分辨率
    images = []                              # 新建列表
    for i in range(amounts):
        filename = f"{path}{os.sep}{str(i)}.gif"    
        c = makecolor()                      # 产生颜色
        im = Image.new("RGBA",size,color=c)  # 新建图形对象
        im.save(filename)                    # 保存gif文件
        images.append(filename)              # 添加到列表        
    return images                            # 返回列表  

def main():
    """主要执行函数"""
    # 指定生成图片的文件夹,如果不存在,则创建它
    folder = os.getcwd() + os.sep + 'test'
    if not os.path.exists(folder):os.mkdir(folder)
    
    images = makegif(folder,100)             # 在folder生成100个gif文件
    [turtle.addshape(im) for im in images]   # 注册到造型字典

    i = 0                                    # 建立索引号
    turtle.ht()                              # 隐藏海龟对象
    turtle.penup()                           # 抬笔
    while i < 100:                           # 当i小于10的时候
        r = i // 10                          # 取行数
        c = i % 10                           # 取列数
        x = c * 20                           # 算x坐标
        y = r * 20                           # 算y坐标  
        turtle.goto(x,y)                     # 到达x,y坐标
        turtle.shape(images[i])              # 切换造型 
        turtle.stamp()                       # 盖图章
        i += 1                               # 索引号加1
    turtle.done()

if __name__ == '__main__':

    main()

联系李兴球,免费发送答案!

发表在 pillow, python, turtle | 标签为 , | 留下评论

练习除错程序_干货管理系统.py

""" 练习除错程序_干货管理系统.py
    本程序是一个有问题的程序,运行后直接显示拜拜。
    现要求修好它,然后增加一个名叫prices的列表。列表中存储每种商品的单价。
    并且 在输入的英文单词中可以输入total,当输入total的时候会显示商品总价。
    
"""
spb = ['西米','花生','枸杞','山药','麻花','腊肉','小鱼干'] # 商品表
amounts = [32,76,1024,10,20,30,133]                       # 数量表

print('/n'*5)                                             # 打印一些换行符号    
print("______________欢迎来到干货管理系统_______________\n\n")

while 1=='1':
    
    print('\n请输入以下单词:')
    
    s = input("append:添加商品,list:列出所有商品,exit:结束\n")
    if s == '':continue    
        
    elif s == 'append':
        name = input('请输入商品名称:')
        spb.append(name)
        
        am = input('请输入商品数量:')
        amounts.append(am)
        
        print('恭喜你,成功添加干货')
        
    elif s == 'list':
        for i in range(7):
            print(spb[i],amounts[i])
    elif s == 'exit':break

    else:print('输入错误,请重新输入')
    
print('拜拜')

发表在 python | 标签为 , | 留下评论