
本篇介绍的街机模块入门,这是创建2D视频游戏的一个Python库。译者:李兴球,原作者:Paul Vincent Craven。
python街机模块游戏库入门案例图片跳跃的小人对于学习编程的人来说,Python是一种出色的计算机语言,对于那些想“完成工作”而不想花大量时间来研究所谓样板代码上的人来说,它是非常不错的。Arcade是一个用于创建二维视频游戏的python库,它很容易地就能开始使用,并且在获得体验时非常有用。在本文中,我将解释如何开始使用Python和Arcade模块来编写视频游戏。
在教学生使用Pyaame游戏库后,我开始开发街机模块。我亲自使用Pygame教了将近10年,我开发了programmarcadegames.com网站进行Python游戏编程在线教学。Pygame很好,但最终我觉得我在浪费时间去弥补那些从未修复过的漏洞。
比如事件循环这样的编码,我觉得不必教了,这不再是我们编码的方式了。经常需要解释为什么y坐标是颠倒的。pygame很少更新,它是基于一个旧的SDL 1库,而不是像OpenGL这样更现代的库,所以我对Pygame的未来没有抱太大的希望。
我想要一个更容易使用、更强大的库,并使用了Python3的一些新特性,比如装饰和类型暗示。Arcade街机模块就是这样的,现在让我们开始入门吧。
安装:
和许多其他软件包一样,Arcade模块可通过pypi提供,这意味着您可以使用pip命令(或pipenv命令)安装Arcade。如果已经安装了python,则可能只需在Windows上打开命令提示符并键入:pip install arcade,或者在苹果机和Linux机器上通过以下命令安装:pip3 install arcade ,单击这个链接可查看更多的安装信息:http://arcade.academy/installation.html。
简单绘画:
您可以打开一个窗口,用几行代码创建简单的图形。让我们创建一个例子来画一个笑脸,如下图所示:
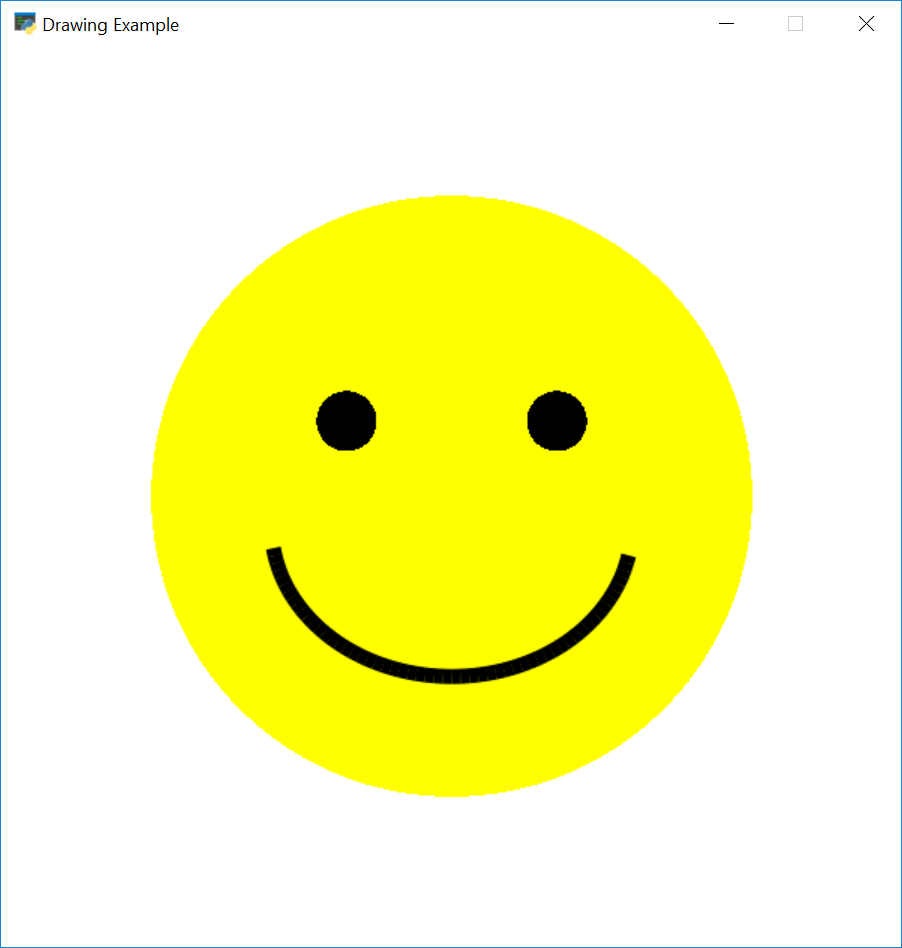
python街机游戏模块画笑脸
下面的脚本显示了如何使用Arcade的绘图命令来执行此操作。注意,您不需要知道如何使用类,甚至不需要定义函数。用快速的视觉反馈编程对于任何想开始学习编程的人都是很好的。
import arcade

# Set constants for the screen size
SCREEN_WIDTH = 600
SCREEN_HEIGHT = 600

# Open the window. Set the window title and dimensions (width and height)
arcade.open_window(SCREEN_WIDTH, SCREEN_HEIGHT, "Drawing Example")

# Set the background color to white.
# For a list of named colors see:
# http://arcade.academy/arcade.color.html
# Colors can also be specified in (red, green, blue) format and
# (red, green, blue, alpha) format.
arcade.set_background_color(arcade.color.WHITE)

# Start the render process. This must be done before any drawing commands.
arcade.start_render()

# Draw the face
x = 300
y = 300
radius = 200
arcade.draw_circle_filled(x, y, radius, arcade.color.YELLOW)

# Draw the right eye
x = 370
y = 350
radius = 20
arcade.draw_circle_filled(x, y, radius, arcade.color.BLACK)

# Draw the left eye
x = 230
y = 350
radius = 20
arcade.draw_circle_filled(x, y, radius, arcade.color.BLACK)

# Draw the smile
x = 300
y = 280
width = 120
height = 100
start_angle = 190
end_angle = 350
arcade.draw_arc_outline(x, y, width, height, arcade.color.BLACK, start_angle, end_angle, 10)

# Finish drawing and display the result
arcade.finish_render()

# Keep the window open until the user hits the 'close' button
arcade.run()
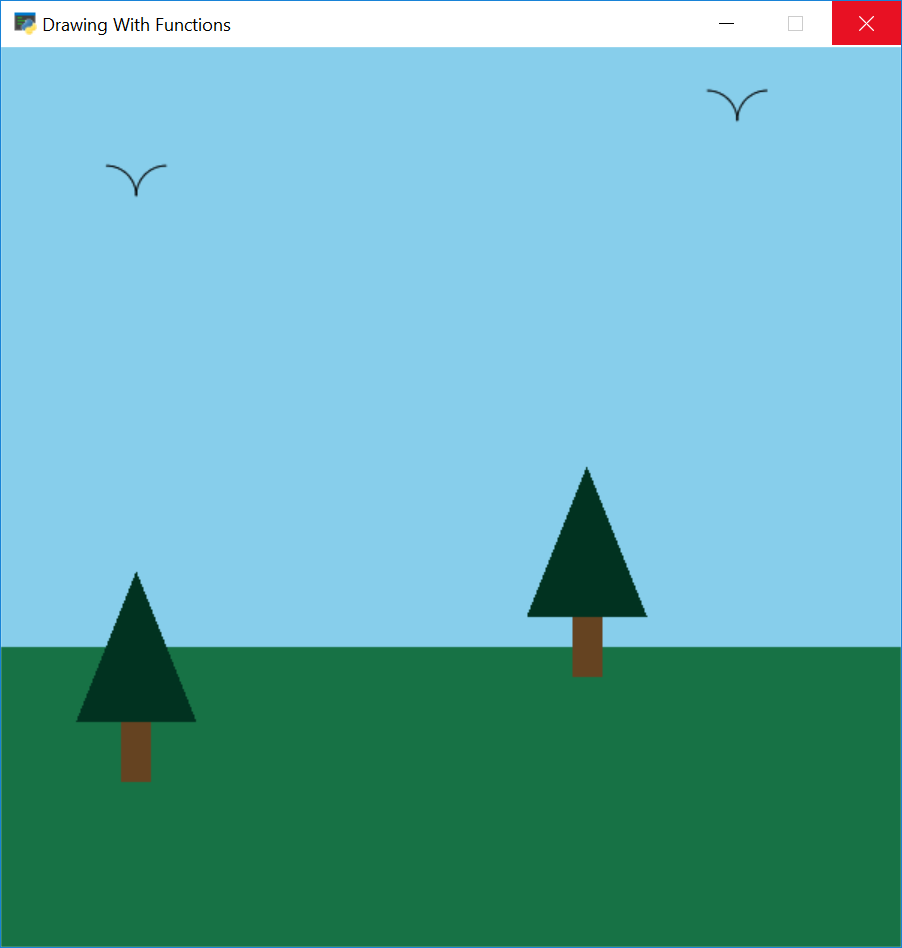
使用函数:
当然,使用全局变量在编程中不是个好习惯。幸运的是,通过使用函数来改善程序是很容易的。这里我们可以看到一个使用函数在特定(x,y)位置绘制松树的示例:
"""
Example "Arcade" library code.

This example shows how to use functions to draw a scene.
It does not assume that the programmer knows how to use classes yet.

A video walk-through of this code is available at:


If Python and Arcade are installed, this example can be run from the command line with:
python -m arcade.examples.drawing_with_functions
"""

# Library imports
import arcade

# Constants - variables that do not change
SCREEN_WIDTH = 600
SCREEN_HEIGHT = 600
SCREEN_TITLE = "Drawing With Functions Example"

def draw_background():
    """
    This function draws the background. Specifically, the sky and ground.
    """
    # Draw the sky in the top two-thirds
    arcade.draw_lrtb_rectangle_filled(0,
                                      SCREEN_WIDTH,
                                      SCREEN_HEIGHT,
                                      SCREEN_HEIGHT * (1 / 3),
                                      arcade.color.SKY_BLUE)

    # Draw the ground in the bottom third
    arcade.draw_lrtb_rectangle_filled(0,
                                      SCREEN_WIDTH,
                                      SCREEN_HEIGHT / 3,
                                      0,
                                      arcade.color.DARK_SPRING_GREEN)


def draw_bird(x, y):
    """
    Draw a bird using a couple arcs.
    """
    arcade.draw_arc_outline(x, y, 20, 20, arcade.color.BLACK, 0, 90)
    arcade.draw_arc_outline(x + 40, y, 20, 20, arcade.color.BLACK, 90, 180)


def draw_pine_tree(x, y):
    """
    This function draws a pine tree at the specified location.
    """
    # Draw the triangle on top of the trunk
    arcade.draw_triangle_filled(x + 40, y,
                                x, y - 100,
                                x + 80, y - 100,
                                arcade.color.DARK_GREEN)

    # Draw the trunk
    arcade.draw_lrtb_rectangle_filled(x + 30, x + 50, y - 100, y - 140,
                                      arcade.color.DARK_BROWN)


def main():
    """
    This is the main program.
    """

    # Open the window
    arcade.open_window(SCREEN_WIDTH, SCREEN_HEIGHT, SCREEN_TITLE)

    # Start the render process. This must be done before any drawing commands.
    arcade.start_render()

    # Call our drawing functions.
    draw_background()
    draw_pine_tree(50, 250)
    draw_pine_tree(350, 320)
    draw_bird(70, 500)
    draw_bird(470, 550)

    # Finish the render.
    # Nothing will be drawn without this.
    # Must happen after all draw commands
    arcade.finish_render()

    # Keep the window up until someone closes it.
    arcade.run()


if __name__ == "__main__":
    main()
更有经验的程序员会知道,现代的图形程序首先将绘图信息加载到图形卡上,然后要求图形卡稍后以批的形式绘制。Arcade街机模块也支持这一点。单独绘制10000个矩形大约需要0.800秒。将它们作为一批绘制不到0.001秒。
Window 类
较大的程序通常从arcade模块定义的window类派生,或者使用装饰器。这允许程序员编写代码来处理绘图、更新和处理来自用户的输入。下面是用于启动基于窗口的程序的模板。
import arcade

SCREEN_WIDTH = 800
SCREEN_HEIGHT = 600


class MyGame(arcade.Window):
    """ Main application class. """

    def __init__(self, width, height):
        super().__init__(width, height)

        arcade.set_background_color(arcade.color.AMAZON)

    def setup(self):
        # Set up your game here
        pass

    def on_draw(self):
        """ Render the screen. """
        arcade.start_render()
        # Your drawing code goes here

    def update(self, delta_time):
        """ All the logic to move, and the game logic goes here. """
        pass


def main():
    game = MyGame(SCREEN_WIDTH, SCREEN_HEIGHT)
    game.setup()
    arcade.run()


if __name__ == "__main__":
    main()
window类有几个方法,你的程序可以重写这些方法来为程序提供功能。以下是一些最常用的方法:
on_draw: 角色最终要重画,所有绘制角色的的代码都在这里写。update: 所有移动和执行游戏逻辑的代码都应该写在这里。这个方法每秒执行60次。on_key_press: 当按下一个键时会调用这个方法,例如这时可以给玩家设定速度或发射炮弹。on_key_release: 当松开一个键时会调用这个方法,或许让玩家停止移动。on_mouse_motion:鼠标移动时调用这个方法。on_mouse_press:鼠标键按下时调用这个方法。set_viewport: 这个功能用于滚动游戏,当你的世界比在一个屏幕上看到的要大得多的时候。调用set_viewport命令允许程序员设置当前可见的世界的那个部分。
角色(精灵):
角色是在Arcade模块中创建图形对象的简单方法。Arcade有一些方法,使绘制、移动和动画角色变得容易。您还可以轻松地使用角色来检测对象之间的碰撞。
创建角色:
从图形中创建Arcade 角色很容易。一个程序员只需要一个图像的文件名就可以实例化一个角色,也可以选择一个数字来放大或缩小图像。例如:
SPRITE_SCALING_COIN = 0.2

coin = arcade.Sprite("coin_01.png", SPRITE_SCALING_COIN)
以上代码将使用coin_01.png中存储的图像创建角色coin。图像将缩小到原始高度和宽度的20%。
![]()
角色列表:
角色通常被组织成列表。这些列表使管理角色更加容易。列表中的角色将使用OpenGL批量绘制作为一个组的角色。下面的代码展示了一个游戏。它运行后来一堆金币供玩家收集。我们使用两个列表,一个是玩家列表,一个是金币列表。
def setup(self):
    """ Set up the game and initialize the variables. """

    # Create the sprite lists
    self.player_list = arcade.SpriteList()
    self.coin_list = arcade.SpriteList()

    # Score
    self.score = 0

    # Set up the player
    # Character image from kenney.nl
    self.player_sprite = arcade.Sprite("images/character.png", SPRITE_SCALING_PLAYER)
    self.player_sprite.center_x = 50 # Starting position
    self.player_sprite.center_y = 50
    self.player_list.append(self.player_sprite)

    # Create the coins
    for i in range(COIN_COUNT):

        # Create the coin instance
        # Coin image from kenney.nl
        coin = arcade.Sprite("images/coin_01.png", SPRITE_SCALING_COIN)

        # Position the coin
        coin.center_x = random.randrange(SCREEN_WIDTH)
        coin.center_y = random.randrange(SCREEN_HEIGHT)

        # Add the coin to the lists
        self.coin_list.append(coin)
我们可以很容易地重画所有金币,以下是代码:
def on_draw(self):
    """ Draw everything """
    arcade.start_render()
    self.coin_list.draw()
    self.player_list.draw()
碰撞检测:
check_for_collision_with_list函数允许我们查看是否有一个角色是否和另一组中的角色发生碰撞。我们可以用这个看到玩家所操作的角色碰撞到的所有硬币。使用一个简单的for循环,我们可以删除游戏中的硬币,提高我们的分数。
def update(self, delta_time):
    # Generate a list of all coin sprites that collided with the player.
    coins_hit_list = arcade.check_for_collision_with_list(self.player_sprite, self.coin_list)

    # Loop through each colliding sprite, remove it, and add to the score.
    for coin in coins_hit_list:
        coin.kill()
        self.score += 1
完整例子请查看: collect_coins.py.
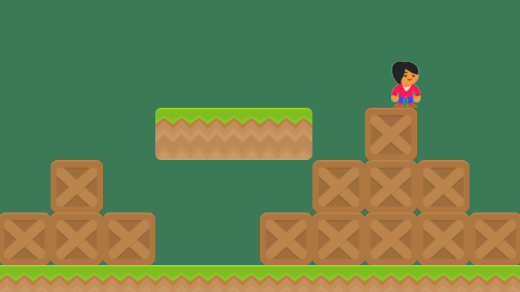
许多游戏都包含了某种物理学上的现象。最简单的是自顶向下的程序,防止玩家通过墙壁。平台游戏则增加了重力和移动平台的复杂性。有些游戏使用一个完整的二维物理引擎,包括质量、摩擦力、弹簧等等。
自顶向下游戏:
![]()
对于简单的自顶向下的游戏,一个Arcade程序需要一个玩家(或其他任何人)无法通过的墙列表。我通常称之为“墙列表”。然后在窗口类的设置代码中创建一个物理引擎:
self.physics_engine = arcade.PhysicsEngineSimple(self.player_sprite, self.wall_list)
玩家角色被赋予一个移动向量,它有两个属性:changex和changey。一个简单的例子就是让玩家用键盘移动。例如,这可能在window类的派生类中:
MOVEMENT_SPEED = 5

def on_key_press(self, key, modifiers):
    """Called whenever a key is pressed. """

    if key == arcade.key.UP:
        self.player_sprite.change_y = MOVEMENT_SPEED
    elif key == arcade.key.DOWN:
        self.player_sprite.change_y = -MOVEMENT_SPEED
    elif key == arcade.key.LEFT:
        self.player_sprite.change_x = -MOVEMENT_SPEED
    elif key == arcade.key.RIGHT:
        self.player_sprite.change_x = MOVEMENT_SPEED

def on_key_release(self, key, modifiers):
    """Called when the user releases a key. """

    if key == arcade.key.UP or key == arcade.key.DOWN:
        self.player_sprite.change_y = 0
    elif key == arcade.key.LEFT or key == arcade.key.RIGHT:
        self.player_sprite.change_x = 0
虽然以上代码设置了玩家的速度,但它不会移动玩家。在window类的update方法中,调用physical_engine.update()将移动玩家,但它不会穿过墙了。
def update(self, delta_time):
    """ Movement and game logic """

     self.physics_engine.update()
完整例子请单击:sprite_move_walls.py.
平台游戏:
![]()
平台游戏也是相当容易制作的。程序员只需要将物理引擎切换到 PhysicsEnginePlatformer,并添加重力常数。
self.physics_engine = arcade.PhysicsEnginePlatformer(self.player_sprite, self.wall_list, gravity_constant=GRAVITY)
您可以使用名为:tiled 的程序设置关卡。请参见sprite_tiled_map.py。对于完整的二维物理,您可以集成Pymunk库。
通过例子学习:
最好的学习方法之一就是看例子。arcade库有很多的示例程序,我们可以利用这些程序来创建游戏。这些例子中的每一个都显示了一个游戏概念,这些都是我这些年授课时学生提出来的。一旦安装了Arcade,运行这些示例就很容易了。每个示例在程序开头都有一个注释,其中包含一个命令,您可以在命令行上键入命令来运行示例,例如:
python -m arcade.examples.sprite_moving_platforms
Arcade这个街机游戏模块能让您可以用易于理解的代码开始编程图形和游戏。许多新的程序员在开始后不久就创造了伟大的游戏。试试看!
